
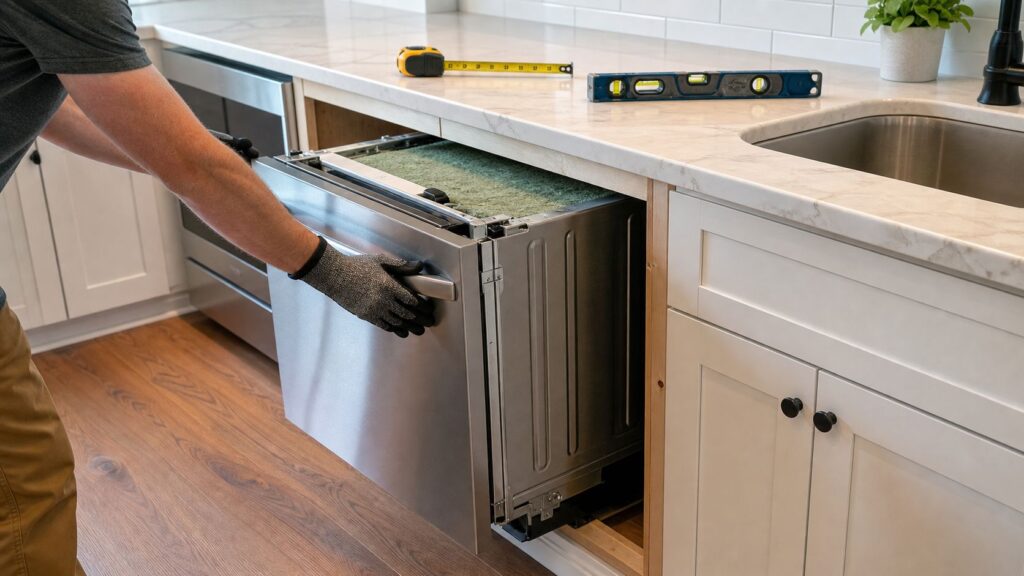
Most bad advice on this topic starts with the wrong picture. It tells homeowners to find a “dishwasher cabinet,” slide the machine into it, and hook it up. That's not how a standard install works in practice. If you start with that assumption, you can waste time, order the wrong materials, and cut apart perfectly good cabinetry for no reason.
In a retrofit kitchen, installing a dishwasher in a cabinet usually means creating a proper opening in a base cabinet run, then making sure the surrounding cabinets, countertop, plumbing, and electrical all support that opening. That's the work. The dishwasher sits on the floor in that space. The cabinet modifications and support details are what make the job either clean and professional or a headache that drags on.
Table of Contents
- Planning Your Install Debunking the Dishwasher Cabinet Myth
- Gathering Your Tools and Prepping the Space
- Cutting and Modifying Cabinets for a Perfect Fit
- Navigating Plumbing and Electrical Connections Safely
- Securing the Dishwasher and Adding Finishing Touches
- Knowing When to Call a Pro A South Jersey Homeowners Guide
Planning Your Install Debunking the Dishwasher Cabinet Myth
Stop looking for a dishwasher cabinet
The first correction matters most. There is no such thing as a dishwasher cabinet in the way most homeowners imagine it. Experienced installers point out that the appliance sits on the floor in the void between base cabinets, not on top of a cabinet base, with the countertop supported by surrounding cabinets or ledger boards, as discussed in this installer discussion about the dishwasher cabinet misconception.
That misunderstanding causes expensive planning mistakes. People shop for a special box to hold the dishwasher, when what they need is a properly sized opening, access to water and drain lines, and a sound way to support the countertop if cabinet structure changes.
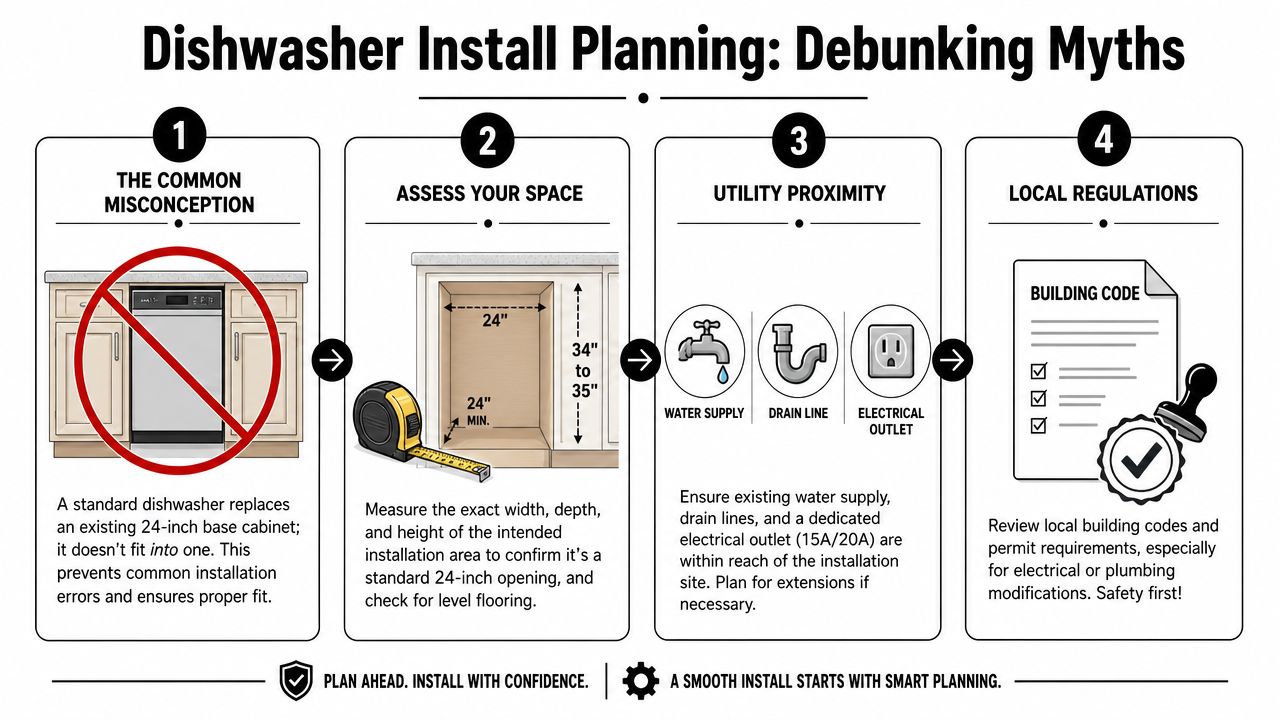
Practical rule: If you're shopping for a box to put the dishwasher inside, you're already planning the job the wrong way.
This same planning mindset helps with other built-in appliances too. If you're balancing multiple appliance changes in one remodel, this drawer microwave installation guide is useful because it shows how appliance openings, support, and clearance have to be planned around cabinetry, not forced into it after the fact.
What to check before you cut anything
Start with layout, not tools. Look at the sink base first because that's where the easiest plumbing and drain access usually lives. In most kitchens, the cleanest retrofit puts the dishwasher right next to the sink cabinet so the water line, drain hose, and electrical route stay short and serviceable.
Then verify whether the cabinet run can spare the width. If you're replacing an existing base cabinet, inspect how it's tied into the neighboring cabinets, the countertop, and the wall. Face-frame kitchens, frameless boxes, laminate tops, and stone tops all come apart differently.
Use this short planning checklist before any demolition:
- Confirm appliance location: Place the dishwasher beside the sink cabinet whenever possible for simpler routing and fewer hidden surprises.
- Inspect countertop support: Check whether the removed cabinet is carrying any weight at the front rail or end of the run.
- Look below the sink: Find where the shutoff, disposal, trap, and receptacle sit so you know where holes can be drilled cleanly.
- Check floor condition: Old South Jersey kitchens often have patched flooring, layered vinyl, or a height change under older cabinets.
- Review the whole remodel: If the kitchen may later get new cabinets, counters, or flooring, plan those moves together. This kitchen remodel planning resource helps map the sequence so you don't create rework for yourself.
A retrofit goes smoothly when the opening, support, and utilities are thought through as one system. It goes sideways when somebody treats the dishwasher like a freestanding appliance and the cabinetry like an afterthought.
Gathering Your Tools and Prepping the Space
Use tools that protect finished cabinets
This job rewards control, not brute force. In a finished kitchen, the best tool is often the one that removes the least material and leaves the cleanest edge.
An oscillating multi-tool earns its keep here. It's ideal for toe-kick cuts, face-frame cuts, and trimming nails or screws without wrecking the neighboring cabinet finish. A circular saw can be useful on loose parts at a bench, but inside a kitchen it's easy to overcut and scar visible surfaces.
A few other tools matter for the same reason:
- Cabinet clamps: They hold adjacent face frames flush while you remove fasteners or add blocking.
- Drill and driver set: One drill for pilot holes, one driver for screws, so you're not constantly swapping bits.
- Sharp pry bar and putty knife: The putty knife protects finished surfaces while the pry bar does the lifting.
- Level and straightedge: You're checking floor, rails, and face alignment, not just whether the dishwasher door “looks okay.”
- Shop vacuum: Sawdust under a dishwasher turns leveling into guesswork.
- Channel-lock pliers and adjustable wrench: Needed later for connections, but also handy for disassembly when old plumbing is in the way.
If you're not sure whether your existing run was built square to begin with, review this guide on how to measure kitchen cabinets accurately. A lot of retrofit frustration comes from trusting old cabinets that were never perfectly aligned in the first place.
Prep the opening like a cabinet installer
Take doors and drawers out first. Label hardware in a small box or zip bag. That sounds basic, but when you're working in a lived-in kitchen, losing one hinge screw can waste more time than the whole demolition step.
Then work in this order:
- Disconnect what's attached to the cabinet. That could be filler strips, countertop screws, clips, or fasteners through the neighboring face frame.
- Score paint or caulk lines. This prevents finish tear-out where cabinets meet walls or each other.
- Loosen the cabinet without twisting it. If you yank one side first, you can chip tile, crack a stile, or stress the counter above.
- Remove the box in pieces if needed. In tight kitchens, that's often cleaner than trying to wrestle out a full base cabinet shell.
A clean removal is half the finish work. When the neighboring cabinets stay straight and undamaged, the final install looks planned instead of patched.
What doesn't work is smashing out the cabinet and promising yourself you'll “trim it later.” That approach usually leaves ragged face-frame edges, chipped finished ends, and a wider repair scope than the dishwasher install ever needed.
Cutting and Modifying Cabinets for a Perfect Fit
Hit the opening size exactly
This is the part where precision matters more than confidence. The standard opening for a dishwasher retrofit is 24 inches wide by at least 34.25 inches high, and many pros aim for 34.5 inches high so the unit slides in without binding, because standard dishwashers are made to be 24 inches wide and 34 inches tall, as noted in this dishwasher opening reference from an installation pro.
That means close isn't good enough. If the opening is tight at the floor, pinched at the face frame, or low under the countertop, the dishwasher can jam during install or scrape its top edge going in.
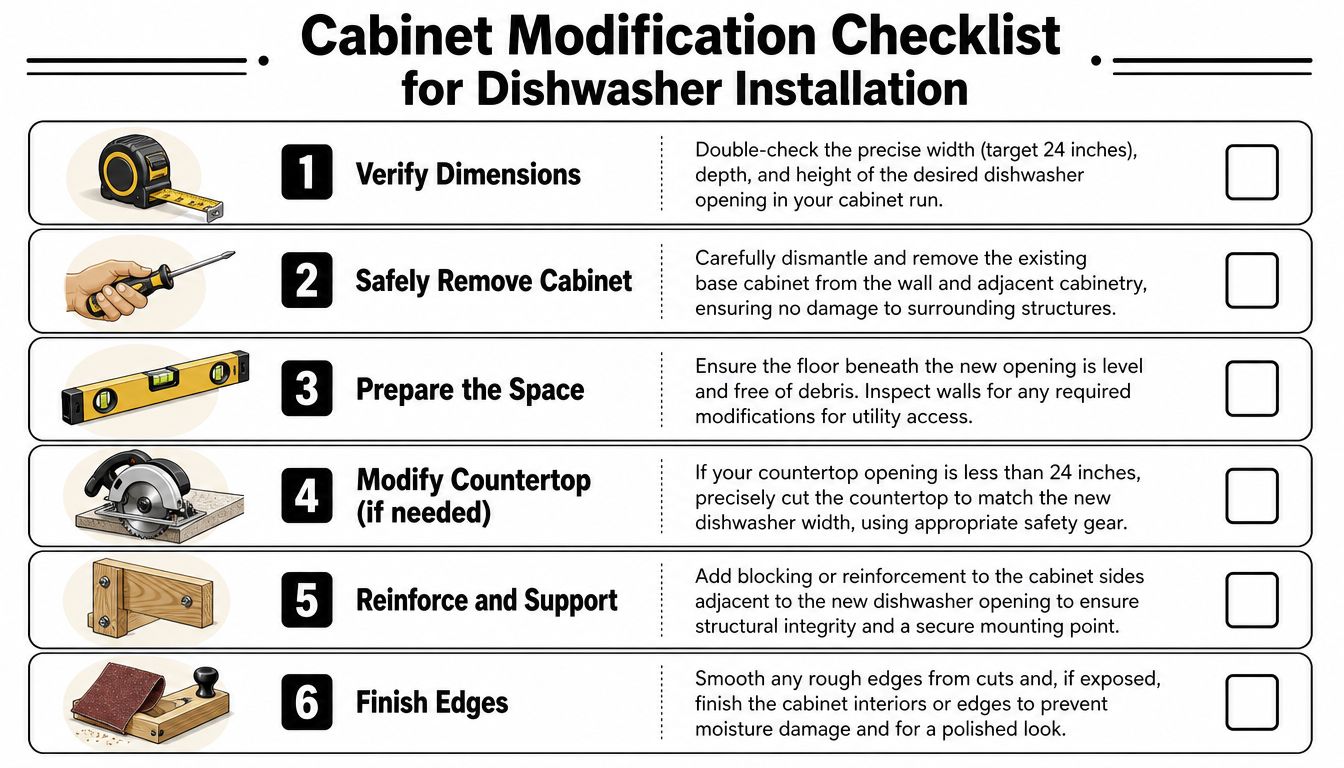
Use a tape measure in more than one place. Measure the width at the front and back. Measure the height on both sides. Check the floor-to-counter distance where the leveling legs will sit, not just out at the room side where the flooring may be different.
Make clean cuts and keep the structure sound
Most retrofits involve removing a standard base cabinet, then cleaning up what remains so the dishwasher can occupy that bay. In a face-frame kitchen, that usually means cutting out rails, cabinet bottoms, and toe-kick portions without damaging the neighboring cabinet frames.
Here's the sequence that works best in the field:
- Mark visible cuts with a knife first: A scored finish line gives you a cleaner edge than forcing a blade through paint or veneer.
- Cut the face frame carefully: The oscillating tool gives you a square, controlled cut where a recip saw tends to wander.
- Remove the cabinet floor completely: A dishwasher sits on the kitchen floor, not on a cabinet platform.
- Preserve adjacent structure: Don't weaken the neighboring sink base just because it's easier to cut through one more rail.
- Add support where you remove support: If a stile, rail, or side panel carried load for the counter, replace that support with blocking or a cleat.
A lot of homeowners forget the toe-kick area matters too. Once the cabinet box is out, the toe space often needs cleanup, trimming, or rebuilding so the dishwasher recess and surrounding cabinet line still make sense visually. This guide to cabinet toe-kick height and layout is worth reviewing before you start cutting that lower front area apart.
The best retrofit cuts don't draw attention to themselves. If you can spot every modification from across the room, the prep work wasn't clean enough.
Handle uneven floors and tight counters early
Older kitchens around South Jersey rarely give you perfect conditions. You may find patch flooring where an old cabinet sat, a dip near the sink wall, or a countertop edge that hangs lower than expected.
When that happens, don't force the dishwasher into the opening and hope the leveling legs solve everything. They won't fix a countertop that's too low or a floor hump that twists the frame.
Use this quick comparison:
| Condition | What works | What doesn't |
|---|---|---|
| Tight height under counter | Trim obstruction or adjust support before install | Forcing the unit in and scraping the top |
| Slight floor dip | Level with the dishwasher feet after the bay is cleared | Ignoring it and letting the door reveal the problem |
| Floor debris or old fasteners | Scrape and vacuum to bare, solid contact points | Setting the machine on scraps and sawdust |
| Exposed cut edges | Sand and protect them | Leaving raw particleboard where moisture can reach it |
If the opening is wrong, the rest of the job gets harder. If the opening is right, the dishwasher install starts to feel straightforward.
Navigating Plumbing and Electrical Connections Safely
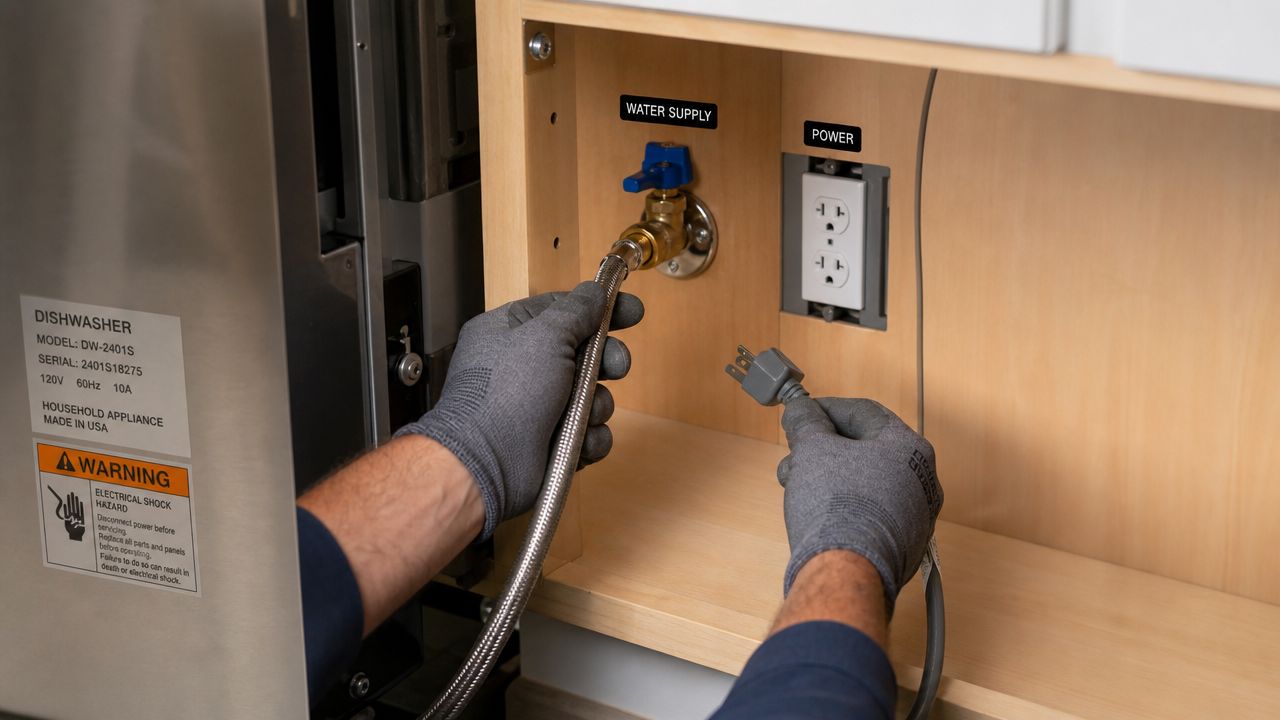
Cabinet work gets the opening ready. Utility work determines whether the machine runs reliably or turns into a callback.
In most retrofits, the supply line, drain hose, and power route through the side of the sink base. Keep those paths neat and deliberate. A sloppy hole location can kink a hose, crowd the trap area, or make future service harder than it needs to be.
Run the plumbing with service in mind
Drill clean holes through the sink base side where the lines can pass without rubbing on sharp edges or interfering with drawer hardware. Keep the water line low and the drain hose routed high inside the sink cabinet before it drops to the disposal or drain connection.
One common failure deserves real attention. If you connect a dishwasher drain hose to a new garbage disposal and forget to remove the plastic drain plug, you'll get an immediate drainage problem on first use. Maytag specifically warns that this missed step causes 100% backup failure in the first cycle in that situation, as described in its dishwasher installation guidance.
Use this field checklist under the sink:
- Water line path: Keep it free of twists and away from sharp screw points or cutouts.
- Drain hose route: Lift it high inside the sink base so dirty water is less likely to flow backward.
- Disposal connection: Verify the knockout plug is removed before you clamp the hose on.
- Leak check: Wipe every fitting dry first. It's easier to spot a fresh drip on a dry connection.
Small plumbing mistakes don't stay small in a cabinet. They swell particleboard, stain finished ends, and show up after the installer has already packed up.
Here's a helpful visual reference before you tie everything in:
Keep the electrical side code conscious
Electrical work is where a lot of confident DIYers should slow down. The practical issue isn't just making the dishwasher turn on. It's making sure the circuit, protection, and connection method fit local code and the appliance requirements.
The verified installation cost data for professional installs specifically notes that GFCI outlet installation is commonly part of the job, along with labor, plumbing upgrades, and permits, according to HomeAdvisor's dishwasher installation cost guide. That tells you something important. Electrical compliance is not an afterthought.
A few grounded rules help:
- Shut off the breaker and verify power is off before touching any wiring.
- Follow the dishwasher manual for plug-in versus hardwired connection.
- Use proper strain relief where cable enters a junction box.
- Respect local code on receptacle type, protection, and location.
If you want a plain-English example of how appliance circuit work needs to be approached carefully, this 240-volt wiring guide from Bulls Eye Repair is a good reminder that electrical details matter even when the appliance hookup itself seems simple. And if your dishwasher install is happening alongside other kitchen electrical changes, this overview of under-cabinet lighting installation basics helps you think about outlet placement and circuit planning together instead of one trade at a time.
What doesn't work is burying questionable wiring behind a new appliance because “it was already there.” If the cable looks wrong, the box is loose, or the receptacle location makes no sense, stop and correct it.
Securing the Dishwasher and Adding Finishing Touches
Level first then fasten
A dishwasher should slide in, sit square, and show even reveals against the adjacent cabinet faces. Don't rush to screw it down the second it clears the opening. Set it, adjust the feet, and check the door action first.
Look at three things before fastening:
- Door swing: It should open cleanly without rubbing the surrounding cabinetry.
- Front alignment: The face of the dishwasher should sit where it belongs relative to adjacent doors and drawer fronts.
- Top contact: The unit shouldn't be jammed hard into the counter underside.
Once it's level and sitting correctly, attach it using the mounting method allowed for your countertop and appliance. Some installs fasten at the top. Others use side mounts. What matters is secure anchoring without distorting the machine body.
End-of-run installs need structure not guesswork
This is the part most generic guides skip. A standard opening between two base cabinets is one thing. An end-of-run dishwasher install is different because one side may have no cabinet beside it to help support the counter.
That setup needs structural planning, not just a bigger saw. Guidance on this kind of retrofit shows that when a dishwasher sits at the end of a cabinet run, proper support requires anchoring a ledger board, or cleat, to the back wall and the adjacent sink cabinet, not just cutting out the cabinet and hoping the countertop carries across on its own, as shown in this end-of-run dishwasher support video.
That detail changes the whole job. The ledger handles support. The adjacent cabinet becomes part of the anchoring strategy. The dishwasher still occupies an appliance bay, but the surrounding structure now has to be built intentionally.
A practical comparison helps here:
| Install type | Main concern | Best fix |
|---|---|---|
| Between two cabinets | Fit and utility routing | Clean opening and proper leveling |
| End of run against wall | Countertop support on open side | Ledger board and secure anchoring |
| End of run with exposed side | Support plus finished appearance | Structural cleat plus finished panel approach |
If the countertop loses support when you remove the cabinet, the dishwasher opening isn't ready yet.
Finish it so it looks intentional
Final details make the retrofit disappear into the kitchen. Reinstall or rebuild the toe-kick area so it aligns with the rest of the run. Add trim only where needed, not to hide bad cuts. If the model accepts a decorative panel, follow that manufacturer's instructions exactly. Don't improvise a panel on a unit that wasn't meant for it.
Look closely at the neighboring hardware and reveals too. The dishwasher may be installed, but if the adjacent door pull sits crooked or the face alignment got bumped during the work, the whole run looks off. That's why even a small finishing detail like cabinet hardware alignment still matters in the last hour of this project.
Good finishing work does two things at once. It protects the cabinet materials from moisture and makes the appliance look like it belonged there from day one.
Knowing When to Call a Pro A South Jersey Homeowners Guide
The DIY line is different for every kitchen
Some homeowners can handle this job cleanly. Others hit one hidden problem and the project stops being a dishwasher install and starts becoming a cabinet, plumbing, and electrical remodel.
That line usually shows up fast. You open the base cabinet and find damaged flooring, unsupported stone, outdated wiring, or plumbing that needs to be moved instead of connected. In older kitchens around Cherry Hill, Voorhees, Medford, and Moorestown, that's not unusual.
A good rule is simple. If you're still doing finish-grade cabinet work and straightforward hook-ups, you may be in DIY territory. If you're changing structure, correcting code issues, or rebuilding support around a countertop, it's time to bring in help.
What professional help is really paying for
Professional installation isn't just about speed. It's about avoiding the expensive mistakes that happen when a retrofit opening is slightly wrong, a drain setup leaks inside a cabinet, or a countertop loses support after a cabinet comes out.
Typical professional dishwasher installation costs between $1,000 and $1,500, with an average of $1,200, and that can include labor of $150 to $300, plumbing upgrades, GFCI outlet installation, and permits, according to HomeAdvisor's breakdown of dishwasher installation costs.

If you're deciding whether to hire someone local, this roundup of HomeProBadge insights for homeowners is a helpful way to think through contractor vetting, scope clarity, and who should handle mixed-trade work.
Call a pro if any of these show up:
- Countertop support questions: Especially with stone or end-of-run layouts.
- Electrical uncertainty: Old receptacles, unclear circuit routing, or code concerns.
- Water damage or rot: Soft cabinet bottoms, swollen end panels, or dark staining.
- Layout changes: Moving the dishwasher away from the sink area or rebuilding surrounding cabinetry.
A clean retrofit looks simple when it's done. Getting there isn't always simple.
If your kitchen project has turned from a basic appliance swap into cabinet modifications, structural support work, or a broader remodel, The Cabinet Coach can help South Jersey homeowners make the right next move. Their mobile showroom and guided remodeling process make it easier to sort out cabinetry, countertop support, layout decisions, and finish selections before small installation issues become bigger renovation problems.