
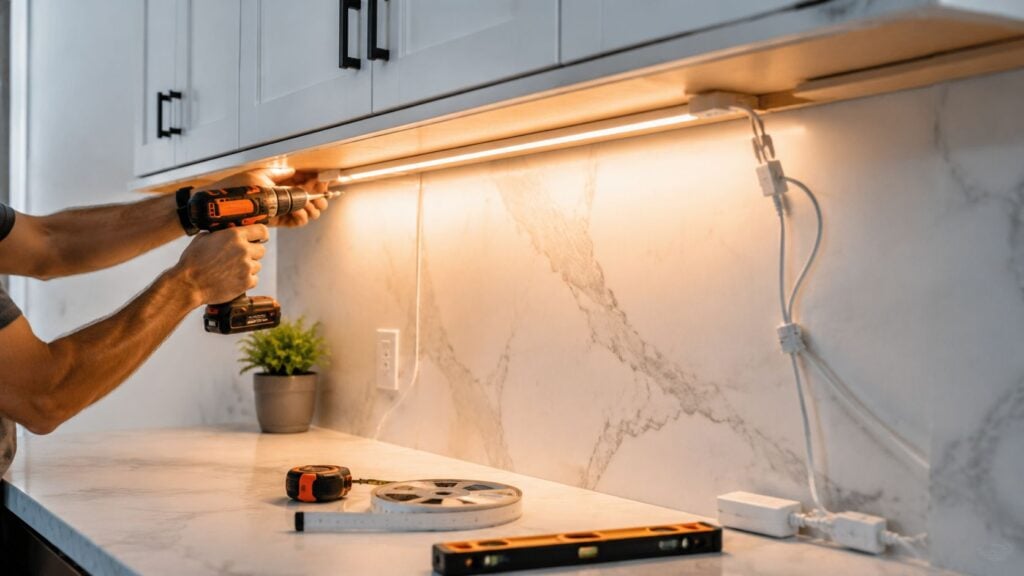
Dinner prep usually starts the same way. You pull vegetables onto the counter, step in front of the sink or stove, and your own body throws a shadow right across the work surface. The ceiling lights are on, the kitchen looks bright from across the room, and yet the exact spot where you need to slice, read labels, or wipe crumbs is dim.
That gap between “the room is lit” and “the counter is usable” is why under cabinet lighting installation has become such a popular kitchen upgrade. It fixes a practical problem first. Then it improves the way the whole kitchen feels at night, especially when you want softer light than the overhead cans.
In South Jersey homes, I see this come up a lot during updates in places like Cherry Hill, Moorestown, and Haddonfield. Some kitchens only need a clean retrofit. Others are already at the point where lighting, cabinetry, backsplash, outlets, and trim all need to work together. If you're still deciding how far to take the project, it helps to look at budget-friendly kitchen upgrade options before you buy fixtures that may not fit the bigger plan.
Table of Contents
- Illuminate Your Kitchen with Confidence
- Planning Your Layout and Lighting Type
- Your Essential Toolkit and Shopping List
- A Guide to Wiring and Mounting Your Lights
- Estimating Costs Dimmers and Smart Controls
- Troubleshooting and When to Call The Cabinet Coach
Illuminate Your Kitchen with Confidence
You flip on the ceiling light, step up to the counter, and your own shadow falls across the cutting board. That is the moment most homeowners realize the kitchen does not need more light in the room. It needs light on the work surface.
Under cabinet lighting fixes a real problem. It brightens prep areas, makes backsplash materials read more accurately, and helps the kitchen feel finished after dark. Good results come from treating it as part task lighting and part cabinet detail. The fixture should disappear. The light should do the work.
I see the same mistake in South Jersey homes again and again. Homeowners buy a lighting kit first, then try to figure out where the driver goes, how to hide wire runs, or why the light reflects hard off a glossy tile backsplash. Those are planning problems, not product problems. In an older kitchen in Cherry Hill, Haddonfield, or Washington Township, cabinet construction and existing wall conditions often decide what is practical before the fixture style does.
That is why a simple install and a clean install are not always the same job.
If you are updating a lived-in kitchen and want a focused project, under cabinet lighting can be a smart standalone upgrade. If you are already changing doors, hardware, counters, or backsplash, the cleaner route is often to plan the lighting with the rest of the work so channels, trim details, and wire paths are handled once. Homeowners comparing lighting with other budget kitchen upgrades that make a visible difference usually get a better result when they look at the full cabinet line instead of one add-on at a time.
For homeowners still comparing fixture categories before they commit, Products for Automation on LED fixtures is a useful product reference. The right choice still depends on your cabinet depth, how much glare your counters throw back, and whether you want the light hidden completely from standing height.
Safety matters here too. Any project that involves tying into house power, adding a wall switch, or drilling through finished cabinets needs to be done carefully. A bad wire path is ugly. A bad electrical connection is a hazard. If the kitchen is already heading toward a remodel-level update, lighting usually fits better as part of that larger cabinet plan, and that is often where a local shop like The Cabinet Coach can save you from rework.
Planning Your Layout and Lighting Type
A lot of first-time installs go wrong before a single hole gets drilled. The homeowner buys a lighting kit that looked good online, mounts it under the cabinets, then notices glare on the quartz, bright circles near the sink, and a driver with nowhere clean to hide. Good planning prevents that.
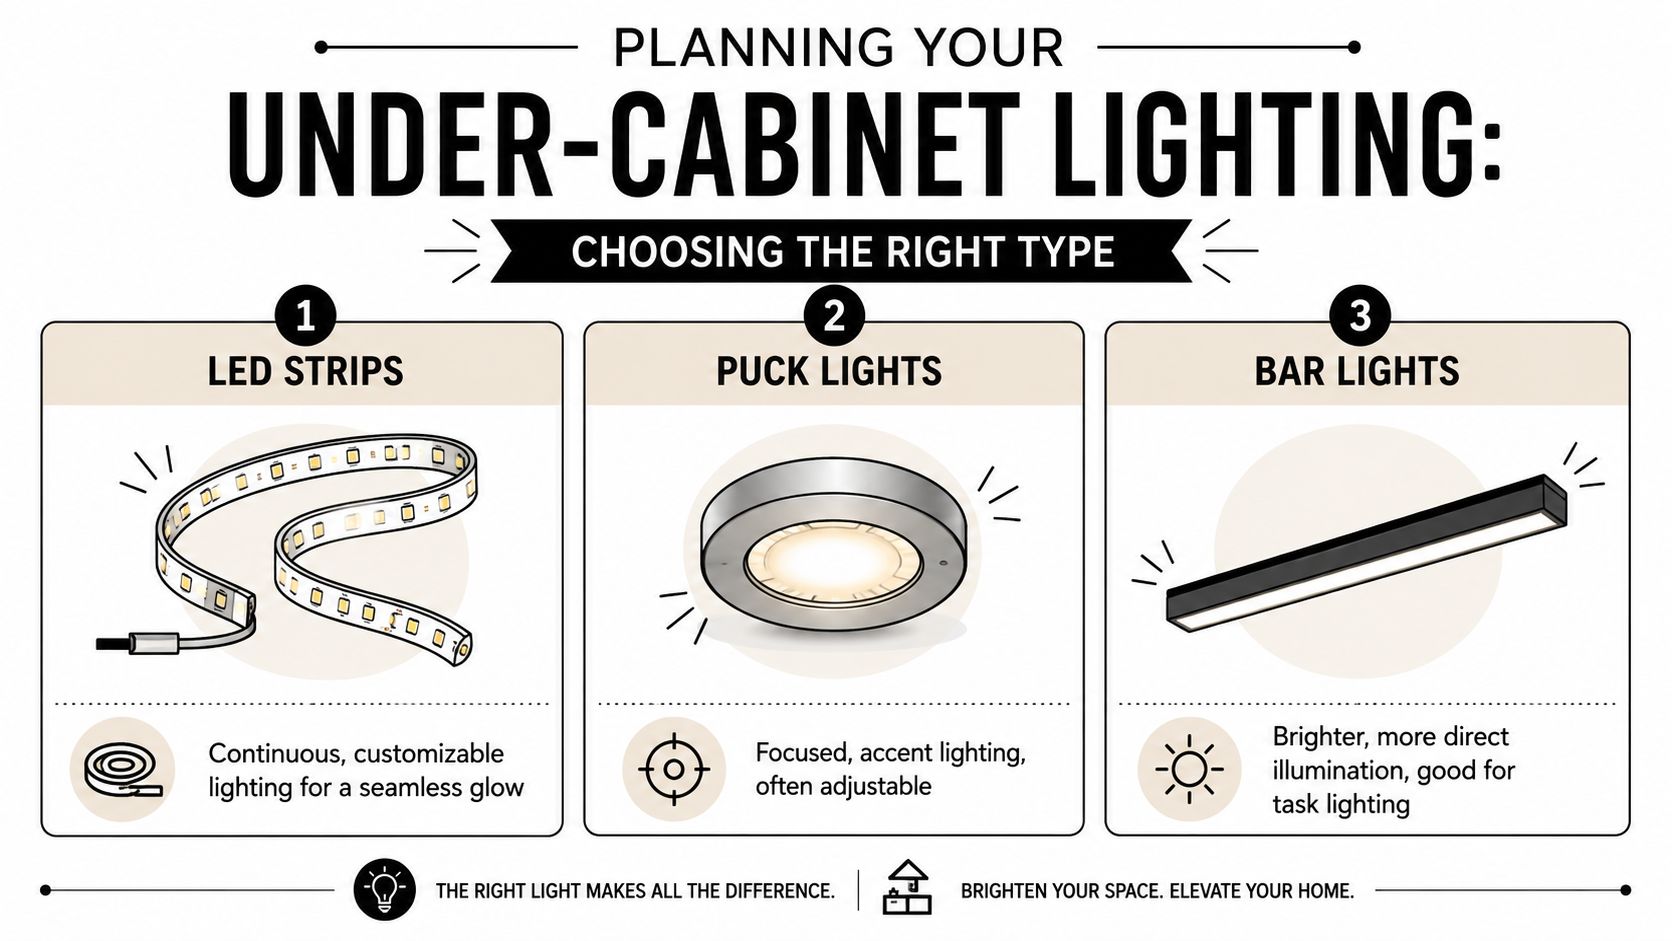
Choose the fixture for the job
Start with how you use the counter.
LED strips give the most even spread. They are usually the best fit for food prep zones, long cabinet runs, and kitchens where you want the fixture hidden from normal standing height. In many South Jersey homes with older cabinet lines, strips also make it easier to work around slight inconsistencies in cabinet bottoms because the light reads as one continuous run.
Puck lights create distinct pools of light. That can work in a display area or a short accent section, but it often leaves shadows between fixtures. Homeowners who want under cabinet lighting for chopping, recipes, and cleanup are often disappointed by pucks once they see the counter at night.
Bar lights are the practical middle ground. They are rigid, simple to mount, and a solid choice when you want better task lighting without building a full tape-light-and-channel system.
If you want a broader visual comparison before choosing a format, this roundup of Products for Automation on LED fixtures is a useful reference.
Match light output to the room, not the box copy
Package labels can make different products sound interchangeable. They are not.
A small galley kitchen with dark counters needs a different approach than a wide Medford or Cherry Hill kitchen with glossy white surfaces that bounce light back into your eyes. Brightness that feels clean in one room can feel harsh in another. Color temperature has the same problem. Warm light softens the room. Cooler light sharpens work surfaces but can make painted cabinets or cream backsplash tile look flat if you overdo it.
Consistency matters more than chasing the brightest option. Keep the color tone the same across the main cabinet run unless you have a very specific design reason to change it. Mixed light color is one of the fastest ways to make a new install look pieced together.
Lay out the light before you buy the power parts
Fixture choice and layout go together. A strip that runs wall to wall sounds great until you realize the microwave cabinet breaks the line, or the sink window leaves you with two short sections that need separate feeds. I usually tell homeowners to mark each cabinet section with painter's tape first. Stand where you normally work. Then check where the light will hit the front edge of the counter, not just the backsplash.
Placement should solve three problems at once:
- Light the work surface evenly
- Hide the fixture from normal view
- Leave a realistic path for wiring and connections
Mounting too far forward often creates glare. Mounting too far back throws more light on the wall than the counter. The sweet spot depends on cabinet depth, face frame profile, and whether there is a light rail already in place.
Plan around the kitchen you have, and the one you may build next
This matters even more in South Jersey homes where kitchens are often updated in stages. If the cabinets are staying and you want a focused upgrade, a retrofit layout makes sense. If backsplash, outlets, trim details, or cabinet modifications are already on the table, lighting should be planned with the rest of the work. That usually gives you cleaner wire paths, better driver placement, and fewer visible compromises later.
If a larger update may be coming soon, planning the kitchen remodel first usually avoids doing finish work twice.
Decide early where the power equipment will live
The neatest fixture in the world still looks sloppy if the driver is stuffed into a crowded cabinet corner with extra wire coiled beside the plates. Plug-in systems can work well for simple retrofits, but only if the cord route is believable and hidden. Hardwired systems look cleaner, though they require more discipline in routing, switching, and access for future service.
Before you order anything, answer these questions:
- Where will the driver or power supply go? Inside a cabinet, above the wall cabinets, or in another concealed location
- Can you reach it later? Service access matters
- Does the spot stay reasonably open? Crowded equipment runs hotter and is harder to replace
- What controls the lights? Existing switch, dimmer, inline control, or smart system
A clean under cabinet lighting job starts with layout, visibility, and power access. Get those three right first. The install goes much more smoothly after that.
Your Essential Toolkit and Shopping List
A rushed store run is how under cabinet lighting jobs go sideways in South Jersey kitchens. Homeowners buy the light kit, skip the small parts, then stop midway because the driver has nowhere clean to live or the wire path shows from across the room. Set everything on the counter first and confirm that each piece has a purpose.
Good prep also tells you whether this is still a simple retrofit. If you find yourself planning cabinet drilling in visible areas, cutting access through finished panels, or trying to hide a bulky power supply in a tight run, the lighting may fit better into a larger cabinet update instead of a one-off project.
Tools that actually matter
Keep these on hand before the first hole is drilled:
- Drill and driver bits: For pilot holes, wire pass-throughs, and mounting screws without chewing up cabinet interiors.
- Voltage tester: Required if you are tying into an existing feed or opening any electrical box.
- Wire strippers and cutter: Clean, undamaged conductors make better connections and are easier to fit in compact housings.
- Tape measure and pencil: Small layout errors become obvious once the lights are on.
- Level: A crooked fixture line shows fast under finished wall cabinets.
- Right-angle attachment: Helpful in tight corners near walls, face frames, and fixed shelves.
- Screwdriver set: Terminal screws, trim pieces, and cover plates often need more control than a drill gives you.
One more tool belongs on the list if you are running low-voltage tape light or a remote driver setup. Read Home AV Pros' wiring guide before you start. It helps homeowners sort out wire runs, transformer placement, and connection basics before they box themselves into a bad layout.
Supplies homeowners forget
The fixture kit rarely includes every small part needed for a clean finish.
- Mounting hardware: Screws, clips, brackets, or channels approved for your fixture
- Wire management pieces: Cable clips, adhesive anchors, raceway covers, or retainers to keep the underside tidy
- Connectors and wire nuts: Match them to the fixture type and conductor size
- Diffuser channel or trim pieces: These soften the light and hide the diode strip
- Touch-up materials: Color-matched filler, caulk, or paint for small holes and minor finish scuffs
Check the manufacturer instructions for driver clearance and ventilation before you tuck a power supply into a cabinet corner. Heat shortens component life, and crowded installations are harder to service later. I also tell homeowners to treat visible fastener placement with the same care they would use for installing cabinet hardware neatly and consistently. Small alignment mistakes read as sloppy once the lights are on.
Buy the concealment parts with the lights, not after. South Jersey supply houses and big box stores do not always have matching channels, trim, and covers in stock once you are deep into the job.
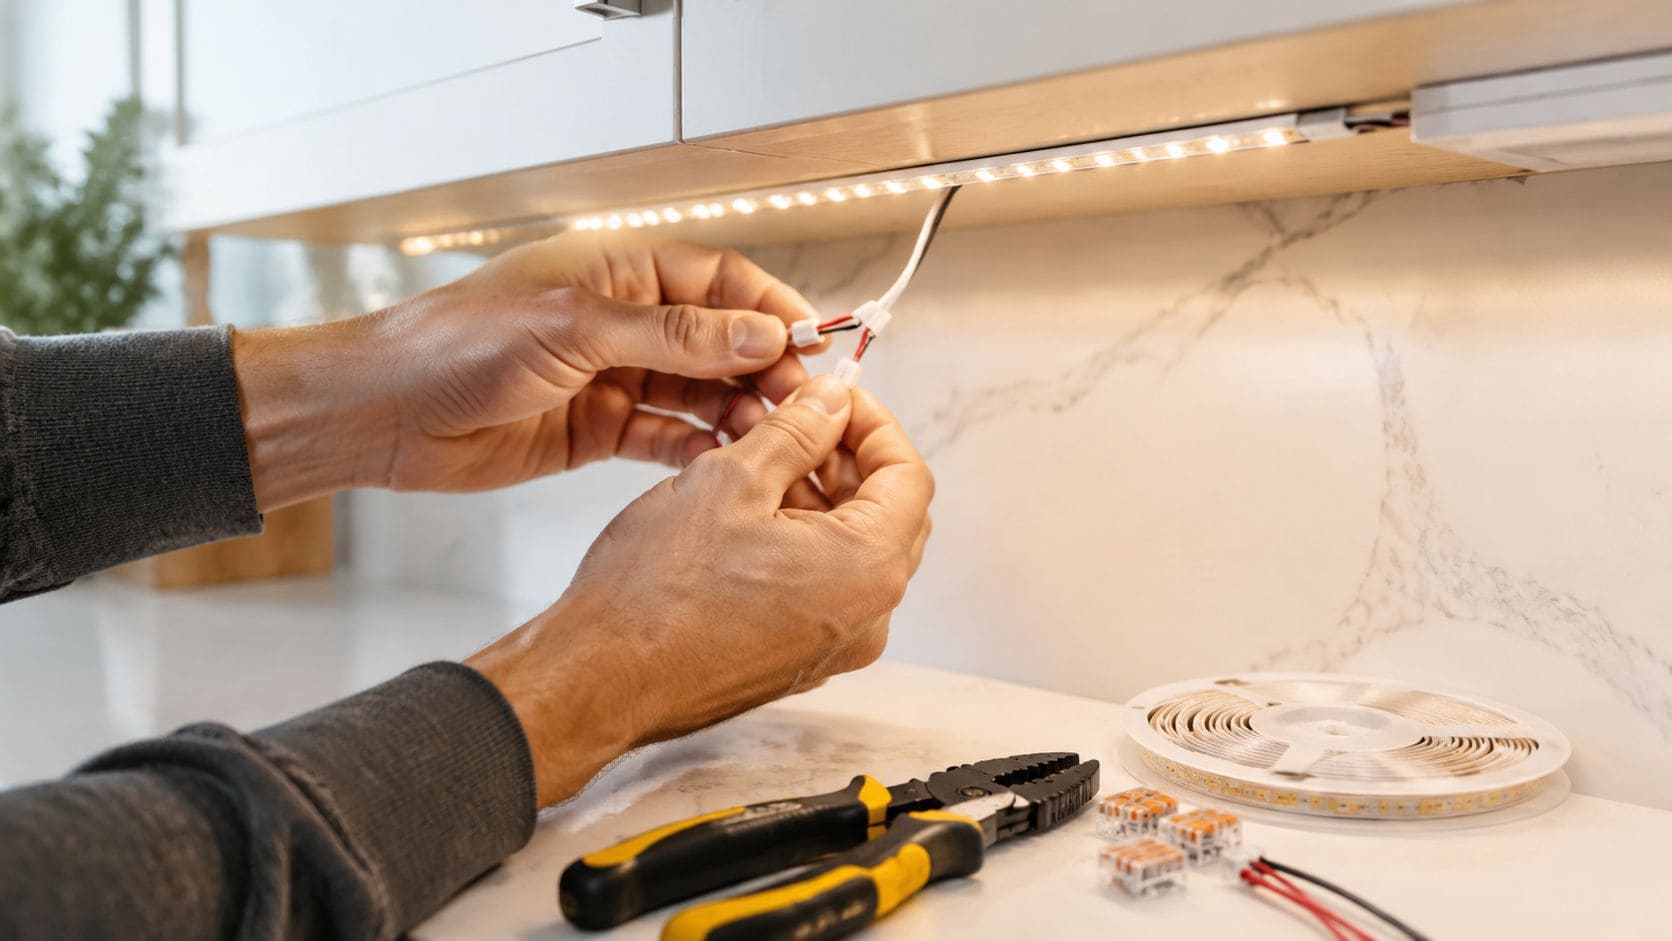
A Guide to Wiring and Mounting Your Lights
It usually starts the same way. A homeowner wants better task lighting, buys a fixture kit, and realizes the hard part is not sticking a light under a cabinet. The hard part is hiding the wiring, protecting the cabinet finish, and ending up with a result that still looks intentional when the kitchen lights are off.
Start with layout marks and surface prep
Set the installation order before you pick up a drill. Mark the layout first. Dry-fit each light. Then mount, route, connect, and test. Changing that order usually leads to extra holes, crooked runs, or exposed wire that has no good place to go.
Clear the counters and empty any cabinet you need to drill through. Wipe the underside of each cabinet so clips, channels, or fixture backs can bond and sit flat. Then mark the front-to-back position of every fixture with a pencil, not a marker.
Placement is a trade-off. Set the light too far back and you lose counter coverage. Set it too close to the face frame and the fixture becomes visible from across the room. Face frames, cabinet depth, and light rail details all affect that sweet spot, so check every cabinet rather than assuming one measurement fits the whole run.
Turn off the power and verify it is off with a tester before touching any existing wiring. That check is required.
In older South Jersey homes, cabinet runs are not always perfectly straight and wall surfaces are often less forgiving than they look. Dry-fitting matters more in those kitchens because a small alignment error shows up fast once the lights are on. If you are already changing trim, adding a light rail, or reworking cabinet bottoms, it often makes sense to coordinate the lighting with cabinet remodeling work that cleans up those details.
Mount first, then build clean wire paths
Get the fixture body where it belongs before making final electrical connections. That gives you real reference points for wire entry, clip spacing, and where a connector or driver can hide without creating a bulge or shadow line.
Plug-in systems are usually simple electrically and harder visually. The fixture may go up in minutes, but the cord path is what homeowners notice later. Drill the smallest pass-through hole that safely fits the cord or connector, keep it high and hidden in the cabinet corner, and avoid a route that drops into view near tile or finished end panels.
Hardwired systems take more planning, especially if you want a clean result without surface raceway. According to Lightup.com's hardwired LED under-cabinet installation guide, installers often leave extra slack at fixture openings for final splices and fixture-to-fixture chaining, and they stress matching the dimmer to the lamp technology and load. Both points matter. Slack gives you room to make a clean connection without pulling conductors tight, and a mismatched dimmer is one of the fastest ways to end up with flicker, buzzing, or dimming that feels jumpy instead of smooth.
For homeowners who want a grounding in low-voltage routing before opening up cabinet interiors, Home AV Pros' wiring guide is a helpful companion.
A quick caution from the field. If the route requires cutting into finished backsplash areas, fishing cable through packed wall bays, or hiding drivers where service access will be poor, the job may fit better into a larger remodel instead of a weekend retrofit. That is especially true in South Jersey kitchens with older plaster, tight soffits, or custom trim that needs to look untouched when the work is done.
Make connections carefully and test in order
Once the lights are mounted and the wire paths make sense, make up the electrical connections one complete stage at a time. Do not power up loose sections with open splices hanging out just to see if they glow.
Use a steady sequence:
- Confirm fixture locations before committing to final splices.
- Pull and label each wire run if the installation crosses multiple cabinet sections.
- Make splices in accessible locations and keep them neat enough to service later.
- Mount drivers, transformers, or hubs securely where heat can dissipate and vibration will not loosen anything.
- Test the full run before installing covers, trim pieces, or diffuser lenses.
This visual walkthrough can help if you want to compare your approach to a standard installation sequence:
A rushed connection often works just long enough to make you trust it.
Finish details matter too. If the fixture body is visible from normal standing height, the installation will always read as added-on. A light rail, small valance, or frosted channel cover can hide the source and soften glare, but each option changes the look. More concealment gives a cleaner line. Too much trim can feel heavy under a shallow cabinet.
The best under cabinet lighting jobs are disciplined all the way through. Straight layout lines, hidden wire paths, accessible connections, and trim that suits the cabinet style are what separate a clean installation from one that looks improvised.
Estimating Costs Dimmers and Smart Controls
Budget questions usually come up after homeowners choose a fixture, but they should come earlier. The install method changes the budget as much as the fixture itself. A simple retrofit with accessible power is a different animal from a kitchen where wires need to be hidden cleanly and controls upgraded.
What the budget usually looks like
HomeAdvisor's 2025 guide estimates professional installation at $230 to $300 per light, with an average of $265, and materials averaging $20 to $25 per light for connectors, fittings, fasteners, and mounting hardware, according to HomeAdvisor's under-cabinet lighting cost guide.
Here's a practical way to view that baseline:
| Expense Item | Estimated DIY Cost | Estimated Professional Cost |
|---|---|---|
| Connectors, fittings, fasteners, mounting hardware | $20 to $25 per light | Typically included within project pricing, though the same category of materials still applies |
| Installation labor per light | Your time and tool cost vary by project | $230 to $300 per light, average $265 |
That table doesn't capture every real-world variable. Access, wall conditions, cabinet interior routing, and whether the install is plug-in or hardwired all affect the total effort. In South Jersey remodels, the hidden labor often comes from finish coordination. Nobody minds paying for a cleaner result when the wiring disappears and the cabinet line still looks intentional.
If you're comparing bids or trying to understand how contractors build electrical scope, tools like Exayard electrical estimating software can give useful context on how estimating is structured, even if you're not the one writing the estimate.
Why dimmer compatibility matters
A basic on-off switch works, but it leaves a lot of value on the table. Kitchens do different jobs throughout the day. Morning coffee, dinner prep, cleanup, and late-night ambient lighting all want different brightness levels.
The important part isn't just adding a dimmer. It's adding the right dimmer for the fixture technology and load. As noted earlier in the hardwiring guidance, incompatibility is a common source of flicker and poor performance. Don't assume any LED dimmer works with any LED fixture.
Smart controls can also make sense if you already use connected devices in the kitchen. Timed schedules, app control, and voice-triggered scenes are convenient, especially in households that use the kitchen as both workspace and gathering space. For a broader look at how lighting fits into connected kitchens, this article on smart kitchen technology in Cherry Hill adds helpful context.
The best control setup is the one that fits how you use the room. If you only want bright prep lighting, keep it simple. If you want the kitchen to shift from work mode to evening mode without harsh overhead light, invest in compatible dimming from the start.
Troubleshooting and When to Call The Cabinet Coach
You finish the install, flip the switch, and the result is close, but not right. One light flickers. Another section stays dark. From across the room, you can see the fixture itself instead of the light wash on the backsplash. Those are common first-project problems, and the fix depends on whether you are dealing with wiring, product compatibility, or cabinet details.
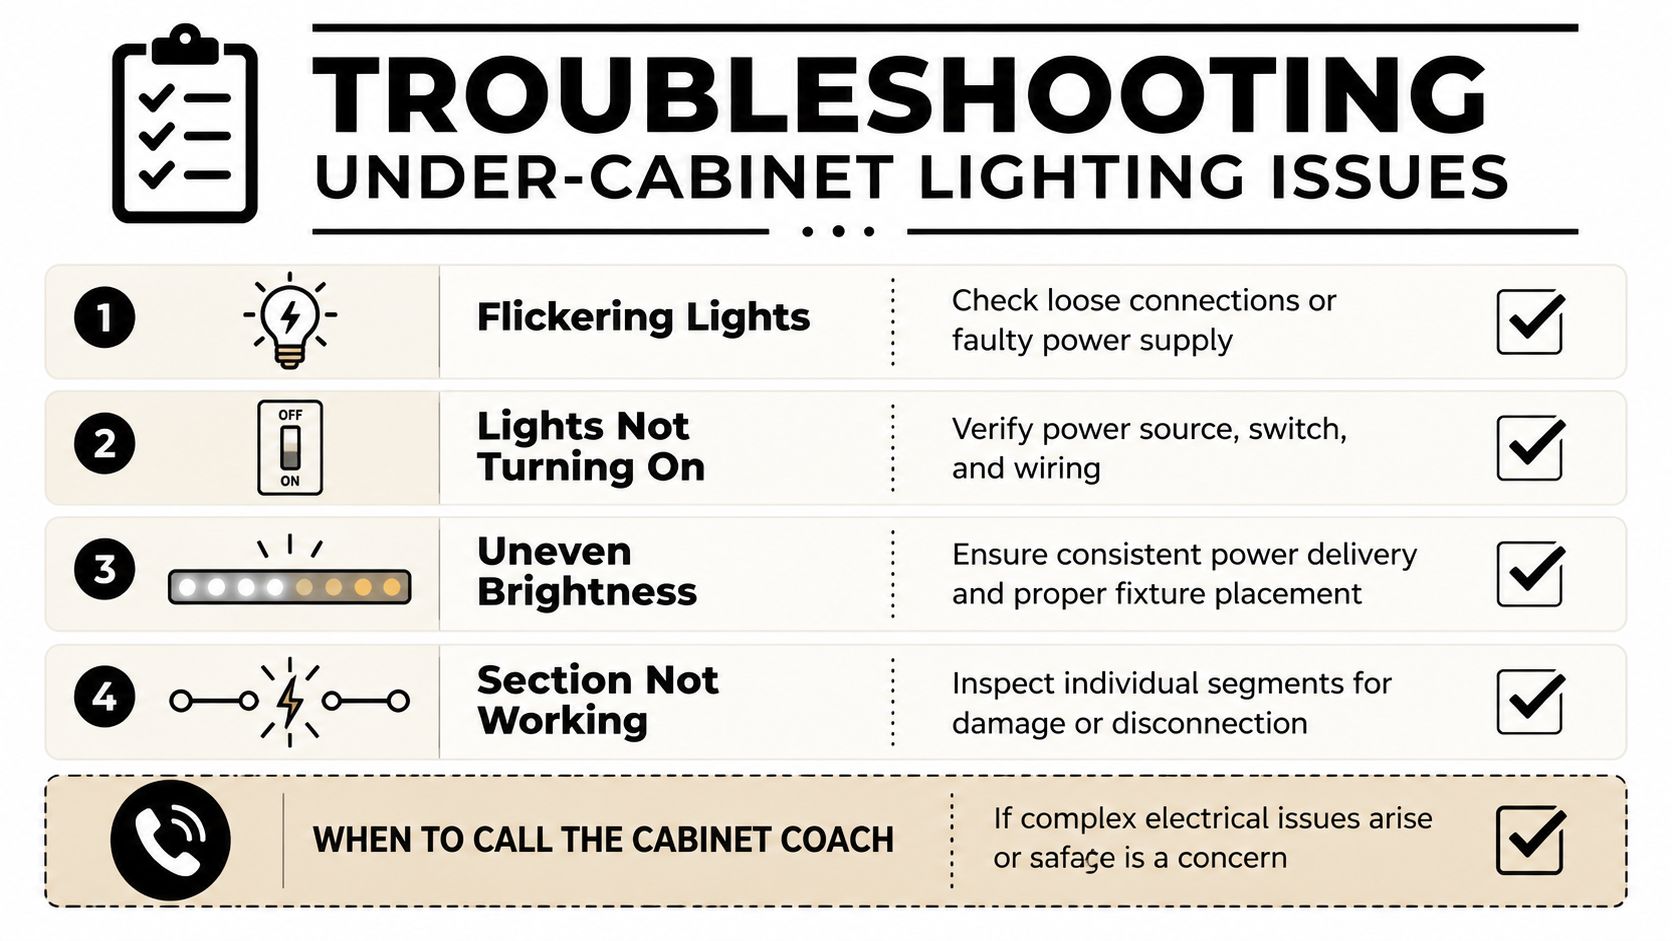
Fix the common problems first
Start with the symptoms you can verify.
- Flickering lights: Check each splice, plug connection, and low-voltage connector. A loose connection is common. If the wiring is tight, verify that the dimmer is rated for the fixture and driver.
- One section will not turn on: Trace the run in order from the power source through each light. One missed connector or one reversed plug can shut down everything downstream.
- Uneven brightness: Look for an overloaded run, a weak connection, or gaps in placement. Short bars spaced too far apart often create dark patches that no brighter bulb will fix.
- Buzzing at the switch: The switch or dimmer is often the problem. LED fixtures, drivers, and controls need to be compatible as a system.
Some problems are visual, not electrical. A light can work perfectly and still look wrong if the fixture is exposed, the diode points are visible, or the glare reflects off a glossy tile backsplash. In those cases, the fix may be a frosted channel, a better setback from the cabinet face, or added trim to hide the fixture line. Homeowner and installer discussions often land on the same conclusion. Concealment should be planned before final mounting, not treated as an afterthought.
If the lights function but the kitchen still feels off, placement is usually the issue.
When a remodel-level solution makes more sense
Call for help if the project starts affecting more than the lights themselves.
- You need new hardwired switching or circuit changes: Stop and bring in a qualified pro. Guesswork around line voltage is unsafe.
- The cabinet bottoms, trim, or backsplash need to be altered: Clean results depend on carpentry, finish work, and lighting layout working together.
- You want the lights to look built in: Surface cords, exposed drivers, and improvised covers usually stand out more over time, not less.
- You are already updating the kitchen: Lighting integrates better before final trim, tile, and paint are locked in.
- You are not fully confident in the wiring: That alone is enough reason to pause.
I see this often in older South Jersey homes. A kitchen may have been updated in stages, with cabinets from one era, wiring from another, and a backsplash added later. Nothing is wildly wrong, but the details do not line up cleanly. Cabinet bottoms may vary from one run to the next. Existing feeds may land in awkward spots. Plaster, tile edges, and trim profiles can turn a simple lighting job into a finish carpentry problem fast.
At that point, a patch fix usually costs more in time and frustration than people expect. If you want the lighting to look like it belonged there from day one, the cabinet layout, trim reveal, backsplash line, and electrical access need to be planned together.
If your kitchen lighting project is starting to touch cabinetry, backsplash details, trim, or a full remodel plan, The Cabinet Coach can help you sort out the bigger picture. South Jersey homeowners use them for guided kitchen and bath remodeling with coordinated cabinetry, finishes, and design support, which is often the smartest path when under-cabinet lighting needs to look fully integrated instead of looking like an add-on.