
The Finishing Touch: A Guide to Cabinet Trim and Molding
Look at your kitchen or bathroom cabinets. They may work perfectly well, but still feel flat. That usually means the boxes are doing their job, while the finish details are missing. Cabinet trim and molding are what take a room from standard to intentional.
The reason these details matter isn't only style. Trim also solves real installation problems. Industry guidance notes that scribe molding covers gaps because walls aren't always straight, ceilings aren't always even, and crown molding closes the space between cabinets and the ceiling in a way that looks finished instead of improvised, as explained in this cabinet moulding overview. That's why good trim choices always balance appearance with fit.
If you're collecting cabinet trim molding ideas for a South Jersey remodel, the best approach is to match the trim to the cabinet door style, ceiling height, room size, and how much visual weight the space can handle. A heavy crown profile that looks right in Moorestown can feel crowded in a smaller kitchen in Audubon or Collingswood.
This guide gets straight to the point. You'll see eight practical trim directions, where each one works best, what tends to go wrong, and how to think about budget and installation difficulty before you commit. If you're planning new cabinetry or trying to achieve cabinet making success, these are the finishing moves that deserve real attention.
Table of Contents
- 1. Shaker-Style Trim Molding
- 2. Raised Panel Trim with Crown Molding
- 3. Flat Panel with Integrated Hardware Trim
- 4. Beadboard Trim with Cottage Styling
- 5. Fluted Trim with Vertical Detailing
- 6. Ogee and Dentil Crown Molding Combinations
- 7. Waterfall Edge Trim with Modern Countertop Integration
- 8. Two-Tone Trim with Contrasting Painted Finishes
- Cabinet Trim Molding: 8 Styles Compared
- Bring Your Vision to Life with The Cabinet Coach
1. Shaker-Style Trim Molding
Shaker trim is the safest good decision in cabinet design. It has enough definition to feel finished, but not so much detail that it locks you into one look for the next decade. In South Jersey, that matters because many homes move between farmhouse, transitional, and cleaner contemporary styling over time.
On a practical level, Shaker trim works because it respects the cabinet door instead of competing with it. A simple recessed frame can carry the room, then hardware, countertop edge, and backsplash do the rest. That's why it fits so well in white kitchens in Cherry Hill, updated colonials in Haddonfield, and open-plan remodels in Mount Laurel.
Where Shaker Trim Works Best
If you're starting with a simple door profile, Shaker trim usually means restrained crown, a clean light rail, or flat fillers that disappear into the run. It doesn't need much. In fact, too much molding is what makes Shaker cabinetry lose its point.
A good rule is to keep the trim profile quieter than the door frame. If the trim is louder than the cabinet face, the kitchen starts to look mixed rather than cohesive.
Practical rule: Shaker cabinets look better with one strong trim move than three small decorative ones.
Cost and Installation Reality
Estimated cost range: low to moderate, depending on paint finish, filler work, and whether you're adding crown.
Estimated installation difficulty: low to moderate. Straight runs are forgiving. Corners, ceiling transitions, and out-of-plumb walls are where the labor shows up.
What works:
- Crisp paint finishes: White, warm white, greige, and muted color palettes keep the style flexible.
- Statement hardware: Brass, black, and brushed nickel all work because the trim itself stays quiet.
- Selective crown use: A slim crown above tall uppers adds depth without making the room feel formal.
What usually doesn't:
- Overbuilt stacked trim: It can make simple cabinets feel confused.
- Heavy distressing: It pushes the style into faux farmhouse quickly.
- Busy backsplash plus detailed trim: One of them needs to calm down.
If you're comparing door profiles before committing, this guide to types of kitchen cupboard doors helps place Shaker trim in context with the rest of the cabinet package.
2. Raised Panel Trim with Crown Molding
Raised panel cabinetry wants trim with presence. If you pair it with a weak top detail, the cabinets can feel top-heavy in the wrong way, with all the visual depth sitting on the door fronts and nowhere else. Crown molding fixes that by giving the run a proper finish line.
This is the look that fits many older South Jersey homes with more formal millwork. In places like Moorestown, Medford, and parts of Haddonfield, raised panel doors with crown still feel architecturally at home, especially when the kitchen opens into rooms with traditional casing and baseboards.
Why It Still Works
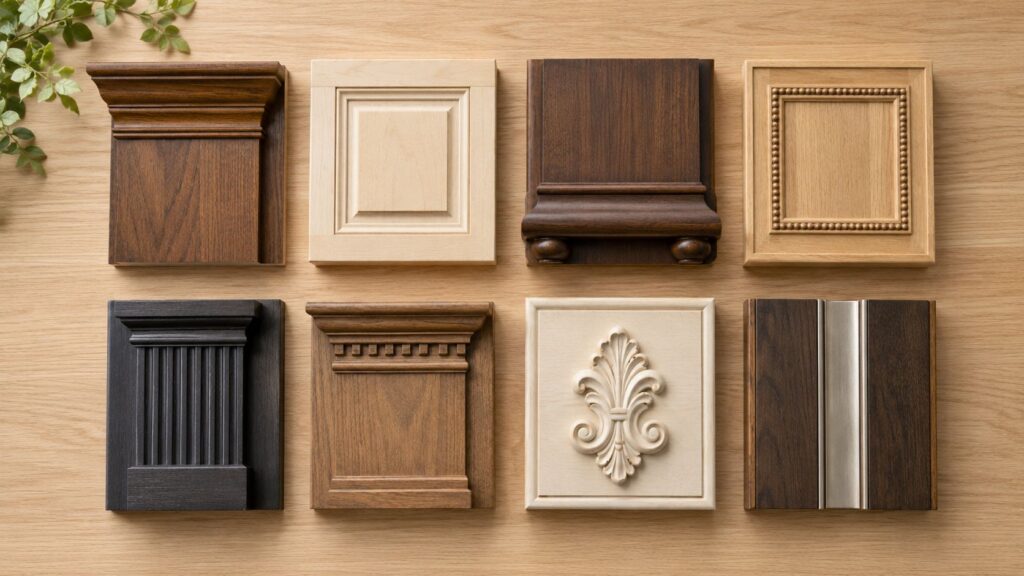
Cabinet trim isn't one piece. It's a category with at least 10 common types used in kitchen renovations, including crown, light rail, dentil, scribe, outside corner, riser, base, toe kick, fillers, and skin panels, according to this guide to kitchen cabinet molding types. That matters here because raised panel kitchens often need more than crown alone. Fillers, skin panels, and a light rail usually complete the look.
In practice, I'd use this approach when the homeowner wants cabinetry to read like furniture or built-in architectural millwork. It brings weight and polish. It also asks more from the room.
Cost and Installation Reality
Estimated cost range: moderate to high. Material matching, layered trim, and finish work increase the bill quickly.
Estimated installation difficulty: moderate to high. Getting crown to sit properly across uneven ceilings and cabinet runs takes patience.
What works:
- Ceiling height that supports the profile: Taller uppers or a visible soffit treatment help.
- Coordinated finish: Stained cherry, walnut, or painted cream all suit the style.
- Lighting that respects the depth: Raised profiles cast shadow, which is part of the appeal.
What usually doesn't:
- Low ceilings with large crown: The room can feel compressed.
- Minimalist appliances and ultra-modern fixtures: They fight the language of the cabinets.
- Skipping side panels: Exposed ends will cheapen an otherwise formal design.
Raised panel with crown is strongest when the whole kitchen agrees with it. Floors, lighting, hardware, and trim all need to speak the same dialect.
3. Flat Panel with Integrated Hardware Trim
Flat panel cabinets are where many homeowners get stuck. They want something modern, but they don't want the kitchen to feel cold, commercial, or hard to use. Integrated hardware trim solves part of that by cutting pulls into the design rather than hanging them onto the face.
This approach is especially appealing in Cherry Hill townhomes, newer Voorhees homes, and compact kitchens where visual calm matters. The lines stay uninterrupted, and the cabinet faces are easier to read as one composition instead of a grid of doors and metal pulls.
The Trade-Off Nobody Mentions Early Enough
Handle-free looks great in photos. In daily use, comfort matters more. If the finger pull is too shallow, too sharp, or placed too high on uppers, people notice it every day.
That's why I advise mockups before production. Open a sample door. Check grip comfort with wet hands. Make sure the finish won't show every touch.
For homeowners weighing this route against more visible pull styles, these kitchen cabinet hardware trends are useful for seeing where integrated trim fits in the broader design conversation.
Cost and Installation Reality
Estimated cost range: moderate to high. The clean look depends on precision, and precision isn't bargain labor.
Estimated installation difficulty: high. Alignment has to be exact because there's no decorative trim to distract from mistakes.
What works:
- Matte and satin finishes: They soften fingerprints better than glossy surfaces.
- Consistent reveal lines: Even spacing is the whole point.
- Soft-close hardware: It keeps slab doors from feeling abrupt.
What usually doesn't:
- Mixing integrated pulls with ornate trim: It creates visual conflict.
- Cheap laminate edges on high-touch areas: Wear shows quickly.
- Uneven appliance panel alignment: The eye catches every inconsistency.
Design note: Modern cabinet trim molding ideas often work best when the trim gets smaller, flatter, or more flush, not more decorative.
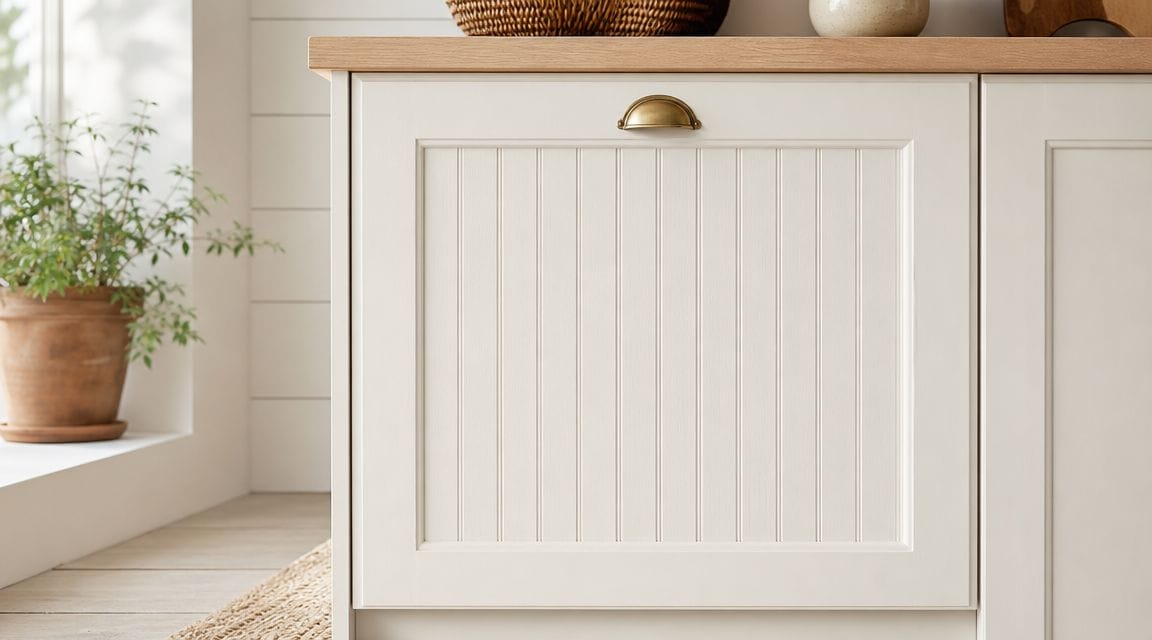
4. Beadboard Trim with Cottage Styling
Beadboard is a texture move first and a trim move second. That's why it can be so effective. In a kitchen full of flat surfaces, the vertical grooves add warmth without requiring ornate profiles.
It suits cottages, farmhouse kitchens, and coastal-leaning bathrooms. In South Jersey, I see it make the most sense in spaces that already have softness built in. Painted wood floors, apron-front sinks, light counters, or old-house architecture give beadboard a natural home.
How to Keep It from Feeling Theme-Heavy
The mistake is using beadboard on every door, every end panel, and the island too. Then the room starts to read as a set piece. A better move is selective use. Put it on the island back, a hutch section, or a vanity. Let the rest of the cabinetry stay simpler.
Beadboard also needs a finish strategy. Painted applications tend to look intentional. Stained beadboard can work, but the groove pattern becomes visually busier.
Cost and Installation Reality
Estimated cost range: low to moderate if applied selectively, moderate if custom built into multiple door fronts.
Estimated installation difficulty: moderate. Alignment and paint prep matter more than the grooves themselves.
What works:
- White and soft neutrals: They keep the profile bright and crisp.
- Mixed cabinet faces: Beadboard on the island and Shaker elsewhere is usually enough.
- Simple hardware: Cup pulls, knobs, and unlacquered brass all pair well.
What usually doesn't:
- Grease-prone areas with deep grooves: Cleaning gets old fast near cooktops.
- Too many rustic details at once: Add beadboard, not beadboard plus rope trim plus distressed glaze.
- Ultra-modern lighting: It can feel disconnected from the cabinet language.
For bathrooms, beadboard is often easier to carry off because the runs are shorter and the texture reads as a deliberate accent rather than a full-room commitment.
5. Fluted Trim with Vertical Detailing
Fluted trim gives you shadow lines without old-fashioned ornament. That's why it's become such a useful middle ground. It can live in a traditional kitchen, but it also works in a cleaner transitional or contemporary room if you keep the scale disciplined.
I like fluting most when it marks a focal point. An island end, a hood surround, or a tall pantry section can take vertical detailing beautifully. Putting it everywhere usually weakens the effect.
Why Fluting Feels Current
Many homeowners want cabinet trim molding ideas that add texture without adding bulk. That's exactly where fluting earns its place. Independent guidance also points to an underserved need in modern kitchens for low-profile, intentional trim choices such as micro-profile trim, flush extensions, and restrained reveal details, especially where heavy molding can feel cramped in smaller homes, as discussed in this overview of kitchen cabinet molding types.
That modern restraint is the lesson. Fluting works best when it stays slim and architectural.
For local inspiration on using vertical texture in a more current way, The Cabinet Coach has a helpful look at the fluted cabinet and tile trend in Cherry Hill kitchen design.
Cost and Installation Reality
Estimated cost range: moderate to high, depending on whether the fluting is applied, routed, or part of a custom component.
Estimated installation difficulty: moderate. The challenge is consistency. Uneven spacing or sloppy seams ruin the effect.
What works:
- Island accents: One focal section has more impact than full-room repetition.
- Painted finishes: They highlight the shadow lines.
- Modern hardware or no hardware: This keeps the detailing fresh.
What usually doesn't:
- Wide grooves in small kitchens: They can read chunky.
- Busy veined counters plus strong fluting: Competing patterns wear out the eye.
- Poorly lit corners: Fluting needs light to do its job.
6. Ogee and Dentil Crown Molding Combinations
Some kitchens want formality, and this is how you get it. Ogee and dentil combinations bring curvature, repetition, and a sense of craft that plain crown can't match. Done well, they feel rooted in the house. Done poorly, they feel pasted on.
This style makes sense in larger traditional homes, especially where the adjacent rooms already have classic molding profiles. If the dining room has detailed casing and the foyer has formal trim, a plain flat cabinet top can look underdressed by comparison.
Where the Complexity Shows Up
Dentil isn't difficult because it's decorative. It's difficult because repetition exposes bad layout. If the pattern dies awkwardly into a wall, collides with another molding, or terminates at the wrong point, the eye goes straight to the flaw.
One detailed instructional source on cabinet trim stresses test-fitting miters, slightly overcutting beyond 45 degrees to handle out-of-square conditions, and reversing crown cuts correctly to avoid directional mistakes, all of which points to accuracy being a major pain point in real installations, as shown in this crown molding installation walkthrough.
Complex crown doesn't forgive rushed carpentry. The profile can be beautiful and still look wrong if the terminations are careless.
Cost and Installation Reality
Estimated cost range: high. This is labor-heavy trim, even before finishing.
Estimated installation difficulty: high. It should be handled by someone comfortable with compound cuts, returns, and transitions into adjacent trim.
What works:
- Rooms with enough vertical space: Formal crown needs air around it.
- Stained wood or painted finishes with depth: The profile deserves a finish that shows it off.
- Matching millwork nearby: The kitchen shouldn't feel like the only formal room in the house.
What usually doesn't:
- Short cabinets with oversized crown: Proportion collapses.
- Modern slab doors beneath ornate dentil: The mix feels accidental.
- Improvised field modifications: This style exposes every shortcut.
7. Waterfall Edge Trim with Modern Countertop Integration
Waterfall edges aren't molding in the traditional sense, but they solve the same design problem. They create a finished termination, define a focal point, and make the cabinetry feel more custom. In modern kitchens, that continuous drop from countertop to floor often replaces the visual job that crown or decorative trim would do elsewhere.
In newer South Jersey kitchens, especially open layouts in Cherry Hill, Voorhees, and Mount Laurel, this look works best on an island that deserves emphasis. It's not a detail to scatter around the room. One strong waterfall is usually enough.
A countertop edge can make or break the transition, which is why it helps to review countertop edge options before locking in slab selections and cabinet reveals.
What Makes a Waterfall Look Expensive
Alignment. The material seam, overhang, cabinet side, and flooring relationship all need to agree. If the slab is beautiful but the end panel is off, the whole feature loses authority.
This idea also asks you to think about living with it. Waterfall ends can reduce knee space, alter seating layouts, and create a more sculptural island that not everyone wants in a hardworking family kitchen.
Cost and Installation Reality
Estimated cost range: high. You're paying for more slab material, precise fabrication, and careful installation.
Estimated installation difficulty: high. Fabrication and field measurements have to be exact.
What works:
- Statement stone or quartz: The vertical face gives the material room to speak.
- Simple cabinet lines: Let the slab be the dramatic element.
- One feature island: It keeps the room from trying too hard.
What usually doesn't:
- Tight layouts: Seating and circulation can suffer.
- Overly busy cabinetry below: It competes with the slab.
- Loose planning between trades: Fabricator, cabinet installer, and flooring crew need to coordinate.
Here's a visual reference for how a waterfall detail can shape the entire island composition.
8. Two-Tone Trim with Contrasting Painted Finishes
Two-tone cabinetry is one of the most flexible ways to make trim matter. You can use color to separate upper and lower cabinets, highlight an island, or give trim pieces more presence without changing the door style itself.
This is a smart choice for homeowners who want a kitchen to feel updated without relying on ornate profiles. A navy island, warm white perimeter, or darker base cabinets can deliver contrast while the trim stays simple. In many South Jersey homes, that balance feels more current than heavy traditional molding.
Why It Works So Well in Real Homes
Two-tone schemes help large kitchens feel less monotonous, and they help small kitchens avoid feeling top-heavy. Lighter uppers keep the room open. Darker lowers ground it.
The broader trim and molding category is also seeing sustained market growth, with one estimate valuing the global market at about USD 8.5 billion in 2023 and projecting around USD 13.9 billion by 2032 at a 5.5% CAGR, while a separate estimate places it at USD 68.4 billion in 2025 and USD 112.7 billion by 2034 at 5.7% CAGR, showing strong growth but also meaningful variation in market-sizing methods, according to this molding and trim market report. The takeaway for homeowners is simple. Trim decisions aren't niche. They're a major part of how cabinetry is being upgraded and customized.
If you're exploring combinations for painted cabinetry, these paint color ideas for kitchen cabinets are a practical place to start.
Cost and Installation Reality
Estimated cost range: moderate. Paint-grade cabinetry keeps it manageable, but custom color separation and finish quality still matter.
Estimated installation difficulty: moderate. The cabinet build may be straightforward, but the finish work has to be clean.
What works:
- Light uppers and darker lowers: This is the most forgiving combination.
- One linking material: Backsplash, wood tone, or hardware should connect both colors.
- Restrained trim profiles: Let color provide the contrast.
What usually doesn't:
- Too many colors: Two is enough in most kitchens.
- Glossy dark finishes in hard-use family kitchens: They show wear quickly.
- Unclear transition points: The eye wants a logical place for the color shift.
Best use: When you want personality without committing to ornate molding profiles.
Cabinet Trim Molding: 8 Styles Compared
| Trim Style | 🔄 Implementation Complexity | ⚡ Resource Requirements | 📊 Expected Outcomes | 💡 Ideal Use Cases | ⭐ Key Advantages |
|---|---|---|---|---|---|
| Shaker-Style Trim Molding | Low, simple recessed panels and straightforward install | Low–Moderate, standard lumber/paint; cost-effective | Timeless, clean aesthetic that enlarges small spaces | Small to mid-size kitchens; busy professionals; transitional/farmhouse | Universally appealing, low-maintenance, budget-friendly |
| Raised Panel Trim with Crown Molding | High, detailed panel work and precise crown installation | High, more material, labor and finishing required | Formal, dimensional look that increases perceived value | Traditional/transitional homes, high-ceiling spaces, resale upgrades | Strong architectural impact and classic elegance |
| Flat Panel with Integrated Hardware Trim | Moderate–High, precise routing and alignment needed | Moderate, specialized fabrication; may reduce hardware costs | Ultra‑modern, uncluttered surfaces; easy cleaning | Contemporary, open‑concept kitchens; design‑forward homeowners | Sleek handle‑free appearance; minimal visual clutter |
| Beadboard Trim with Cottage Styling | Low–Moderate, straightforward but needs consistent groove alignment | Low–Moderate, inexpensive panels/paint; moderate labor for installation | Warm, textured cottage/coastal character | Family kitchens, coastal or farmhouse styles, accent applications | Adds charm and hides minor imperfections affordably |
| Fluted Trim with Vertical Detailing | Moderate, requires precise groove spacing and finish | Moderate, custom routing or milled pieces | Subtle architectural texture and vertical emphasis | Transitional and modern‑traditional homes; focal cabinets/islands | Sophisticated detail without ornate cost; versatile styling |
| Ogee and Dentil Crown Molding Combinations | Very High, expert carpentry and meticulous mitering | Very High, premium materials and specialist installers | Formal, high‑end appearance with strong architectural weight | Upscale traditional homes, high‑ceilings, resale‑focused projects | Maximum perceived value and classic architectural character |
| Waterfall Edge Trim with Modern Countertop Integration | High, custom countertop fabrication and precise installation | High, costly stone/quartz fabrication and installation | Dramatic, contemporary focal point; strong material continuity | Design‑forward islands in open layouts; high‑end renovations | Striking visual drama; material showcase and seamless integration |
| Two‑Tone Trim with Contrasting Painted Finishes | Moderate, careful painting and crisp color separation required | Low–Moderate, painting costs; easier than full replacement | Personalized, modern look with visual depth and zone definition | Homeowners wanting a refresh without replacing cabinets | Flexible, easily updated, high visual impact for modest cost |
Bring Your Vision to Life with The Cabinet Coach
Feeling inspired is the easy part. The harder part is choosing a trim direction that fits your room, your cabinet style, and the way your household uses the space. That's where many remodels go sideways. A molding profile looks great on a sample door, then feels too heavy once it's repeated across a full kitchen, or too slight once it meets a tall ceiling.
That's why cabinet trim should never be selected in isolation. Crown profile, door style, side panels, fillers, countertop edge, backsplash scale, and hardware all affect whether the final room feels calm or cluttered. Even practical pieces like light rail, scribe, shoe molding, and skin panels matter because they influence how finished the installation looks and how well it handles imperfect walls and floors. For cabinet trim specifically, expert guidance highlights crown molding, stacked crown molding, shoe molding, scribe molding, and light rail molding as especially useful because each solves a different installation or finish issue, and standard crown often uses only 3 to 6 inches of trim to close typical ceiling gaps.
For South Jersey homeowners, local context matters too. A trim package that feels appropriate in a larger Moorestown kitchen may overwhelm a compact bungalow in Collingswood or Haddon Heights. Contemporary homes in Voorhees or Mount Laurel often benefit from slimmer, quieter profiles, while older homes with existing millwork can support more detail without feeling forced.
The Cabinet Coach offers a practical path for sorting through those decisions in real conditions, not just on a showroom wall. As South Jersey's mobile cabinet showroom, the company works with homeowners in Cherry Hill, Moorestown, Voorhees, and throughout Camden and Burlington Counties, bringing cabinetry, countertops, hardware, and finish discussions into the actual home where scale, light, and surrounding trim can be evaluated together.
That kind of process is valuable because trim choices are visual, but they're also technical. Small differences in reveal lines, crown buildup, end panel treatment, and color contrast can change the whole outcome. If you're using digital inspiration tools early in planning, ai kitchen design can help you explore concepts, but real project decisions still need to be tested against your room dimensions, cabinet layout, and installation realities.
If you want your cabinets to look intentional instead of just installed, trim deserves real design attention. It's often the detail that tells people whether the room was assembled from parts or designed as a whole.
If you're planning a kitchen or bath update in South Jersey, The Cabinet Coach can help you compare cabinet trim molding ideas in the context of your actual space, then coordinate cabinetry, countertops, hardware, and finish details into a plan that fits your home and budget.