
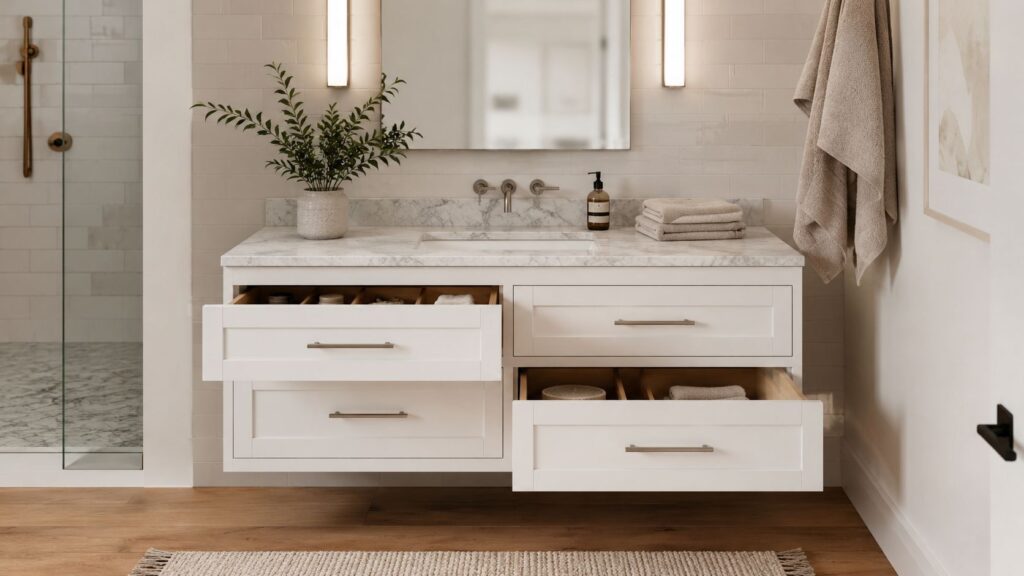
A bathroom vanity replacement often starts with a simple complaint. The cabinet is swollen near the floor, the drawers jam when someone reaches for a hairbrush, and the mirror light leaves half the face in shadow. In a Mount Laurel townhome, that might mean a dated cherry vanity crumbling at the toe kick while two children share one undermount sink and a basket of hair tools competes for counter space.
The temptation is to order a cabinet that fits the old footprint and solve the problem quickly. That approach often creates new ones. Vanity width affects drawer layout, depth affects circulation, countertop selection affects sink placement, and mirror and lighting decisions affect the electrical rough-in. Plumbing, wall support, door swings, tile, hardware, and storage all meet at this small stretch of wall.
A successful bathroom vanity cabinet design treats the vanity as a coordinated system, not a standalone box. The cabinet must hold up to moisture, the counter must suit the sink and cleaning routine, the hardware must work with the drawer fronts, and the lighting must let people shave, apply makeup, and find what they need. A useful starting point is this bathroom remodeling planning guide, especially before demolition or plumbing changes begin.
Table of Contents
- Why Your Bathroom Vanity Deserves a Real Plan
- Getting the Dimensions and Clearances Right
- Choosing the Right Vanity Style for Your Space
- Cabinet Materials, Finishes, and Construction Details
- Storage, Hardware, and Countertop Pairings
- Lighting and Mirror Integration Around the Vanity
- Budget, Timeline, and Working with a Mobile Showroom
Why Your Bathroom Vanity Deserves a Real Plan
The vanity is one of the few bathroom elements that affects nearly every daily movement. Someone opens a drawer while another person turns toward the shower. A child reaches for a cup near the sink. A homeowner plugs in a styling tool, wipes toothpaste from the counter, or stores cleaning products behind a door. A beautiful elevation drawing won't compensate for a drawer that hits the toilet or a sink that leaves no comfortable landing space.
Treat the wall as a system
Start with the room, not the cabinet catalog. Record the finished wall length, adjacent door swings, toilet position, shower enclosure, window trim, baseboard, and the location of water supplies and drains. Then mark where outlets, sconces, switches, and medicine cabinets could go. A change from a single sink to a double sink can alter plumbing rough-ins, while a thicker countertop can change the final counter height.
The same coordination applies above the counter. A wide mirror may look balanced with the cabinet but leave no room for side sconces. A medicine cabinet may provide valuable storage yet require wall depth and electrical planning. An integrated outlet inside a drawer can keep a hair dryer off the counter, but the electrician needs to know about it before the cabinet and backsplash are installed.
Practical rule: If the cabinet, counter, mirror, lighting, and plumbing aren't selected together, the room is still being designed by accident.
Design for the actual household
A powder room can tolerate a furniture-style vanity with limited closed storage because guests usually need hand towels and basic toiletries. A family bathroom needs a different response, often with deep drawers, divided storage, durable finishes, and a place for bulky supplies. A primary bath may justify a longer built-in run, linen tower, or makeup area, but only if the wall length and circulation support it.
Humidity also changes the specification. South Jersey bathrooms experience repeated moisture exposure, and coastal homes may add salt-laden air and seasonal movement. Cabinet edges, toe kicks, drawer hardware, and wall fasteners deserve as much attention as the visible door style.
The plan should answer practical questions before a product is ordered:
- Who uses the room: One adult, a couple, children, guests, or someone using a mobility aid?
- What stays on the counter: Hair tools, cosmetics, soap, toothbrushes, or almost nothing?
- Where does the plumbing sit: Can the drain remain, or will the layout require a licensed plumber?
- What must remain accessible: Clear floor area, knee space, outlets, and easy-to-reach storage?
- How will the wall be lit: Ceiling fixture only, sconces, vertical LEDs, or a backlit mirror?
That small checklist prevents a common remodeling mistake, choosing a cabinet first and trying to force the room to accept it later.
Getting the Dimensions and Clearances Right
A vanity can fit the wall and still make the bathroom awkward. The door may strike a drawer, the toilet may leave too little passage, or the sink may sit too close to a side wall. Set the room's geometry first, then coordinate the cabinet, countertop, hardware, mirror, and lighting around it.
Bathroom cabinetry commonly uses a 21-inch depth and a finished counter height of 34 to 36 inches, as outlined in this bathroom vanity dimensions guide. A shallower cabinet can protect door and shower clearance, but it gives up drawer depth and leaves less room for plumbing hardware.
Start with depth and height
A standard 21-inch-deep cabinet generally accommodates the sink, drain assembly, and under-sink storage without projecting too far into the room. An 18-inch shallow vanity suits a narrow galley bathroom or compact powder room where the door, toilet, and shower compete for the same circulation area. Measure the actual finished wall, including trim, before choosing the cabinet depth.
Counter height should match the users and the sink. A 36-inch cabinet often feels comfortable for adults who prefer a higher work surface. A lower finished height can serve children or accessibility-focused planning more effectively. Vessel sinks need separate calculation because the basin rises above the countertop. Lowering the cabinet may be necessary to keep the finished rim comfortable.
Width controls counter space, drawer capacity, and sink spacing. Common widths include 18, 24, 30, 36, 42, 48, 60, and 72 inches. For a closer look at choosing between one and two sinks, use this double vanity size guide. Single-sink layouts often suit the 30- to 36-inch range, while shared vanities commonly use 60- to 72-inch widths to preserve drawer space and reduce splash conflicts.
| Vanity Type | Width | Depth | Height | Best For |
|---|---|---|---|---|
| Compact single sink | 24 inches | 18 to 21 inches | 34 to 36 inches | Small powder rooms and tight baths |
| Standard single sink | 30 to 36 inches | 21 inches | 34 to 36 inches | Hall baths and everyday use |
| Generous single sink | 42 to 48 inches | 21 inches | 34 to 36 inches | Primary baths needing counter and drawer space |
| Double sink | 60 to 72 inches | 21 inches | 34 to 36 inches | Shared primary bathrooms |
Lay out the clearances
Clearance rules determine whether the finished room feels comfortable. Aim for 30 inches of floor space in front of the vanity where the room allows, with 21 inches as a common minimum benchmark for movement. Keep a sink centerline at least 15 inches from a side wall. For two sinks, centerlines should be at least 30 inches apart, with 36 inches preferred in many planning guidelines. ADA-oriented planning uses a counter or sink rim no higher than 34 inches and approximately 27 inches of knee clearance below the sink. The practical implications are summarized in this bathroom cabinet dimensions resource.
Check the toe kick as part of the layout. A roughly 4-inch toe-kick zone lets users stand close to the counter without hitting the cabinet base. A floating cabinet removes that recessed base, but it still requires reliable wall blocking and coordinated plumbing.
Before ordering, mark the cabinet footprint, door swing, toilet clearance, and fixture centerlines on the floor or wall. In New Jersey, permit requirements depend on the work. Replacing a cabinet in its existing location may be straightforward, while moving supply lines, changing drains, adding electrical circuits, or altering walls can trigger permits and inspections. Confirm the scope with the local construction office and licensed trades.
Choosing the Right Vanity Style for Your Space
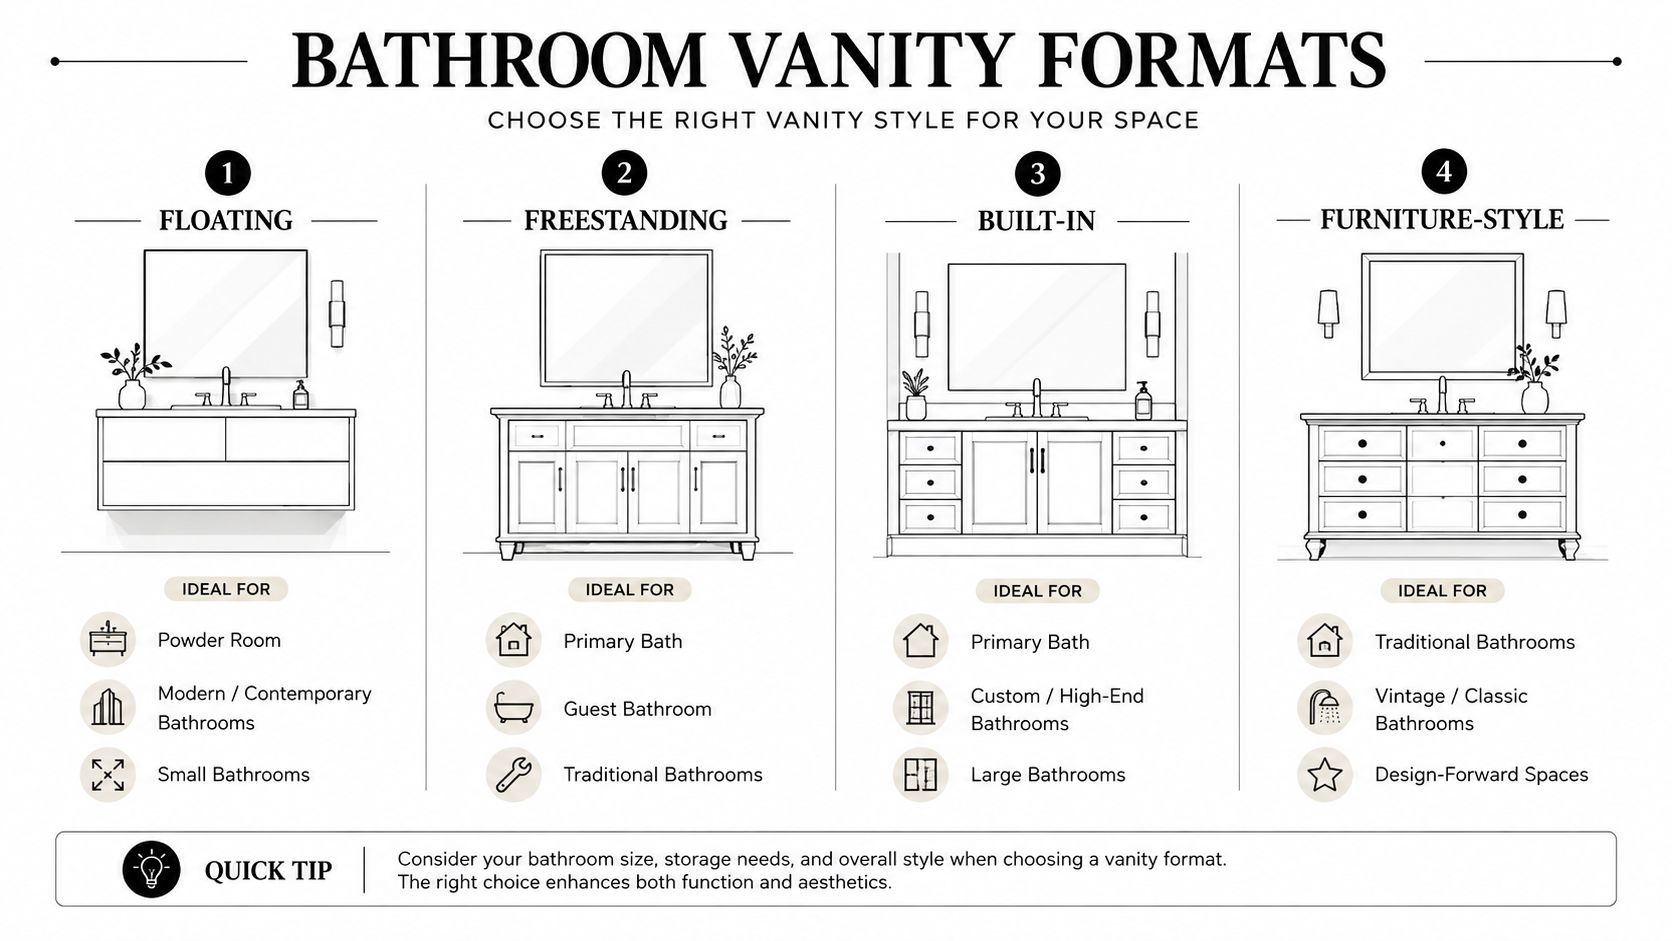
Vanity format changes the room's visual weight, storage capacity, installation difficulty, and cleaning routine. Four styles cover most bathroom cabinet projects, but none is universally correct.
Floating vanities
A floating or wall-hung vanity leaves visible floor beneath the cabinet. That open strip can make a small bathroom feel less crowded and makes mopping easier. The trade-off is real: the cabinet needs structural support, the plumbing must be cleanly arranged, and the usable storage envelope may be smaller than the same-width floor-standing cabinet.
Floating designs suit powder rooms, contemporary hall baths, and compact spaces where visual openness matters more than maximum capacity. They can work in a family bathroom, but vertical storage or a linen tower may be needed to replace the cabinet volume given up below the counter.
Freestanding vanities
Freestanding cabinets with legs or a full toe kick offer the widest range of drawer and door arrangements. They fit naturally in many South Jersey colonials and ranches, particularly when the existing plumbing location should remain unchanged. Installation is usually more forgiving than a wall-hung design because the cabinet carries its own load.
A full toe kick can collect dust and moisture if the bottom edge isn't sealed properly. Legs create a lighter furniture appearance, but they also expose more floor and can make a crooked floor line more noticeable.
Built-in and furniture-style options
A built-in vanity can extend into a linen tower, side cabinet, or knee-space makeup area. It works best when the wall is long enough to support the entire composition without crowding the toilet or door. Custom filler panels and end conditions can make a built-in run look intentional rather than like several boxes pushed together.
Furniture-style vanities bring a console or dresser character to powder rooms and traditional baths. They pair well with vessel sinks and decorative mirrors, but the finish must be protected from standing water, and the open underside can reduce concealed storage. A vessel also raises the final sink height, so the cabinet and countertop specification must be coordinated.
Design decision: Match the vanity format to the wall length, plumbing location, and amount of closed storage the household actually needs. Style should resolve those constraints, not hide them.
Cabinet Materials, Finishes, and Construction Details
Cabinet construction determines how a vanity handles fasteners, moisture, movement, and repeated use. The visible door style matters, but the box, back panel, edge treatment, drawer assembly, and finish often decide whether the cabinet still feels solid after years of bathroom humidity.
Compare the cabinet box
Plywood generally offers strong screw-holding performance and a stable substrate for cabinet construction. MDF provides a smooth surface for painted doors and panels, but exposed or poorly sealed edges need protection from water. Particleboard can perform adequately when carefully sealed and kept dry, though damaged edges are less forgiving.
| Material | Best For | Moisture Resistance | Cost Tier |
|---|---|---|---|
| Plywood | Durable cabinet boxes and heavier use | Good when edges and joints are sealed | Higher |
| MDF | Smooth painted components and stable panels | Fair to good when fully sealed | Mid-range |
| Particleboard | Budget-conscious projects with controlled exposure | Fair when protected from water | Lower |
These categories aren't enough by themselves. Ask how the manufacturer seals cut edges, supports the back panel, reinforces the sink area, and finishes the toe kick. A strong box with an exposed bottom edge can still fail if water repeatedly reaches that edge.
Look beyond the door sample
Inset doors sit within the face frame and create a custom furniture look, but they require more precise alignment. Partial overlay doors leave some frame visible, while full overlay doors create a cleaner, more contemporary plane and can maximize the apparent front surface.
Painted lacquer or other painted finishes suit crisp contemporary and transitional rooms, especially when paired with slab or Shaker fronts. Stained wood works well for warm, traditional, or coastal-cottage interiors, but the finish should be sealed consistently across faces, edges, and end panels. Thermofoil and textured laminates offer practical, uniform surfaces, though repairs and heat exposure should be discussed before selection.
Inspect drawers and hidden reinforcement
Dovetail drawer boxes usually signal a more mechanically joined assembly than stapled boxes, but the slide system and load rating still matter. Soft-close hinges and slides improve daily use, yet they should be specified for bathroom conditions and expected drawer contents rather than treated as interchangeable accessories.
Back-panel reinforcement keeps the cabinet square and gives wall fasteners a dependable structure. Edge banding protects exposed panel edges, while a properly finished toe kick prevents mop water from reaching the box. The visible style can be modern, transitional, or cottage-inspired, but the construction should match the room's moisture exposure and storage demands.
For a deeper material discussion, compare the practical differences in plywood versus MDF cabinets before approving the specification.
Storage, Hardware, and Countertop Pairings
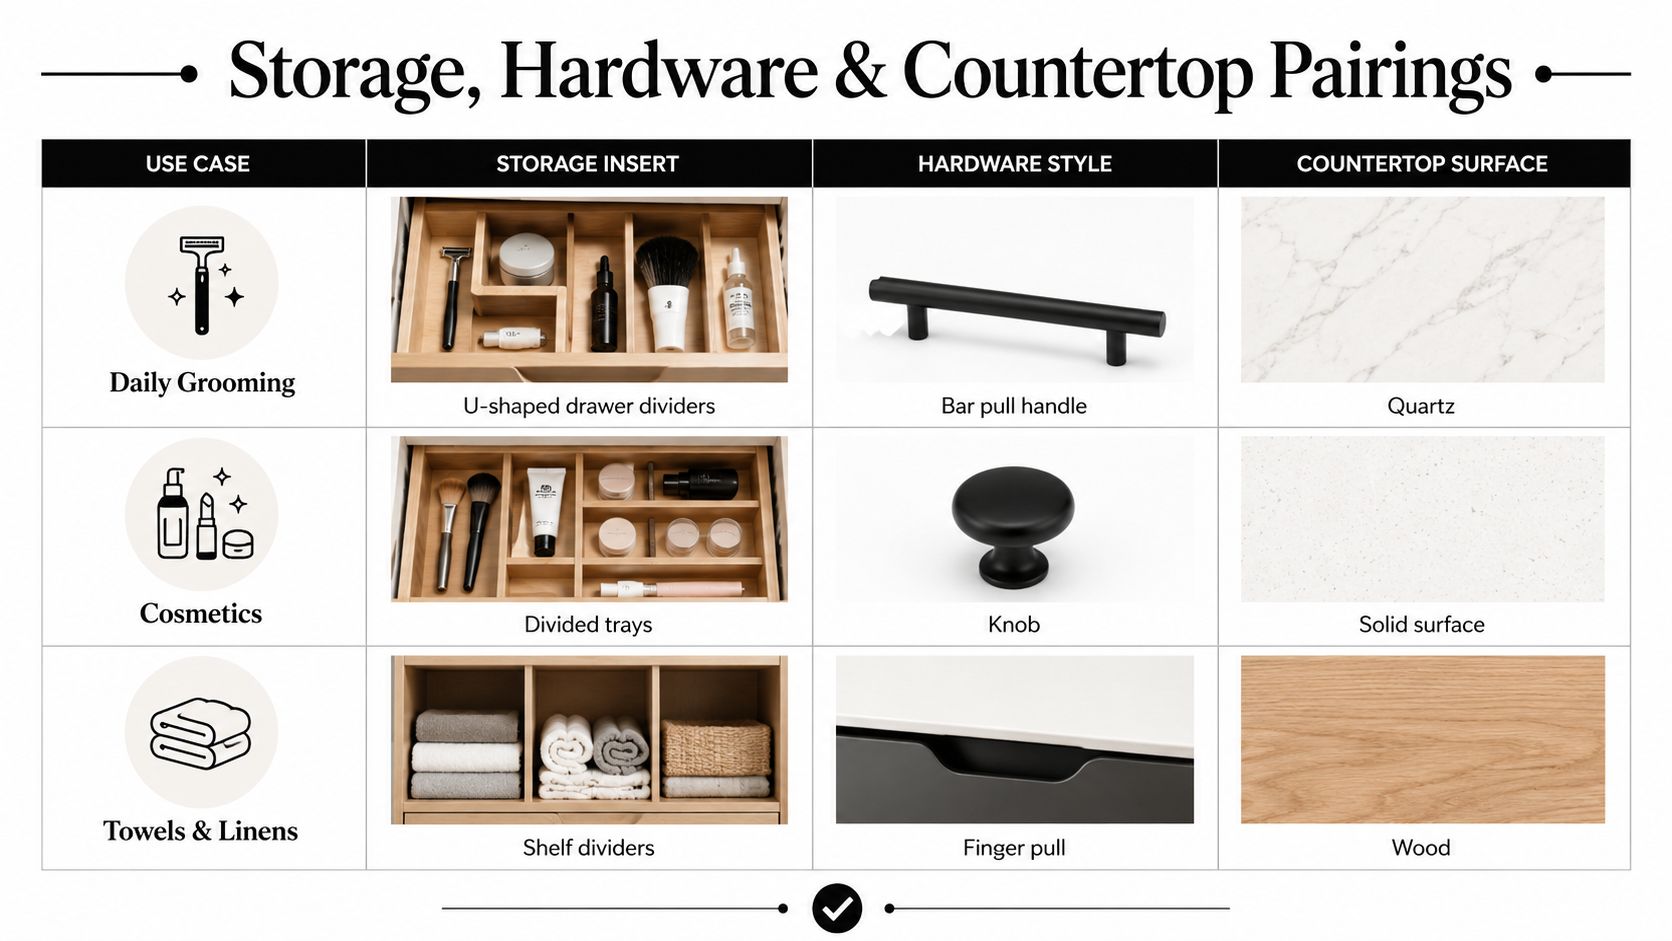
Storage planning should begin with the items that need a home, not with a favorite drawer photograph. A vanity for daily grooming needs a different interior from one storing towels, cleaning products, and spare toiletries.
Build storage around routines
Use a U-shaped drawer divider for bottles, brushes, and small grooming tools. Divided trays keep cosmetics from becoming a single crowded layer. Tilt-outs near the sink can hold sponges or small items, while full-height door storage suits cleaning products and backup supplies.
Hair tools deserve special planning. A dedicated drawer with an integrated outlet can keep a styling brush or dryer contained while it charges, but electrical work must be coordinated before cabinet installation. Heat-producing tools should follow the product manufacturer's safety guidance and shouldn't be stored hot in a closed compartment.
The bathroom vanity storage solutions guide is useful when comparing drawer organization, sink-base limitations, and vertical storage options.
Match fronts and pulls
Slab drawer fronts support a clean contemporary look and pair naturally with integrated finger pulls or long, minimal bars. Shaker fronts work across contemporary and transitional interiors, with knobs on doors and elongated pulls on drawers providing a familiar balance. Flat recessed panels can bridge furniture-style detailing and simpler cabinetry.
Hardware placement should account for wet hands and daily grip. A tiny decorative knob may look right in a powder room but feel awkward on a heavily used drawer. Brass, chrome, nickel, black, and mixed-metal schemes can all work, but faucets, drains, shower trim, sconces, and cabinet hardware should be reviewed together rather than selected from unrelated samples.
Select the countertop with the cabinet
Quartz offers a consistent appearance and straightforward cleaning, while granite brings natural variation and a durable stone surface. Marble provides character but demands a household comfortable with patina and careful maintenance. Solid surface can create a visually quiet, repairable installation, while laminate and wood-based surfaces require more attention to water at seams and edges.
An undermount sink leaves a clean counter edge and makes wiping water into the basin easier. An apron-front or other specialized sink changes cabinet sizing and support requirements, so it shouldn't be treated as a late substitution. Countertop weight, sink cutout, faucet drilling, backsplash thickness, and cabinet support belong on one approved order.
Lighting and Mirror Integration Around the Vanity
A vanity may have well-built cabinetry and still perform poorly if the face is shadowed. Ceiling fixtures provide general illumination, but they often leave darkness under the brow and chin. Plan the mirror, sconces, LED sources, switches, and cabinet elevation together, because each affects the others.
Use three layers
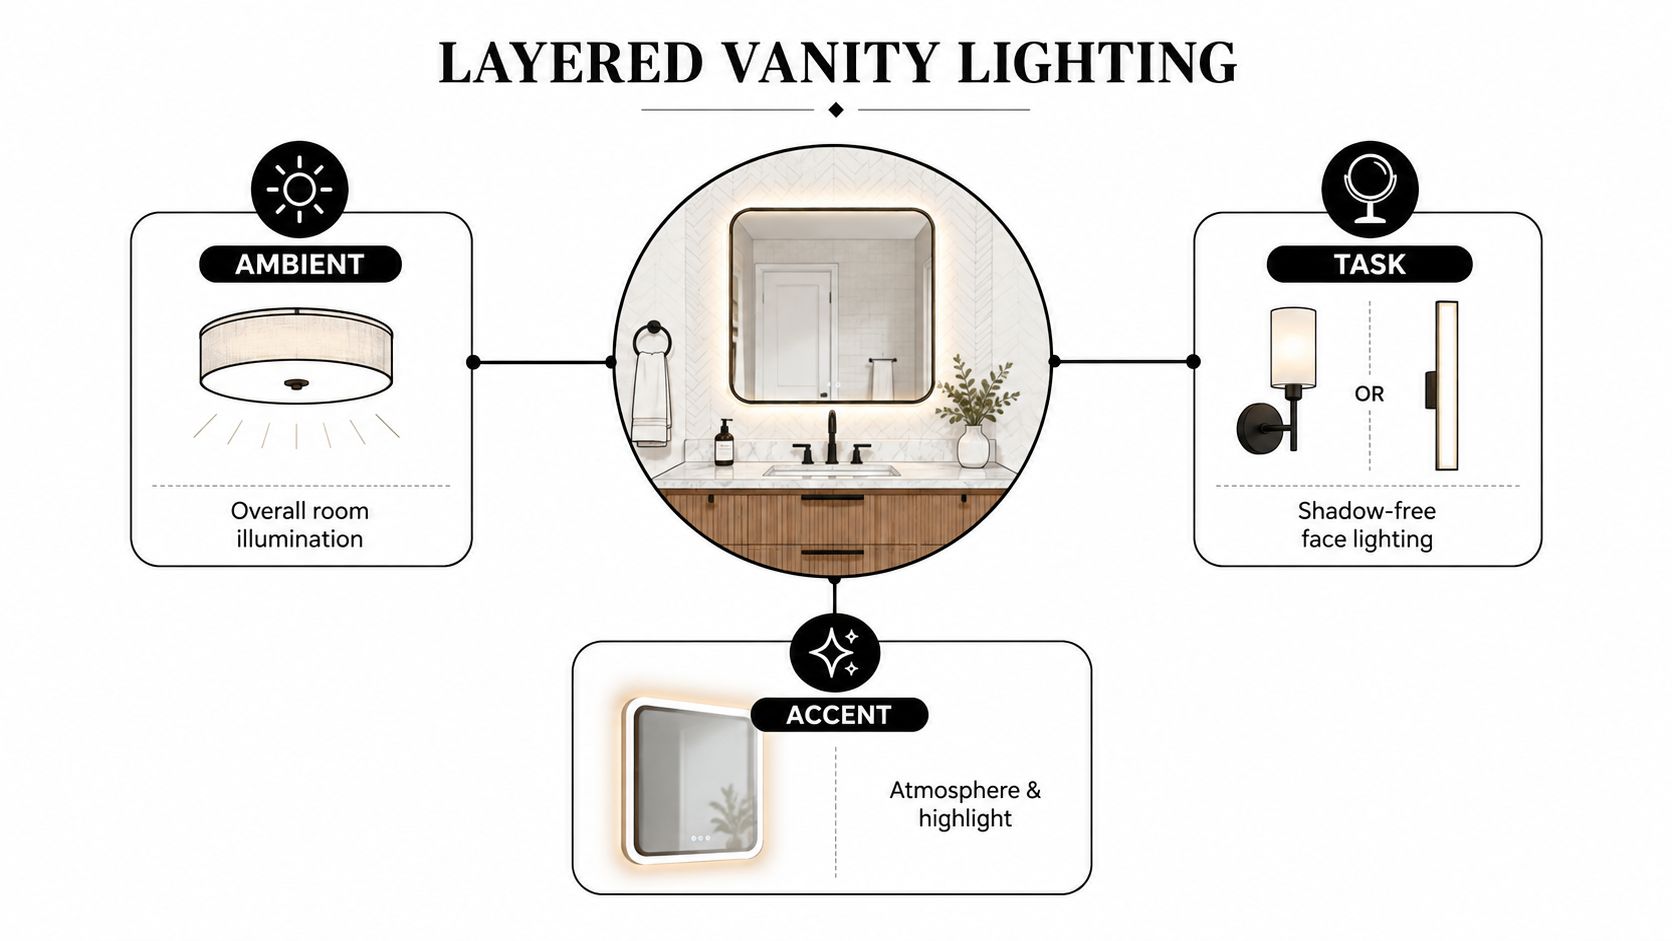
Ambient lighting illuminates the room overall, usually through a ceiling fixture or recessed layout. Task lighting belongs at the mirror, where it can light the face from a useful angle. Accent lighting, including a backlit mirror or concealed cabinet lighting, adds atmosphere and draws attention to the vanity wall, but it should not replace task lighting.
Side-mounted sconces or vertical LED strips usually create more even facial light than one overhead bar. An overhead fixture can still work with a shallow mirror, a compact room, or a fixture designed to distribute light downward without harsh shadows. Base the choice on the routine, whether the space is used for shaving, skincare, makeup, or helping children wash up.
Size the mirror intentionally
A mirror approximately as wide as the vanity usually produces a balanced composition. A slightly narrower model can suit a wall with deliberate returns, sconces, or trim around its edges. A full-width frameless mirror can make a small bathroom feel larger, while a framed mirror gives the wall a more furniture-like character and a defined boundary.
Medicine cabinet mirrors add storage without taking counter space, but confirm wall depth, door swing, and electrical locations before ordering. Recessed models need a suitable cavity. Surface-mounted versions extend farther into the room. Set mirror height in relation to the users, faucet, backsplash, sconces, and any crown or ceiling restrictions.
Coordinate the electrical details
Color temperature affects the appearance of cabinet finishes, countertops, and tile. 2700K creates a warmer residential glow, 3000K remains warm with a cleaner appearance, and 3500K looks cooler and more neutral. Select the temperature with the overall finish package and desired atmosphere, rather than treating the fixture as a separate purchase.
Use dimmers compatible with the chosen fixtures. Confirm whether a lighted mirror includes its own driver or control. Sconces near tubs and showers need the appropriate IP rating for their location, and a licensed electrician should verify installation requirements.
When coordinating recessed lighting installation, settle fixture locations before fabricating the mirror and backsplash so cuts, junctions, and cabinet proportions align with the final layout. A licensed electrician can help confirm the placement before walls are closed.
Budget, Timeline, and Working with a Mobile Showroom
A bathroom vanity budget is shaped by more than the cabinet price. Cabinetry, countertop fabrication, sink and faucet selections, plumbing rough-ins, electrical updates, tile coordination, delivery, and installation labor can all affect the final scope. Stock, semi-custom, and custom projects also differ in how much flexibility they provide when the room has an unusual wall, off-center drain, or tight clearance.
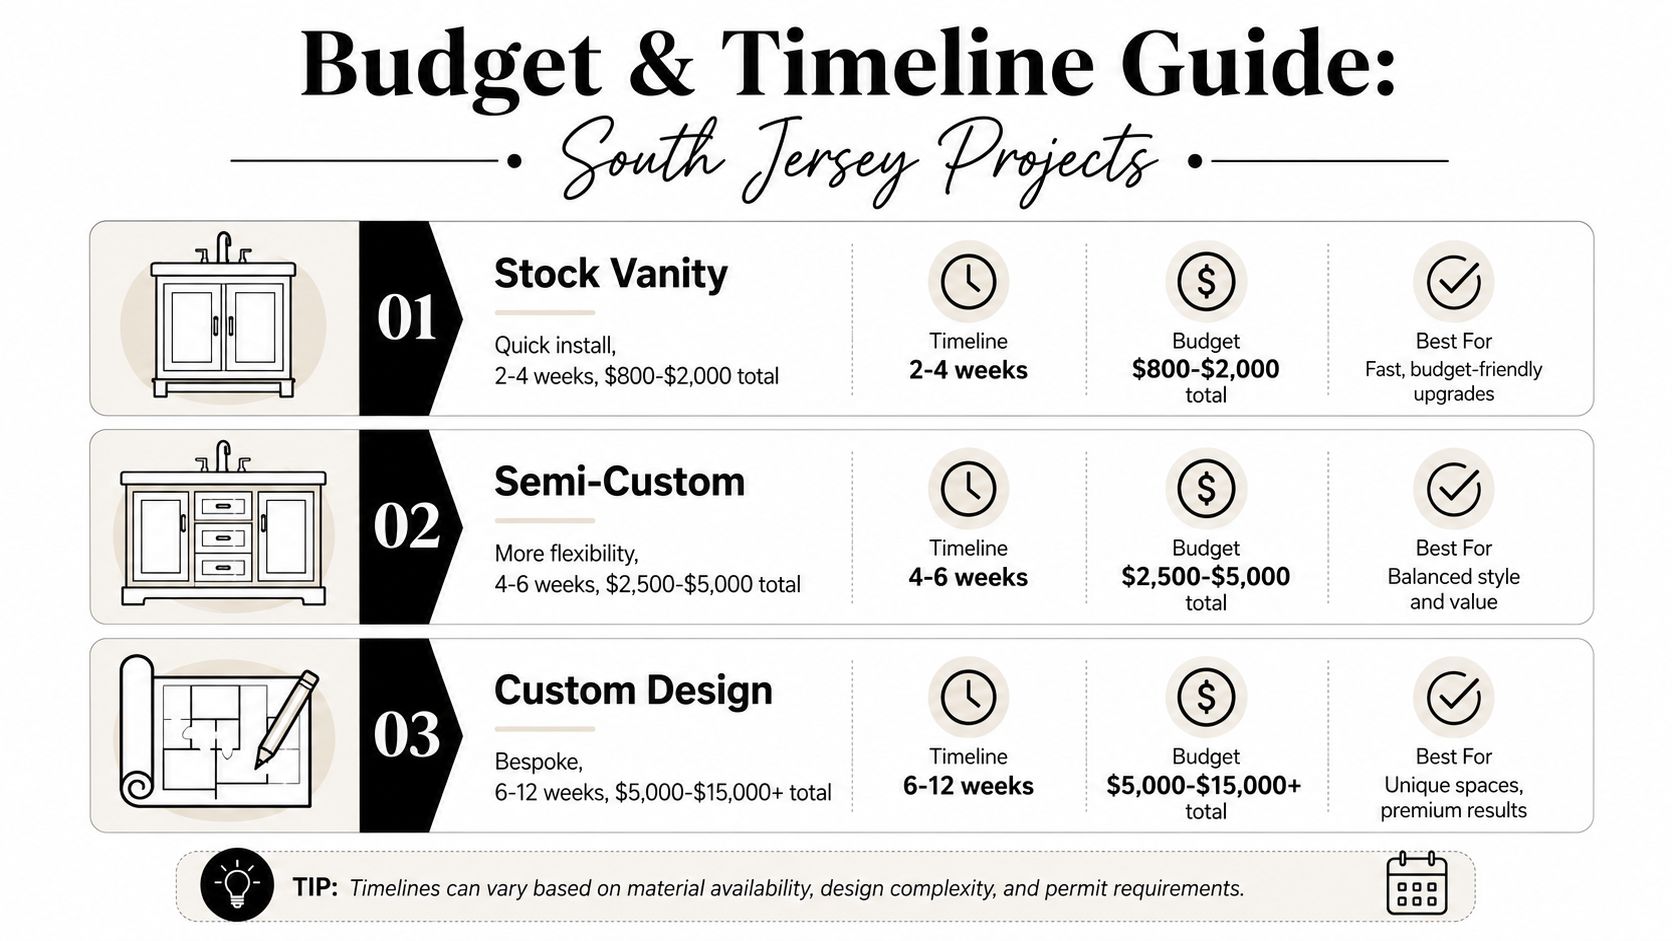
The supplied project guide uses distinct planning tiers: a stock vanity is described as $800 to $2,000 total with a 2 to 4 week timeline, a semi-custom project as $2,500 to $5,000 total over 4 to 6 weeks, and a custom design as $5,000 to $15,000 or more over 6 to 12 weeks. Those figures belong to the guide's stated package descriptions, not a universal quote, so confirm what each allowance includes before comparing proposals.
Plan the sequence
A typical project moves from layout review to field measuring, product selection, ordering, demolition, rough plumbing and electrical, wall preparation, cabinet installation, countertop templating, fabrication, finish work, and final walkthrough. The timing depends on the actual scope and trade availability. Slab lead times, tile subcontractor scheduling, and backordered hardware are common sources of delay, so they should be checked before demolition begins.
A mobile showroom can make product decisions more accurate because samples are reviewed in the actual bathroom. Door colors, countertop pieces, tile, hardware, and mirror finishes look different against existing flooring and natural light than they do under a showroom's artificial lighting. In-home measuring also exposes out-of-square walls, baseboard conflicts, plumbing offsets, and door-swing problems before the cabinet is ordered.
The Cabinet Coach is one South Jersey option that brings cabinetry, countertops, hardware, and related selections to the home as part of an in-home design process. Its approach is described in this guide to mobile cabinet showroom remodeling, where homeowners can review coordinated choices without making repeated trips to separate retailers.
Use a written homeowner checklist
Before signing, ask for clear answers in writing:
- Scope: Confirm demolition, disposal, plumbing, electrical, cabinet installation, countertop work, mirrors, lighting, tile, and painting.
- Allowances: Identify which selections carry allowances and what happens if the chosen product costs more or less.
- Lead times: Verify cabinet, countertop, sink, faucet, hardware, mirror, and specialty insert availability.
- Field conditions: Confirm who measures the room and who approves changes caused by hidden plumbing or wall conditions.
- Final payment: Require a punch-list process covering alignment, drawer operation, finish damage, caulk, plumbing leaks, lighting operation, and cleanup.
A vanity is a small-room project disguised as a cabinet purchase. When the layout, construction, storage, surface, hardware, mirror, lighting, and installation sequence are resolved together, the finished bathroom works harder and creates fewer expensive surprises.
The Cabinet Coach helps South Jersey homeowners coordinate vanity cabinetry, countertops, hardware, tile, lighting considerations, and storage around the actual dimensions of the bathroom. Visit The Cabinet Coach to arrange a consultation and review your vanity plan in the home, where existing finishes, natural light, plumbing, and circulation can guide the decisions.