

You've chosen the cabinets, saved a dozen countertop photos, and started wondering whether moving the sink to the island will turn a simple update into a full construction project. In a Cherry Hill kitchen, that concern is justified. A countertop replacement rarely stands alone. Cabinet level, plumbing locations, appliance specifications, backsplash timing, slab availability, fabrication, and installation all have to line up.
That coordination is why professional kitchen countertop installation services matter. The slab is only the visible part of the job. Quality shows up in the template, the seam plan, the support beneath the surface, the cutouts around sinks and cooktops, and the handoffs between trades. Homeowners renovating kitchens overwhelmingly treat countertops as a major decision. The 2026 Houzz U.S. Kitchen Trends Study found that 91% of renovating homeowners upgraded countertops, while 35% splurged on them, making countertops the most commonly improved kitchen feature in that survey.
Table of Contents
- Getting Ready Before You Book a Countertop Consultation
- Choosing the Right Countertop Material for Your Home
- Measuring and Templating the Countertop Correctly
- Demolition Day and the Countertop Installation Workflow
- Timeline and Cost Breakdown for a 2026 Countertop Project
- Smart Questions to Ask Your Countertop Contractor
- Post-Installation Care and Your Next Steps
Getting Ready Before You Book a Countertop Consultation
Start with information, not a material sample. Consider a Cherry Hill split-level ranch with original 1980s laminate, base cabinets that have settled slightly, and a homeowner who wants to move the sink from the perimeter run to the island. A contractor can discuss possibilities during the first call, but an accurate recommendation depends on what sits behind the countertop.
Gather wide photos of the kitchen, close-ups of cabinet interiors, and a simple sketch showing wall lengths, windows, doors, appliances, and the proposed sink location. Measure the existing countertop length for a rough planning conversation, but label those measurements as approximate. They're useful for an initial budget discussion, not for fabrication.
Collect the details that control the quote
Have these items ready before the consultation:
- Cabinet information: Note whether the existing cabinets will remain, be repaired, or be replaced. Include manufacturer details if available, cabinet depth, island dimensions, and any areas where the boxes feel loose or uneven.
- Sink and faucet specifications: Save the model numbers for the new sink, faucet, soap dispenser, air switch, and filtration system. An undermount sink needs a different fabrication approach from a drop-in sink, and the faucet holes may need to be drilled separately.
- Appliance cutout sheets: Provide the exact cooktop, range, and built-in appliance specifications. A generic appliance width isn't enough when the stone has to accommodate a tight cutout.
- Plumbing plans: Decide whether the sink is moving, whether the dishwasher is moving with it, and whether new supply or drain work is required. A countertop installer shouldn't discover the plumbing change after the slab has been templated.
- Backsplash direction: Decide whether tile will continue to the underside of the cabinets, rise behind a range, or become a full-height slab backsplash. That choice affects wall preparation, seams, and the finished edge.
Tile timing deserves an early decision. Tile installed before the countertop can complicate removal and may leave the installer protecting a finished surface. Tile installed afterward gives the backsplash installer a clean countertop edge, but it requires the countertop crew to leave the wall transition ready for the next trade.
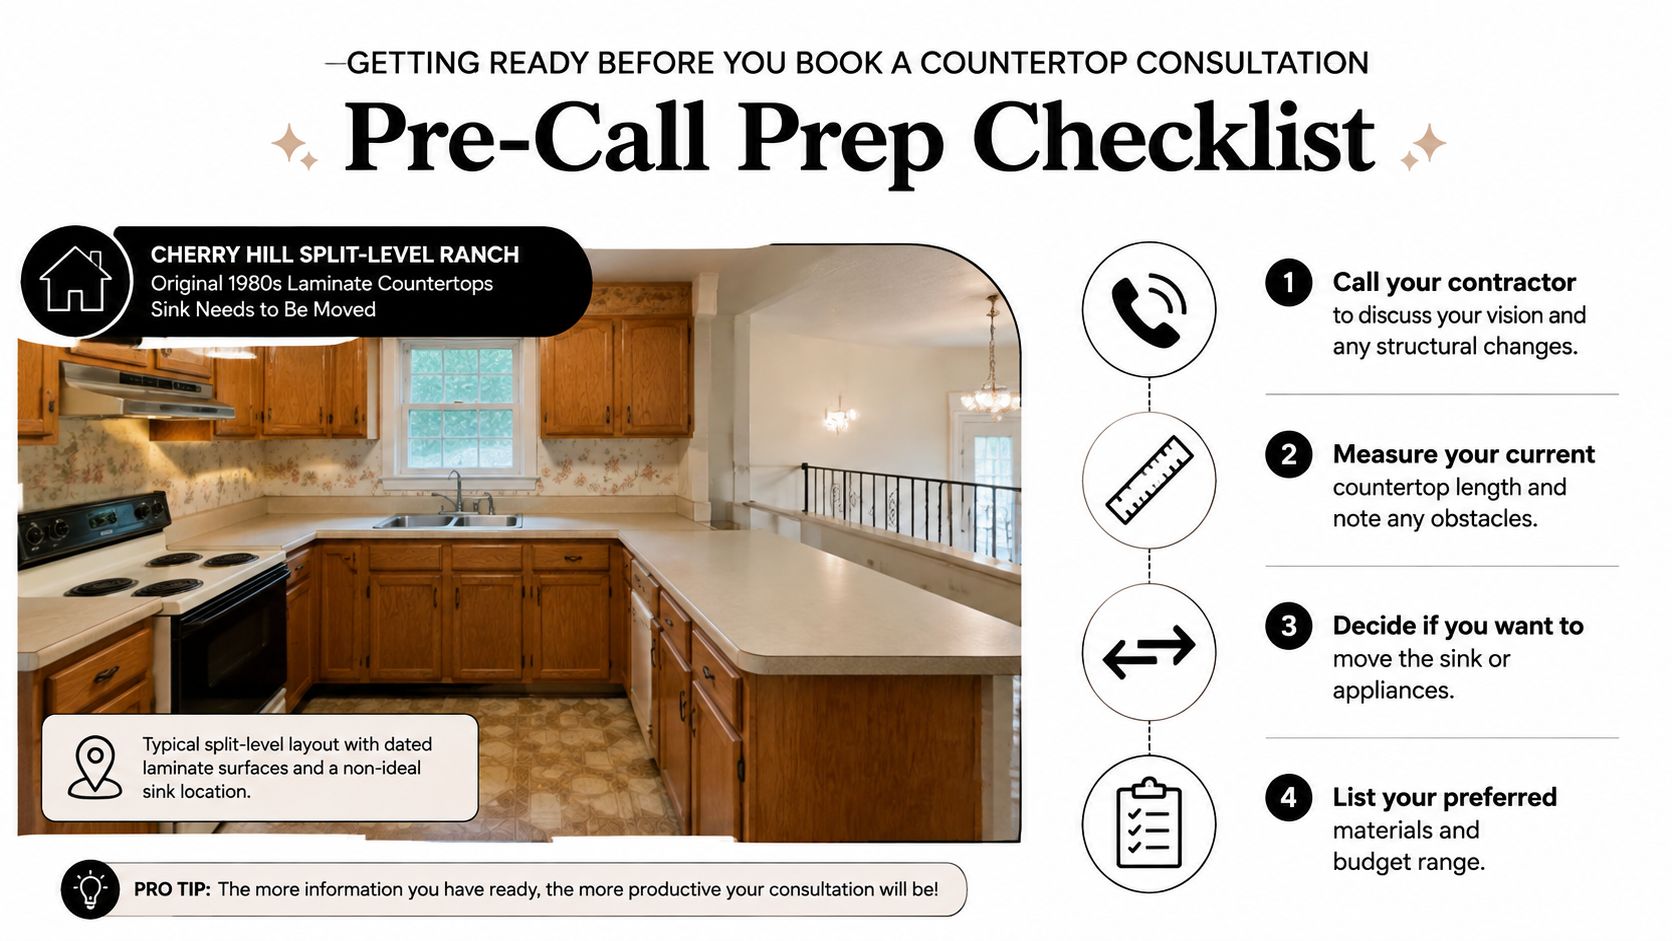
Practical rule: Lock sink type, faucet placement, cooktop specifications, cabinet scope, and backsplash sequence before final templating. Changing one of those items afterward can mean a revised template, a new fabrication plan, or a return visit.
If you want a guided starting point, schedule a free in-home kitchen design consultation and bring the information above. Before the first visit, confirm that the contractor will review:
- Current countertop and cabinet condition.
- Sink, faucet, and appliance documentation.
- Plumbing and electrical changes.
- Backsplash and cabinet installation timing.
- Demolition access, parking, stairways, and floor protection.
- The desired material, edge, overhangs, and budget direction.
That preparation turns a vague “How much will this cost?” conversation into a useful project discussion.
Choosing the Right Countertop Material for Your Home
The material you choose depends on whether you sear steaks daily, chop vegetables on the surface, or keep the kitchen mostly for hosting. In South Jersey, the right decision also depends on cabinet strength, slab access, fabrication requirements, and how plumbing and backsplash work will be scheduled around installation. A mobile showroom can bring full-size samples to the home, where you can judge color beside cabinets, flooring, and daylight instead of relying on a small store sample.
| Material | Durability | Maintenance | Install Complexity | Best For |
|---|---|---|---|---|
| Quartz | Consistent and resistant to everyday staining, but heat still needs caution | Simple routine cleaning | Heavy pieces and planned seams require careful support | Busy family kitchens |
| Granite | Durable natural stone with varied strength and pattern | May require periodic sealing | Heavy slabs, natural variation, and seam layout need attention | Natural-stone lovers seeking practical performance |
| Marble | Handles baking work well, but can etch and scratch | Requires attentive cleaning and sealing | Veining and cutouts demand careful layout | Bakers who accept patina and maintenance |
| Quartzite | Hard natural stone with strong visual character | Usually needs sealing and stone-safe care | Dense, heavy slabs require experienced fabrication and handling | Homeowners wanting dramatic veining with more hardness than marble |
| Solid surface | Repairable and available in integrated designs | Low-maintenance and easy to clean | Flexible fabrication, with different seam and edge techniques from stone | Seam-conscious, practical designs |
| Butcher block | Warm and functional, but more vulnerable to moisture and cuts | Requires regular oiling and prompt cleanup | Straightforward compared with stone, but sink areas need careful protection | Warm island accents |
| Porcelain | Resists many stains and offers a slim modern look | Low-maintenance with appropriate cleaners | Specialized tooling and careful transport are essential | Large-format, contemporary kitchens |
Quartz is my default recommendation for a busy household that wants a predictable appearance and simple care. It still needs protection from high heat, and large pieces require proper support during handling and installation. Granite suits homeowners who want natural variation with less maintenance than marble. Marble belongs in a baking-focused kitchen when you accept etching, scratches, and patina as part of its character.
Older South Jersey homes deserve extra scrutiny. Uneven walls, narrow stairways, additions, and cabinets that have settled can affect slab access, support, and seam placement. A beautiful material may become a poor choice if the fabricator cannot move it safely through the home or if the cabinet base needs reinforcement first.
Porcelain needs an honest review. Trend coverage identifies large-format porcelain slabs, warm neutrals, leathered or honed finishes, and thinner profiles as important design directions, while quartz still holds the largest market share, according to SlabWise's 2026 countertop trends guide. Porcelain can create fewer visual interruptions with large slabs and suit slim modern profiles, but its hardness and handling requirements leave little room for careless fabrication. Confirm the installer's experience before choosing it.
For a broader comparison of finishes, edges, and material categories, review this guide to types of countertops. Then narrow your options to two finalists before the consultation. Ask the contractor to check availability, slab layout, cabinet support, cutout requirements, and installation access for both. The best material is the one that fits your cooking habits and your actual project conditions, not the one that looks best under showroom lighting.
Measuring and Templating the Countertop Correctly
A rough measure answers a budgeting question. A final template answers a fabrication question. Confusing the two is one of the fastest ways to create an expensive problem.
The final digital template should happen after cabinets are installed, permanently anchored, leveled, and shimmed. A tape measure can't capture every bowed wall, out-of-square corner, filler variation, appliance reveal, or island overhang. The template becomes the cutting instruction for the fabrication shop, so it must reflect the kitchen as it exists.
What the templater verifies
A professional templating visit should include laser measurement and digital capture of the walls and cabinet runs. The technician should confirm the actual sink and cooktop models, mark faucet and accessory holes, verify overhang dimensions, record the selected edge profile, and review the proposed seam locations with you.
Cabinet tops should be checked for level. The plan notes call for confirming level within 1/8 inch over 10 feet, but that tolerance should be treated as a field verification target, not something to assume from appearance. Walls that lean or corners that aren't square should be documented because those conditions affect both countertop fit and backsplash installation.
Seam placement deserves a conversation, not a silent shop decision. Recognized installation guidance recommends placing seams where the slab has strong continuous support, ideally over a cabinet partition and away from high-stress locations such as cooktops and cutout corners. The supporting subtop must remain flat and continuous. Workmanship guidance also identifies seam widths around 1/16 inch, with color-matched two-part epoxy applied over solid support, as a practical standard for reducing visible movement and cracking. See the countertop installation workmanship guidance for the underlying installation principles.

A good templater will also explain what happens if the wall behind the counter is out of plumb. The countertop may fit the cabinets perfectly while leaving a variable backsplash gap that the tile installer must absorb. That isn't automatically a defect, but it should be identified before fabrication.
For homeowners comparing the full replacement sequence, this guide to how to replace kitchen countertops is a useful planning reference.
Treat the template date as the project start. Fabrication, delivery, demolition, plumbing coordination, and tile scheduling all depend on the verified field conditions. A contract date alone doesn't make the slab ready to cut.
Demolition Day and the Countertop Installation Workflow
A well-run installation day starts before anyone touches the old countertop. The crew should establish a protected route from the entry door to the kitchen, cover flooring, shield cabinet faces, protect appliances, and isolate nearby finished tile. In an older South Jersey home, that preparation matters because narrow halls, split-level stairs, uneven floors, and tight parking can turn carrying slabs into the most delicate part of the day.
The plumber or installer disconnects the sink and related plumbing according to the agreed scope. The crew then removes the old top carefully, preserving base cabinets wherever possible. If the laminate is fastened through the cabinet tops, the installer should remove those fasteners rather than pry aggressively against a cabinet box that may already be compromised.
The sequence that protects the finished result
After demolition, the crew checks that cabinets are level, secure, and adequately supported. Any damaged bases, loose anchors, or unsupported spans should be addressed before the new material arrives. Industry guidance emphasizes that support and joint layout need to be planned before fabrication, because a beautiful slab can't compensate for movement underneath it.
The new pieces are carried in, positioned, and dry-fitted. Installers check walls, corners, overhangs, appliance openings, sink placement, and seam alignment before applying adhesive. Seams should sit over solid support, and the joint is typically set with a color-matched two-part epoxy or an appropriate acrylic system, depending on the material.
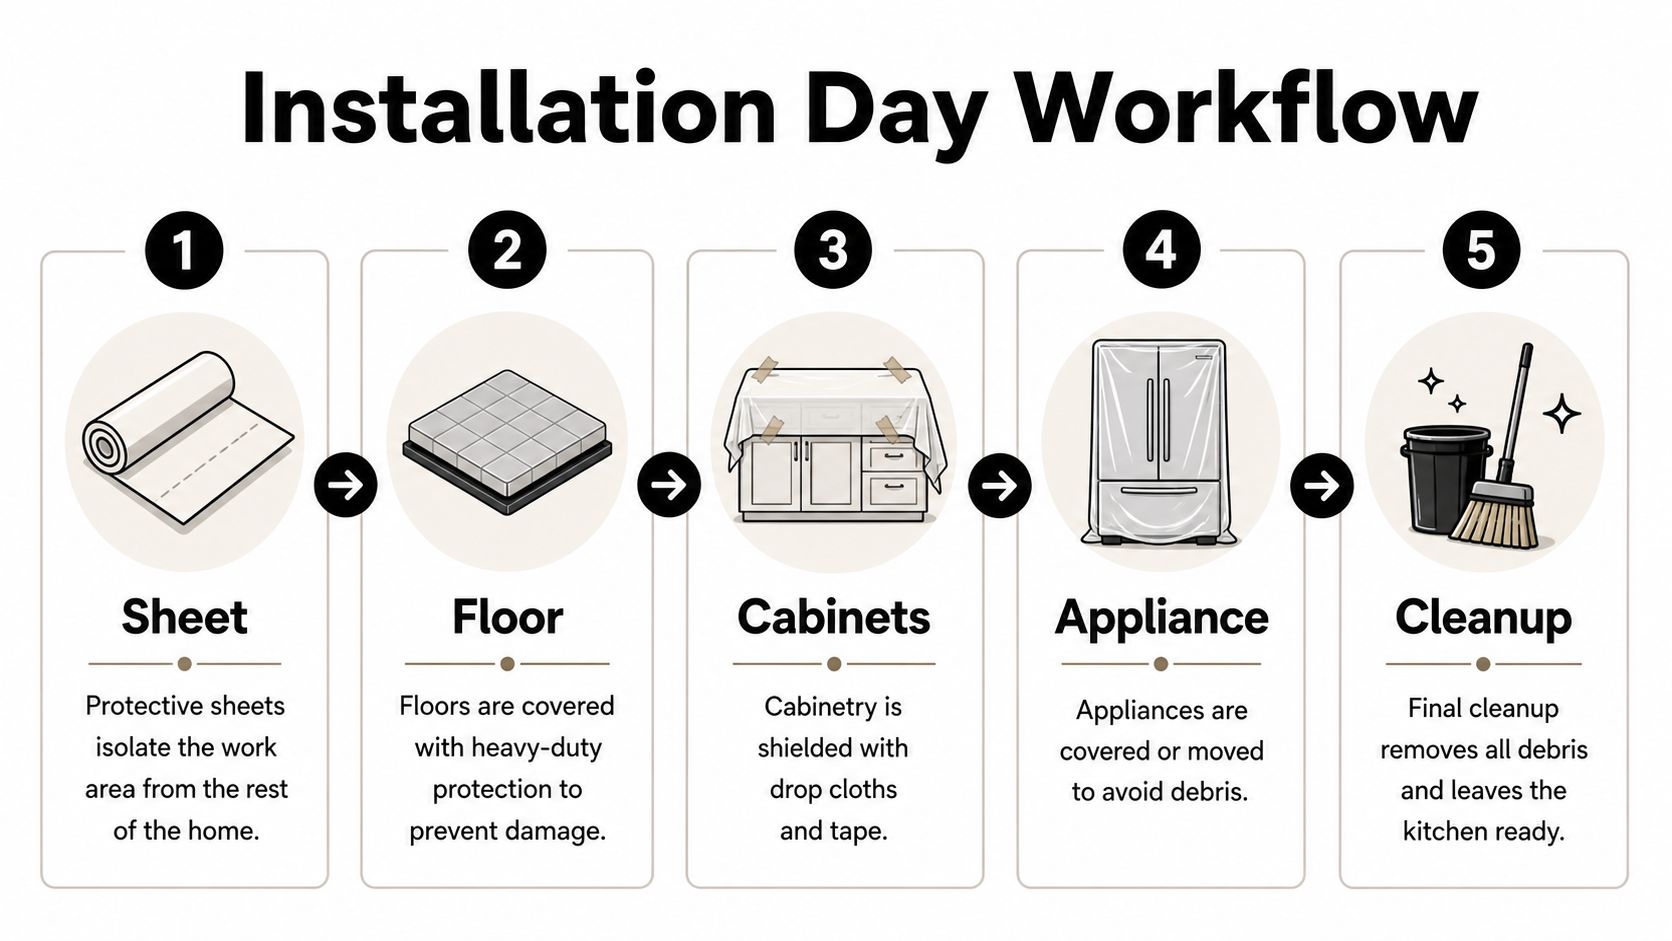
Sink and faucet cutouts follow the planned handling sequence. Some sinks are fabricated into the slab before delivery, while other openings are exposed or completed as part of the installation plan. The crew shouldn't improvise this around a fragile edge or attempt an unsafe field modification to save a few minutes.
Stone is generally set with adhesive and shims where needed. Laminate requires a different approach, including precise scribing against walls and secure fastening. Porcelain demands especially careful handling and suitable tooling. The installation method should match the surface, the cabinet structure, and the sink design.
Expect noise, vibration, dust, and temporary loss of sink access. Before final payment, walk the kitchen with the lead installer and inspect:
- Seams: Check alignment, color, smoothness, and visible separation.
- Support: Confirm overhangs and joints don't flex or rock.
- Cutouts: Verify the sink, faucet holes, cooktop, and accessories fit the approved specifications.
- Transitions: Review the wall edge and backsplash preparation.
- Cleanup: Confirm debris, adhesive residue, and protective materials have been removed.
Timeline and Cost Breakdown for a 2026 Countertop Project
A countertop project takes more than the hours spent inside the kitchen. The full schedule includes material selection, rough budgeting, cabinet preparation, field verification, fabrication, delivery, installation, plumbing, and backsplash coordination. A smooth project commonly spans several weeks because fabrication can't begin responsibly until cabinets and specifications are confirmed.
The broad planning range for many 2026 countertop projects is roughly $40 to $150 per square foot, based on the project guidance provided for this article. That range is not a quote. Premium stone, complex edges, decorative backsplashes, unusual layouts, waterfall ends, integrated sinks, and multi-piece islands can move the final price higher. Natural stone such as granite and marble generally carries a higher material cost than laminate, while quartz combines premium pricing with consistent patterns.
| Cost Driver | Typical Planning Range | Typical Effect on Schedule |
|---|---|---|
| Material selection | $40 to $150 per square foot for many projects | Availability and special ordering can affect fabrication start |
| Fabrication | Varies by material, cutouts, edges, and layout | Shop work begins after final template approval |
| Sink and cooktop cutouts | Priced as separate scope items in many estimates | Requires confirmed models before fabrication |
| Edge profile and waterfall work | Simple edges are easier than decorative or built-up details | More fabrication coordination and handling |
| Removal and disposal | Separate line item when existing tops must be removed | Adds protection, demolition, and cleanup time |
| Plumbing and appliance changes | Separate trade scope | Can delay final hookup when rough-ins aren't ready |
| Backsplash and tile transitions | Depends on tile, slab, and wall conditions | Requires sequencing with the countertop installation |
The largest avoidable expense is ordering the countertop before cabinet bases are permanent and level. If the cabinets move after templating, the fabricated pieces may no longer fit. Quality standards for concrete countertops illustrate why tolerances matter, including 1/16 inch flatness variation over 4 feet, a maximum seam width of 1/8 inch, and adjacent surfaces flush within 1/64 inch along a seam. Those figures come from the Concrete Countertop Institute's quality standards, and they show how small field errors can create visible defects.
For practical budgeting ideas that extend beyond the countertop line item, read this resource on kitchen remodeling expenditure advice. Then request an itemized estimate covering material, fabrication, square footage, edges, cutouts, delivery, installation, removal, and sales tax. Ask when the deposit and final balance are due, and ask how the contractor prices cabinet repairs or plumbing changes discovered after demolition.
The countertop market itself is substantial. One industry report estimates the global countertops market at USD 157.74 billion in 2025, with a projection of USD 267.38 billion by 2033 at a 6.8% CAGR, according to Grand View Research's countertops market report. A separate installation and repair estimate places that global segment at about USD 18 billion in 2023 and over USD 25 billion by 2028, reflecting roughly 6% annual growth. Those figures describe a global market, not your Cherry Hill quote, but they reinforce that installation is a specialized service rather than a minor add-on.
For a material-specific pricing reference, review countertop pricing by material.
Smart Questions to Ask Your Countertop Contractor
A dependable contractor should be able to explain the entire chain from cabinet verification to final plumbing hookup. A fabricator who only cuts slabs may still produce good work, but you need to know who owns the gaps between trades.
Ask these questions before signing:
- Who measures the kitchen? Confirm whether the person taking the initial measurements is different from the technician completing the final digital template.
- Who performs the final template? Ask whether the work happens in-house and what conditions must be complete before the visit.
- Who fabricates the slab? Request a clear explanation of the shop's role, equipment, material handling, and quality checks.
- Who installs the countertop? Identify the installation crew and confirm insurance and any licensing requirements that apply to the work.
- Who handles tear-out and disposal? Make sure removal, protection, and cleanup are included or separately priced.
- Who coordinates plumbing? Establish whether the countertop company reconnects the sink or whether your plumber returns after installation.
- Who owns corrections? If a sink opening, seam, or wall transition needs adjustment, identify the single responsible contact.
Get the scope in writing
Your proposal should separate material, fabrication, cutouts, edge treatment, delivery, installation, removal, tax, and any cabinet or plumbing work. It should also explain assumptions about access, cabinet condition, backsplash removal, and appliance handling.
Ask how the contractor handles uneven cabinets, old walls, damaged bases, delayed plumbing, material damage, and revised appliance specifications. A responsible contractor won't promise an exact fabrication date before final templating because the shop can't control conditions that haven't been verified.

Red flags: A large deposit without a clear cancellation policy, a lump-sum estimate with no scope, dismissal of cabinet leveling, or a guaranteed fabrication date before templating should make you pause.
Request proof of insurance, license information where applicable, recent local work, and references from Cherry Hill or nearby South Jersey communities. Ask to see how the contractor documents seam locations, support requirements, edge details, and the manufacturer's warranty.
A full-service cabinet and countertop partner should anticipate dependencies rather than wait for you to discover them. The Cabinet Coach is one South Jersey option that brings cabinetry, countertops, hardware, and tile selections to the home through a mobile showroom process, with design guidance and project coordination included in its service model.
Post-Installation Care and Your Next Steps
The first day isn't the end of the project. It's the point where the new surface needs protection while adhesive, seam materials, and silicone complete their cure. Keep heavy objects away from seams, don't place hot pans on a freshly installed surface, and follow the installer's written instructions before using the sink or loading the overhang.
If plumbing was staggered, wait for the plumber's confirmation before using the sink, dishwasher, garbage disposal, or filtration equipment. For homeowners dealing with disposal questions or a separate plumbing repair, a resource such as Stultz Plumbing San Antonio repairs can help explain why that equipment should be handled as plumbing scope rather than assumed countertop scope.
Match care to the material
Quartz generally needs routine cleaning with a pH-neutral product and a soft cloth. Avoid abrasive powders, aggressive scouring pads, and cleaners that the manufacturer doesn't approve. Quartz is practical, but it still deserves protection from direct high heat.
Granite and marble require stone-safe cleaning and periodic sealing according to the material, finish, and manufacturer's guidance. Marble is especially unforgiving of acidic spills and abrasive products because etching can change the surface even when the countertop is structurally sound.
Butcher block needs a different routine. Keep water from sitting around sink edges, wipe spills promptly, and maintain the surface with the appropriate food-safe oil or conditioner. Use this guide to butcher block countertop care for the maintenance details that stone-care instructions won't cover.
Keep a project file containing:
- Fabrication warranty: What the shop covers and for how long.
- Installer workmanship terms: How seam, support, cutout, and installation concerns are handled.
- Material warranty: The manufacturer's care requirements and exclusions.
- Approved care products: Cleaner, sealer, oil, and heat guidance.
- Final documentation: Invoice, slab or material information, seam locations, photos, and contact details.
The remaining trade sequence should be deliberate. Plumbing reconnects after the sink is secured. Electrical trim follows appliance and outlet access checks. Tile backsplash work comes after the countertop edge and wall transition are confirmed. Cabinet touch-ups should happen after installation, when the crew can see any exposed shims, filler gaps, or minor marks.
A guided mobile-showroom handoff should finish with a final walkthrough, a care sheet, a seam-location diagram, confirmation of sink and faucet fit, and one point of contact responsible for coordinating any adjustment. That last item matters most. Homeowners shouldn't have to decide whether a problem belongs to the fabricator, installer, cabinet contractor, or plumber.
The Cabinet Coach brings countertop, cabinetry, hardware, and tile selections to South Jersey homes through a mobile showroom and coordinates the design decisions that affect template, fabrication, and installation. Visit The Cabinet Coach to schedule a consultation and start your countertop project with a clear scope, coordinated trades, and a plan built around your kitchen.