
You're probably standing in a kitchen that finally looks finished, right up until you notice the cabinet doors and drawer fronts are still blank. The paint is clean. The counters are in. The lighting is working in your favor. Then the hardware comes out of the box, and suddenly the last step feels like the riskiest one.
That hesitation is normal. Drilling into a brand-new cabinet door is permanent. A hole that's off by even a little can throw off the whole run, especially on a wall of uppers or a clean bank of drawers. Hardware is the detail people touch every day, but it's also the detail they see from across the room. It has to work in your hand and make sense visually.
In practice, good placement isn't about memorizing one generic rule and applying it everywhere. Door style matters. Drawer size matters. Appliance panels change the conversation. Accessibility matters more than most homeowners realize until they start living in the space. That's why a solid cabinet hardware placement guide has to do more than say “center it” and move on.
The job gets easier once you treat placement like a system instead of a guess. Use repeatable measurements. Respect the construction of the door. Choose one logic for the whole kitchen and stick with it. That's how installers avoid the patchwork look that makes even expensive cabinetry feel unfinished.
Table of Contents
- The Final Touch That Defines Your Kitchen
- Foundations of Flawless Hardware Placement
- Placing Hardware on Different Cabinet Door Styles
- Mastering Drawer Hardware Placement
- Advanced Considerations and Avoiding Common Mistakes
- Bring Your South Jersey Kitchen Vision to Life
The Final Touch That Defines Your Kitchen
Hardware is often called the jewelry of the kitchen, but that comparison only goes so far. Jewelry can be changed in a minute. Cabinet hardware leaves holes behind. That's why this final step deserves the same care as your cabinet layout or countertop selection.
The biggest mistake DIY installers make isn't choosing the wrong knob or pull. It's assuming every door and drawer should be treated the same way. A Shaker door asks for one approach. A slab front asks for another. A deep lower drawer that you mostly view from above doesn't read the same way as an upper drawer at eye level.
Practical rule: Consistency across the full kitchen matters more than chasing a different “perfect” placement for every single front.
A kitchen looks polished when the hardware follows a clear visual rhythm. The eye notices alignment before it notices finish color or shape. If one pull sits a little high on a drawer stack, or one knob drifts on a run of uppers, people may not name the problem, but they'll feel it.
That's also why experienced installers dry-fit the plan before they drill. They mark every location, step back, open adjacent doors, check appliance clearances, and only then commit. It's a slower start, but it prevents the kind of correction work nobody wants to do on painted or stained cabinetry.
The difference between passable and professional
Professional-looking installation comes from a few habits:
- Choose one hardware language: If the kitchen uses knobs on doors and pulls on drawers, keep that logic throughout unless there's a clear functional reason to break it.
- Respect cabinet construction: Put hardware where the door style wants it, not where a random online image happened to place it.
- Test before drilling: Painter's tape mockups and templates catch problems while they're still easy to fix.
A beautiful kitchen can still feel awkward if the hardware lands in the wrong spot under your hand.
That's where homeowners usually gain confidence. Once the rules make sense, the process stops feeling risky and starts feeling methodical.
Foundations of Flawless Hardware Placement
A clean install starts before the first pilot hole. The cabinets need a placement system that fits the size of each front, the way the door is built, and how your hand will use it every day.

Start with proportion, then adjust for use
The 1/3 rule is a good starting point for drawer pulls. DK Hardware's cabinet hardware placement sizing guide recommends choosing a pull around one-third the width of the drawer front, with many pulls also looking balanced within the one-third to two-thirds range. On a 24-inch drawer, that usually puts you in the neighborhood of an 8-inch pull.
That rule works because it solves two common problems at once. Small pulls on wide drawers look skimpy and feel harder to grab. Oversized pulls can dominate narrow fronts, especially in kitchens with a lot of upper cabinetry or detailed door styles.
Use the rule as a baseline, not as a law.
In my own layouts, I adjust from there based on cabinet style and function. A sleek slab kitchen can carry longer pulls without looking crowded. A Shaker kitchen, an inset kitchen, or a run with appliance panels usually needs more restraint so the hardware supports the door design instead of fighting it. If the kitchen is being planned for aging in place or easier one-handed use, a slightly longer pull often makes sense even when a shorter one would look fine on paper.
DK Hardware also shows a common placement zone of 2.5 to 4 inches from the bottom edge on many doors and drawer fronts. That gives you a practical starting range, but the exact location still needs to respect the cabinet construction. On some drawers, a one-third-up placement can feel better in use and look more settled.
Use tools that remove guesswork
Good hardware placement is repetitive work. The right tools keep that repetition accurate.
A practical install kit includes:
- Combination square: Sets the same offset from the edge every time.
- Painter's tape: Makes layout marks easier to see and helps protect finished surfaces.
- Cabinet hardware jig: Keeps hole placement mirrored and speeds up multi-door runs.
- Sharp pencil or marking knife: Cleaner marks produce cleaner drilling.
- Brad-point bit: Starts accurately and chips less on painted or stained faces.
Homeowners sorting through the bigger cabinetry decisions often benefit from this Melbourne homeowners' guide to cabinetry, especially if the project includes bath storage, finish coordination, or custom-style planning beyond the kitchen.
If you are still comparing shapes, finishes, and pull styles, review how to choose cabinet hardware before you drill. It is much easier to change direction at the selection stage than after you have opened up a row of painted fronts.
Understand the measurements that actually matter
The number that controls installation is the center-to-center measurement. That is the distance between the centers of the two screw holes, not the full length of the pull.
Homeowners mix this up all the time because product photos emphasize overall length. Installers care about three separate measurements, and each one affects a different decision:
| Term | What it means | Why it matters |
|---|---|---|
| Overall length | End-to-end size of the pull | Affects visual scale |
| Center-to-center | Hole spacing from screw center to screw center | Determines drilling location |
| Projection | How far the pull stands off the cabinet face | Affects comfort and clearance |
Center-to-center controls your template. Overall length controls how the pull looks on the drawer. Projection controls whether your fingers fit comfortably behind it and whether the pull will clear nearby trim, appliance handles, or tight corners.
That last point gets missed in modern kitchens. Appliance panels, paneled refrigerators, and tight aisle clearances can all turn a good-looking pull into an annoying one if the projection is too deep or the placement is too close to an adjacent handle. Universal design matters here too. Hardware should be easy to grasp without pinching, twisting, or reaching for a tiny target. If the kitchen needs to serve kids, older adults, or anyone with limited hand strength, this is the stage to build that in.
Placing Hardware on Different Cabinet Door Styles
A Shaker door, a slab door, and an inset door should not all get the same handle location. That shortcut is why so many first-time installations look slightly off, even when the holes are drilled cleanly.

Shaker doors need frame-aware placement
Shaker doors have built-in reference lines. Use them.
On a typical Shaker door, the knob or the lower end of a vertical pull usually belongs on the stile, close to the rail intersection, not centered on the full door slab. That keeps the hardware tied to the frame instead of floating over the recessed panel. In the field, this is the mistake I see most often on DIY installs. The pull is technically straight, but it ignores the door geometry, so the whole cabinet run feels less disciplined.
A practical rule is to treat the stile as your placement zone and let the rail establish the height. On upper cabinets, that usually means the hardware sits in the lower corner area of the door frame. On base cabinets, it shifts to the upper corner area. The exact spot can move slightly depending on rail width, bevel detail, and pull size.
Use these checks before you drill:
- Knobs: Place them on the stile where the rail and stile create a natural visual anchor.
- Vertical pulls: Start with the lower screw or pull end aligned to that same framed area, then confirm the full pull length does not run awkwardly into the panel.
- Pairs of doors: Mark both doors at the same time so the hardware mirrors cleanly across the opening.
If you are still identifying your door style, this guide to types of kitchen cupboard doors will help you match the front profile to the right placement method.
Slab doors reward consistency
Slab doors give you fewer visual cues, so consistency matters more. A repeated offset from the side and from the top or bottom edge usually looks best.
For modern slab cabinetry, I recommend choosing one offset and repeating it across the whole run unless a specific condition forces a change. Appliance panels are the usual exception. A tall refrigerator panel, dishwasher panel, or pull-out pantry can need a different location for balance and reach, especially if the handle needs to align with nearby appliance hardware.
Small errors show fast on slab fronts. There is no frame detail to hide a crooked pull or a drifting height line.
Keep these trade-offs in mind:
- Long pulls show layout errors immediately: Even a slight tilt is visible on a flat door.
- Very small knobs can be harder to grip: Clean-looking hardware still needs enough purchase for wet hands, arthritis, or limited grip strength.
- Appliance panels need function first: A pull that looks centered but feels awkward every day is the wrong placement.
For accessible kitchens, slab doors often work well with longer pulls because they are easier to grasp from different hand positions. That matters in family kitchens and aging-in-place remodels.
Inset and full-overlay doors need clearance planning
Inset and full-overlay cabinets can both look polished, but they behave differently once hardware goes on.
Inset doors have narrow, visible reveals around the perimeter. Hardware that sits too close to the edge can crowd that reveal and make the door look busy. Move it too far inward, and the hand position starts to feel less natural, especially on a narrow door. I usually dry-fit inset hardware with painter's tape first, then open the door fully and check sightlines from across the room. That extra five minutes prevents a lot of regret.
Full-overlay doors give you more face area, but they also tighten the visual spacing between adjacent doors and drawers. On a wide run, handles that are individually centered by eye can still look uneven once everything is installed. The fix is to check alignment across the entire bank, not one opening at a time.
A simple pre-drill check keeps these styles under control:
| Door type | Watch for | Best habit |
|---|---|---|
| Inset | Tight reveals, latch-side comfort, and swing clearance | Tape hardware in place and test the door open |
| Full-overlay | Crowding between neighboring fronts | Check alignment across the whole cabinet run |
| Double doors | Poor mirroring from left to right | Mark both doors before drilling either one |
Raised-panel doors add one more wrinkle. The profile can be more decorative, so hardware should sit where it respects the frame and does not compete with the panel shape. If the profile is ornate, a simple knob often looks cleaner than an oversized pull.
Good placement should look intentional from six feet away and feel natural in your hand up close. That balance is what separates a hardware install that looks homeowner-done from one that looks like it came out of a cabinet shop.
Mastering Drawer Hardware Placement
You can get every door perfect and still have the kitchen look off once the drawer pulls go on. Drawer hardware is where small measuring errors become visible fast, especially on a three-drawer stack or a wide run under the cooktop.

Small drawers and wide drawers follow different logic
A shallow top drawer and a 36-inch pot drawer should not be treated like the same problem. One piece of hardware may be right on one and undersized on the other.
For narrow utility drawers, a single centered knob or pull usually looks clean and works well. Mid-width drawers can still carry one pull if the hardware has enough presence. Once a drawer gets wide, two pulls often solve both problems at once. The drawer feels easier to open from either side, and the front looks properly scaled instead of bare in the middle.
That trade-off matters in real kitchens. A single long pull can work on a wide slab drawer in a modern design, but on many Shaker kitchens it starts to dominate the front. Two smaller pulls usually fit the style better. On inset cabinetry, I am even more careful about this because the drawer front has a more precise look and oversized hardware can make the proportions feel heavy.
A practical rule set looks like this:
- Narrow drawers: One centered knob or pull
- Medium drawers: One pull, sized to suit the drawer width and style
- Wide drawers: Two pulls or two knobs, mirrored from the centerline
- Extra-wide appliance-style drawers: Confirm the weight and use pattern before deciding between one long pull and two smaller ones
If you are already upgrading drawer boxes, it helps to understand what dovetail drawers are because good drawer construction and good hardware placement usually show up together in a finished kitchen.
Lower drawers should be set for real viewing angles
Dead-center is not always the best answer on a lower drawer. A pull that is mathematically centered can look slightly low once you are standing over it, which is how lower cabinets are seen and used.
On deep base drawers, trash pull-outs, and sink-base false fronts with matching hardware nearby, I often place the pull a touch above true center. The amount is small, but the visual correction is real. You want the hardware to look centered from standing height and feel easy to catch without bending your wrist awkwardly.
That becomes even more important in kitchens designed with accessibility in mind. A slightly higher pull on a lower drawer can be easier for a shorter homeowner, an older adult, or anyone who does not want to crouch to get a solid grip. Good placement should serve the user first, then the photo.
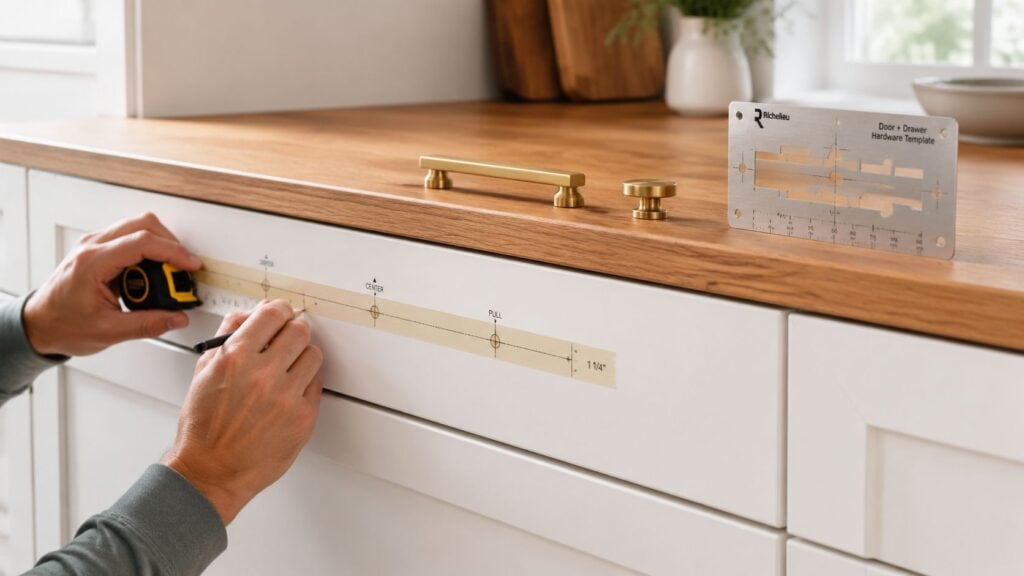
Here's a visual walkthrough of installation logic in action:
Lower-drawer placement should be judged from standing height, not only from a tape measure.
Keep a drawer bank reading as one composition
A drawer stack has to work as a group. If each front is measured in isolation, the pulls may be technically centered but still look jumpy across the bank.
Use a full-layout approach before drilling:
- Mark the vertical and horizontal centerline on every drawer front first. This keeps the whole stack working from one reference system.
- Tape the hardware in place and step back. Check it from normal walking distance, not with your face a foot from the cabinet.
- Compare equal conditions. If the top two drawers get one pull each, the next cabinet over should follow the same logic unless there is a style or function reason to change it.
- Test hand position on working drawers. Pot drawers, recycling pull-outs, and microwave base drawers all ask for slightly different grip behavior.
- Check appliances and panel reveals nearby. A drawer pull that looks fine on paper can feel crowded next to a paneled dishwasher or refrigerator column.
Homeowners usually get into trouble here by drilling one drawer, liking it, and repeating that measurement on the rest. That shortcut causes visual drift. I mark the whole run, tape the full set, and only drill once the bank reads cleanly from end to end.
Advanced Considerations and Avoiding Common Mistakes
The usual advice on cabinet hardware assumes a standard kitchen, standard users, and standard cabinet fronts. Real kitchens aren't that tidy. Height differences, mobility needs, appliance panels, and unusual door configurations all force better decisions.
Accessibility changes what good placement means
A kitchen can look beautiful and still be tiring to use. Hardware placement affects grip, reach, and the amount of wrist rotation needed to open a door or drawer. That's why universal design pushes you to think beyond appearance.
In accessible kitchens, pulls often outperform small knobs because they're easier to catch with more than one grip style. Someone carrying a pot, someone with limited dexterity, and a child reaching for a snack all interact with hardware differently. A forgiving pull shape helps all of them.
A few universal-design habits improve usability fast:
- Favor pulls over tiny knobs: They're easier to grasp with a closed hand, fingertips, or the side of the hand.
- Avoid aggressive edges: Sharp, square hardware may suit the photo shoot but can feel punishing in daily use.
- Test from actual user positions: If a homeowner is shorter, taller, or uses mobility support, placement should reflect that reality.
The key trade-off is simple. Hardware that looks delicate often asks more from the user. Hardware that's easier to use usually needs a little more visual presence. In most kitchens, function should win.
Appliance panels are not standard cabinet doors
Many guides fail to address specific needs. Panel-ready refrigerators, dishwashers, freezer columns, and appliance garages don't behave like ordinary cabinet doors. They're heavier, the opening force is different, and the wrong pull can feel inadequate even if it looks fine.
Current guidance in the design space also hasn't kept up well with this category. Existing placement guides fail to address appliance-integrated cabinetry requiring oversized, heavy-duty pulls, even as home design platform data cited by Room for Tuesday shows a 35% increase in appliance-ready kitchen renovations in 2024 to 2025, as noted in Room for Tuesday's cabinetry hardware placement guide.
That trend creates confusion because homeowners assume the same rules apply everywhere. They don't.
For appliance panels:
- Use hardware scaled to the load: A panel-ready refrigerator needs a pull that feels substantial in the hand.
- Think about opening force first: If the panel fights back, decorative logic alone won't save the experience.
- Check neighboring clearances carefully: Appliance pulls often project more and can collide with nearby drawers or handles.
Heavy appliance panels expose weak hardware decisions immediately. If the pull feels undersized on day one, it won't grow into the job later.
If you want help with the mechanics of templates, bit choice, and clean drilling technique, how to install cabinet hardware is a practical companion to the placement decisions here.
Mistakes that show up fast and how to prevent them
Some errors are obvious the minute the screws go in. Others only appear once the whole kitchen is assembled. Both are avoidable.
Here's a quick trouble table:
| Mistake | What goes wrong | Better move |
|---|---|---|
| Freehanding each door | Small differences become visible across the run | Use one jig or one template for all like-sized fronts |
| Ignoring door style | Hardware fights the door's visual lines | Place from the stile or panel structure, not the full rectangle |
| Choosing by looks alone | Pull feels too small, too sharp, or awkward | Test grip comfort before finalizing |
| Skipping mockups | Placement looks different once all cabinets are installed | Tape hardware in place and review at room distance |
| Forgetting clearances | Doors, drawers, or appliances bump into neighboring hardware | Open everything before drilling |
One more caution matters. A “mostly right” installation can be harder to live with than one obvious mistake, because you notice it every day and can't stop seeing it. Slowing down before drilling is still the cheapest fix in the entire process.
Bring Your South Jersey Kitchen Vision to Life
The best cabinet hardware placement guide leaves you with a method, not just a list of measurements. Respect proportion. Match the hardware location to the door style. Treat drawers according to size and viewing angle. Check appliance panels separately. Make every decision in the context of the whole kitchen, not one cabinet at a time.
The details that make the room feel finished
When homeowners get this right, the kitchen feels settled. Nothing looks accidental. The pulls line up, the knobs sit where your hand expects them, and the cabinetry reads as one complete design.
For wall cabinets, historical guidance places knobs 2 to 3 inches from the lower corner of the door panel, a standard that has persisted and remains relevant in markets like South Jersey, according to Emtek's discussion of cabinet hardware measurements. That kind of measured consistency is what keeps a kitchen from feeling improvised.
This is also where local conditions matter. Homes in Cherry Hill, Voorhees, Haddonfield, and surrounding Camden and Burlington County communities often mix older footprints with updated finishes. In those kitchens, hardware has to bridge style and function carefully. It should suit the cabinetry, but it also has to respect tight clearances, family use, and the way people move through the room.

When expert help saves the most time
Some homeowners enjoy the install and just want a reliable plan. Others would rather avoid templates, test fits, and the stress of drilling into finished doors. Both approaches are reasonable.
If you're still weighing layout details, finish pairings, or full-room selections beyond hardware alone, a kitchen design consultation can simplify the process before a single hole is drilled. That's often the difference between a kitchen that's merely updated and one that feels fully resolved.
Good hardware placement is a small detail with outsized consequences. It affects the look, the comfort, and the confidence of the whole room. Done right, it disappears into the experience of using the kitchen. That's exactly what you want.
If you'd rather have expert guidance from the start, The Cabinet Coach brings a mobile showroom experience directly to South Jersey homeowners, with personalized help selecting cabinetry, countertops, hardware, and finishes that work together. For projects in Cherry Hill, Voorhees, Haddonfield, and throughout Camden and Burlington counties, their team can help you avoid costly placement mistakes and create a kitchen that feels polished from every angle.