
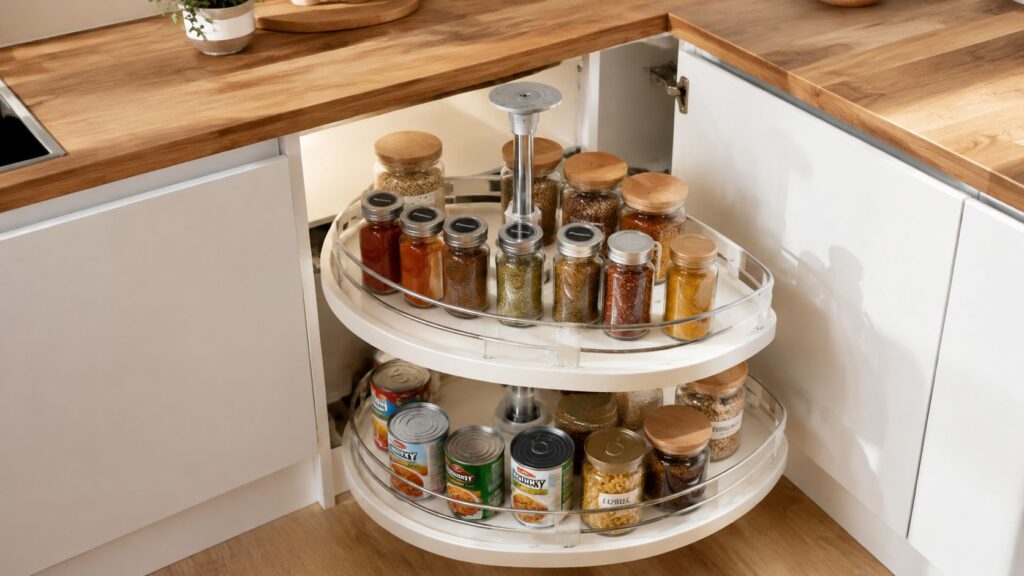
You reach into the back of a deep corner cabinet, push a stack of food containers forward, and watch the front row topple into the aisle. The cabinet technically has storage, but the usable portion ends where your arm stops. That's the problem lazy susan cabinet hardware is meant to solve.
A rotating shelf can bring corner contents forward instead of forcing you to unload the cabinet first. But the hardware only works well when the tray shape, bearing system, door swing, cabinet framing, and expected load all match the actual box. A shelf that's a little too large can scrape every turn, while an undersized or lightly built system may wobble once it carries cookware or canned goods.
The modern lazy Susan also has a longer history than its cabinet application. A related revolving storage concept appears in China in 1298, and Wang Zhen documented the system in 1313. The first confirmed printed use of the phrase “lazy Susan” appeared in the Boston Journal in 1903, and the term entered Webster's Dictionary in 1933, according to this history of the lazy Susan.
Table of Contents
- What Lazy Susan Cabinet Hardware Does
- Types of Lazy Susan Hardware for Kitchen Corners
- Materials, Finishes, and Bearing Systems Compared
- Sizing and Measuring for a Smooth Fit
- Installation Overview and Common Pitfalls
- Maintenance, Troubleshooting, and Retrofit Decisions
- When to Bring in a South Jersey Cabinet Pro
What Lazy Susan Cabinet Hardware Does
A homeowner may call the entire rotating shelf a lazy Susan. In cabinet work, lazy susan cabinet hardware refers to the mechanical kit that lets a shelf or tray turn. A complete installation can include one or more trays, a center post, pivot pins, mounting brackets, and a bearing hub or plate.
The tray is the storage surface you load. A full-round tray creates a continuous circle. A pie-cut tray uses two curved shelves that meet near the door. Half-moon and kidney-shaped trays can pull forward before rotating, which helps in a blind-corner cabinet where a fixed circular shelf cannot clear the opening.
The rotating parts and the fixed cabinet
The mounting hardware remains attached to the cabinet while the trays turn around it. Depending on the kit, top and bottom pivot pins, a center post, or separate bearing plates on the cabinet floor and upper shelf guide that movement. The bearing supports the vertical load and reduces the force required to turn the shelf.
That distinction controls the retrofit decision. Lazy Susan hardware isn't the cabinet box, so it cannot correct a warped, out-of-square, or undersized cabinet. A nominal cabinet dimension does not reveal the opening, interior depth, face-frame obstruction, hinge sweep, or side clearance available to the tray. Those measurements determine whether the shelf can rotate without binding.
Practical rule: Measure the opening, interior depth, hinge sweep, and side clearance before choosing the rotating mechanism.
Load matters as much as clearance. A tray carrying cookware or canned goods puts more strain on the post, bearing, and mounting points than one holding lightweight pantry items. If the corner opening is narrow, the cabinet is badly obstructed, or the required tray would leave little clearance, a pull-out or blind-corner system may provide better access than a rotating shelf. It can bring storage forward without asking a large tray to turn inside a tight box.
Corner base cabinets are the common application, but rotating organizers also fit some wall-corner and tall pantry layouts. Base cabinets typically hold heavier items. Wall cabinets offer less vertical room and usually need a lighter arrangement, while tall pantry installations require attention to full-height structure, shelf spacing, and door movement.
For practical guidance before loading a finished installation, see organizing deep kitchen cabinets. For broader storage ideas, Gates Home Furnishings casual collections show how rotating access can support everyday use beyond kitchen corners.
Types of Lazy Susan Hardware for Kitchen Corners
The right type starts with the cabinet's shape, not with the product photo. Stand in front of the cabinet and identify whether the door opens directly over the corner, whether the cabinet has a diagonal front, and whether the interior is blocked by a face frame. Those details determine whether the shelves need to rotate in place, pull forward, or clear the opening before turning.
Single and double shelf arrangements
A single-shelf kit has one rotating tray. It's the least complicated retrofit and can work well when the cabinet holds large items that need vertical room, such as a stockpot or a tall appliance. A double-shelf kit places independent trays on a central support, giving you more usable storage without changing the cabinet footprint. The trade-off is reduced vertical clearance and more careful load distribution.
Pie-cut trays are common in framed base corner cabinets. Their straight edges meet near the door area, allowing the shelves to rotate around the face frame rather than crash into it. A full-circle tray provides continuous access around the center and can rotate a full turn, but it needs the right cabinet geometry and enough clearance around its outer edge.
A pie-cut design gives up the slice near the door swing. A full-round design gives up the corner radius while preserving a continuous circular platform. Neither is automatically superior. The better choice is the one that clears the door and brings the items you use forward.
Cabinet location changes the specification
A diagonal corner-base cabinet often accepts a full-round or pie-cut arrangement depending on the interior shape. A wall-corner cabinet may use a smaller, lighter tray because the cabinet depth and shelf height differ from a base unit. Tall pantry corners can use rotating inserts, but the post, shelves, and door alignment need to be checked across the entire height.
Specialty options include half-moon blind-corner retrofits, kidney-shaped pull-and-spin organizers, and polymer “magic corner” carriers. These systems first slide out on rails, then rotate or pivot into view. They can outperform a fixed spinning shelf when the cabinet opening is narrow or the usable corner sits far behind the door.
For additional ideas about arranging difficult kitchen storage, Boston moving company storage tips can help you think through item frequency and cabinet accessibility before selecting a mechanism.
| Type | Best Cabinet Fit | Key Trade-Off |
|---|---|---|
| Single shelf | Base or wall corner with large vertical items | Simple retrofit, but less organized capacity |
| Double shelf | Base corner with smaller items | More storage levels, less space between trays |
| Pie-cut | Framed diagonal or corner-base cabinet | Clears the door area, but loses the inner pie-slice |
| Full-round | Frameless or suitable wall-corner cabinet | Continuous rotation, but needs generous perimeter clearance |
| Half-moon pull-out | Blind corner with a restricted opening | Brings contents forward, with more rails and moving parts |
| Magic corner carrier | Deep blind corner requiring staged access | Excellent reach, but higher complexity and cost |
Materials, Finishes, and Bearing Systems Compared
Tray material affects more than appearance. It changes shelf weight, screw-holding strength, moisture tolerance, and how confidently the organizer carries a full load. A lightweight laminate-on-MDF tray is often adequate for ordinary pantry storage, while plywood becomes the safer specification for heavier cookware or frequent use.
Laminate-on-MDF is common because it's economical, clean-looking, and relatively light. Birch or maple plywood is heavier, resists moisture better, and gives mounting screws a stronger substrate. Polymer trays are easy to wipe clean and appear frequently in European-style kits. Chrome wire trays ventilate well and keep the assembly light, but they aren't the first choice when the shelf must carry dense items.
Bearing systems set the feel
A friction-pivot pin is inexpensive and can suit a lightly loaded shelf. Under repeated heavy use, however, it tends to develop more resistance and wear than a properly sized ball-bearing system. A captive-ball bearing race produces a smoother turn and distributes the load around the rotating assembly.
Independent top and bottom bearing plates connected by a center post provide the most control for demanding cabinet installations. They also make leveling easier because the installer can correct the support at both ends of the post instead of asking one small pivot to control the entire shelf assembly.
Load planning should include the tray itself and everything placed on it. A fully loaded double-shelf unit carrying canned goods can exceed 40 pounds, so a plywood tray paired with ball-bearing hardware is more appropriate than a friction pivot for that use.
| Component | Common Options | Best Match For |
|---|---|---|
| Tray surface | Laminate-on-MDF, plywood, polymer, chrome wire | Match weight, moisture exposure, and cleaning needs |
| Rotation point | Friction pivot, captive-ball race | Light storage versus smoother frequent use |
| Support structure | Center post, top and bottom bearing plates | Standard organization versus heavier loads |
| Finish | White, almond, maple, chrome, oil-rubbed bronze, satin nickel, matte black | Coordinating with cabinet interiors and visible hardware |
| Tray edge | Solid rim, molded lip, wire perimeter | Containing loose items and simplifying cleaning |
South Jersey showrooms commonly stock neutral finishes such as white, almond, maple, and chrome. Oil-rubbed bronze, satin nickel, and matte black may require a special order, particularly when the finish must match decorative knobs or pulls. For a broader look at coordinating details, use this guide on how to choose cabinet hardware.
Sizing and Measuring for a Smooth Fit
A lazy Susan should spin with the cabinet doors open and closed without scraping the face frame, hinges, adjacent cabinet, or appliance. Measure the actual cabinet, not the label on the plan or the nominal width printed on a product listing.
Start with the usable opening width. Measure between the surfaces that can interfere with the tray, leaving out door frames, applied molding, and other obstructions. Then measure cabinet depth from the back wall to the front edge of the carcase. In a standard 36-inch base corner cabinet, a shelf radius often falls in the 15- to 18-inch range, but that's only a starting point. Confirm the interior before ordering, as frame thickness and corner construction can reduce the available footprint.
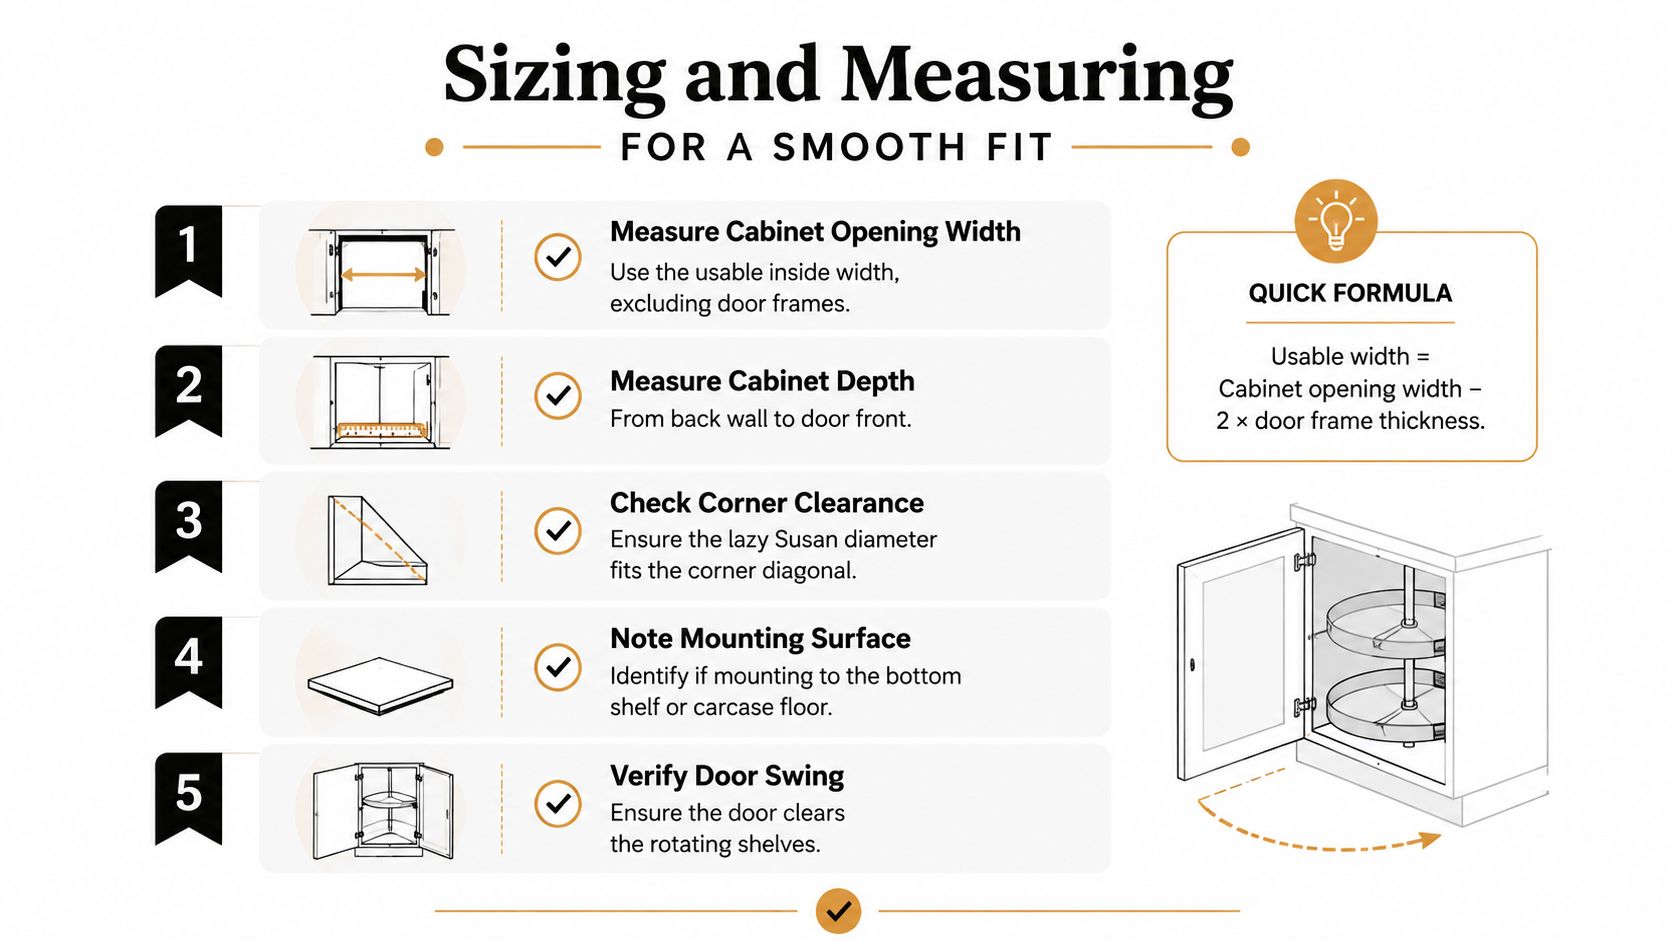
Record the measurements that control fit
- Opening width: Measure the clear space inside the cabinet, excluding door frames and molding.
- Interior depth: Measure from the rear wall to the front edge of the cabinet box.
- Hinge clearance: Identify where the hinge sits and measure from the side wall to that hardware. A tray that clears the cabinet wall may still strike the hinge.
- Shelf height: Allow room for the tallest item you plan to store, with a half-inch of breathing room above it.
- Side clearance: Check the full rotation path beside a dishwasher, island, wall, or adjacent cabinet.
Independent hardware guidance recommends at least 3/4 inch of side clearance between a full-round shelf and nearby cabinet surfaces. That space accounts for door hardware, face-frame tolerances, and finish build-up, all of which can turn a close fit into a shelf that drags or binds. The kitchen cabinet measuring guide provides a useful reference before you shop.
Write the measurements on paper and sketch the door swing. A quick drawing often exposes a conflict that a single width measurement misses. If the tray diameter fits only when the door is removed, the system isn't correctly specified.
Installation Overview and Common Pitfalls
A clean retrofit begins with an empty cabinet. Remove the existing shelves, vacuum the interior, and inspect the floor and walls for swelling, loose laminate, or water damage. Particleboard and MDF need special care because an overtightened screw can strip the mounting point or distort the cabinet floor.
Install the support before the shelves
- Find the center point. Measure from both side walls and mark the crossing point on the cabinet floor or bottom shelf. Don't estimate from the opening because face frames can be uneven.
- Pre-drill pilot holes. Use the hardware template and a drill bit sized for the fasteners. Pilot holes reduce splitting and make it easier to keep the bearing plate centered.
- Attach the lower bearing plate. Secure it to a sound, level mounting surface. If the cabinet floor is uneven, use appropriate shims rather than forcing the plate flat with excessive screw pressure.
- Set the post or support bracket. The vertical post must be plumb. A small deviation can make the shelves wobble or scrape as they rotate.
- Install the upper bearing and trays. Secure the top support, set the shelf heights, and test rotation before loading anything.
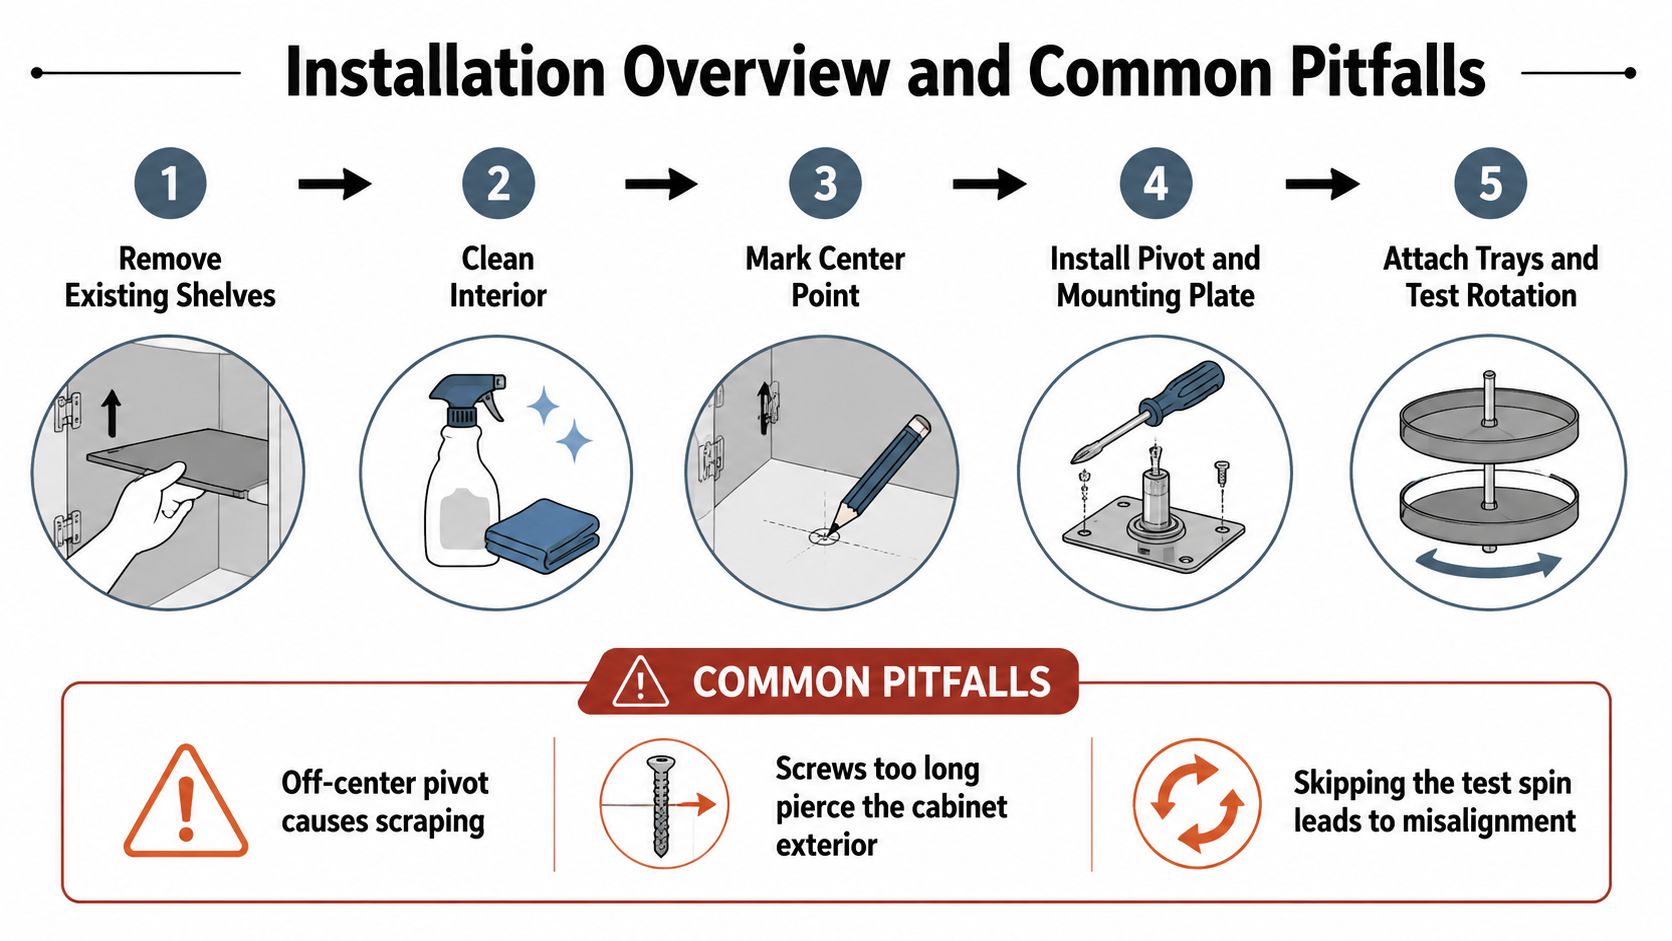
The test spin is not a formality. Rotate the empty trays through the entire path, then close the doors and check the reveal. If the tray binds before you add dishes, the problem is alignment or clearance, not storage weight.
Installation warning: Don't use longer screws simply because the shelf or laminate feels thick. The fastener must hold securely without piercing the cabinet exterior or striking a nearby door mechanism.
A cabinet that isn't square may need shims beneath the base plate. If the existing box has settled, the installer may also need to adjust the upper support or change the tray diameter. The cabinet hardware installation guide can help with general preparation, but corner retrofits deserve extra caution because several moving parts must align at once.
DIY installation makes sense when the cabinet is square, the mounting surfaces are sound, and the kit includes a clear template. Bring in a cabinet professional when the floor is damaged, the face frame is irregular, or the project requires changing the cabinet opening rather than replacing the organizer.
Maintenance, Troubleshooting, and Retrofit Decisions
Most lazy Susan systems need little attention after installation, but rotation problems usually provide a clear clue. A wobbling tray points toward loose mounting screws, an unplumb post, or an uneven base. Binding often comes from debris in the bearing, a shelf set too close to the cabinet wall, or two trays installed out of alignment.
Start with the simplest inspection:
- Wobble: Check the mounting screws and confirm that the post is vertical.
- Stiff rotation: Brush dust from the bearing track and inspect the shelf edges for contact.
- Squeaking: Use a small amount of silicone spray rather than oil, which can attract dust.
- Persistent looseness: Replace the bearing kit when the mechanism has excessive play instead of replacing every shelf.
- Door interference: Rotate the empty tray while watching the hinge and face frame, then correct the geometry before loading it.
A retrofit is sensible when the cabinet carcase is solid, dry, and reasonably square. Hardware can improve access to a sound box, but it can't repair water damage, a warped floor, or an opening that was built around an unusual corner angle.
The alternative may be better in a blind corner. A pull-out system brings the storage carrier toward you instead of asking you to reach around a rotating radius. That can make more sense when the opening is narrow, the corner is unusually deep, or the homeowner prefers seeing the entire contents at once. A full cabinet replacement becomes the practical choice when the existing box has structural damage or can't provide the clearances required by any suitable organizer.
When to Bring in a South Jersey Cabinet Pro
A corner retrofit crosses into professional territory when the face frame is out of square, plumbing or electrical work runs through the corner, or you're deciding between a rotating shelf and a pull-out system. In older Cherry Hill, Voorhees, and Marlton homes, settling can leave cabinet openings uneven enough that stock hardware won't sit flat. The issue isn't the product label. It's the relationship between the actual opening and the moving shelf.
A cabinet professional should field-measure both cabinet legs, check level across the corner, inspect the mounting substrate, and verify the door swing before specifying a kit. That process also helps coordinate a replacement skin, countertop work, or a broader cabinet change when the retrofit exposes a larger problem.
Call for help if the door won't close after installation, the existing shelf hardware has rusted into the side walls, or the project has expanded beyond one cabinet. Homeowners comparing local support can also review kitchen remodeling contractors in New Jersey while deciding whether a hardware swap is enough.
The Cabinet Coach's mobile showroom serves Cherry Hill and surrounding South Jersey communities with in-home design consultations, cabinetry, countertops, hardware, and coordinated remodeling guidance. That approach is useful when lazy susan cabinet hardware needs to be evaluated as part of the entire corner layout rather than selected in isolation.
Bring your cabinet measurements, photos, and a list of what you want to store to The Cabinet Coach for a complimentary video consultation. Their team can help determine whether a rotating shelf, pull-out organizer, or replacement corner cabinet fits your space and remodeling plans.