
You're standing in front of brand-new cabinets with a pull in one hand, a pencil in the other, and a very uncomfortable thought in your head: once that drill bit goes through the door, there's no un-drilling it.
That hesitation is justified. Cabinet hardware looks like a small decision until you are placing it. Then it becomes obvious that a knob set slightly too high, a pull that's a touch off-center, or one inconsistent drawer front can change the whole kitchen. Hardware is the jewelry of the room, but it also gets touched more than almost anything else. If it's awkward to grab, too low, too high, or visually crooked, you'll notice it every day.
A good cabinet hardware placement guide should do more than give a few generic measurements. It should help you understand why placement works, what changes with different cabinet styles, and where people usually make expensive mistakes. If you're still deciding on finish, style, or size before you drill, this guide on how to choose cabinet hardware is a useful place to sort that out first.
Table of Contents
- The Finishing Touch That Makes or Breaks a Kitchen
- Foundation Rules for Hardware Placement
- Mastering Drawer Hardware Placement
- Nailing Door Hardware for Every Cabinet Style
- Avoiding and Fixing Common Installation Mistakes
- Advanced Scenarios and Accessible Design
The Finishing Touch That Makes or Breaks a Kitchen
A kitchen can have beautiful cabinetry, clean stone, and perfect paint, then still feel slightly off once the hardware goes on. That's how sensitive the eye is to placement. People often blame the handle style when the issue is location.
I've seen homeowners hold a pull against five different drawers, step back, move it a fraction, then second-guess themselves all over again. That's not overthinking. It's the moment where the project stops being theoretical and turns permanent. One hole in the wrong place can mean patching, filling, repainting, or living with a result that never feels quite right.
Hardware placement doesn't just finish cabinetry. It sets the rhythm of the whole kitchen.
The reason this part gets tricky is that cabinets don't all behave the same way. Upper doors are reached differently than lower doors. Wide drawers need a different strategy than narrow ones. Slab fronts don't give you the same visual cues that framed doors do. And some of the best-looking installations aren't mathematically centered at all. They're visually centered, which is a different thing.
A lot of generic advice skips that distinction. It tells you to center everything and move on. That's how people end up with lower drawer pulls that technically measure right but still look low when viewed from standing height. It's also how pantry hardware ends up feeling awkward, or trash pull-out hardware ends up fighting the mechanism instead of working with it.
Good placement has to do three jobs at once. It needs to look balanced, feel natural in the hand, and respect how the cabinet opens. If one of those three gets ignored, the result feels amateur fast.
Foundation Rules for Hardware Placement
Good installs start with a repeatable layout, not case-by-case guesswork. If every door and drawer gets a different decision, the kitchen loses rhythm fast. The fix is simple. Set a few anchor rules first, then adjust only when the cabinet function demands it.

Why these rules matter
Start with one principle. Hardware should line up with the cabinet's structure and with the way your hand uses it.
On framed doors, that usually means placing knobs or pulls near the opening corner and keeping the offset consistent from one matching door to the next. On slab fronts, there is no frame to guide the eye, so alignment matters even more. Small inconsistencies show up immediately.
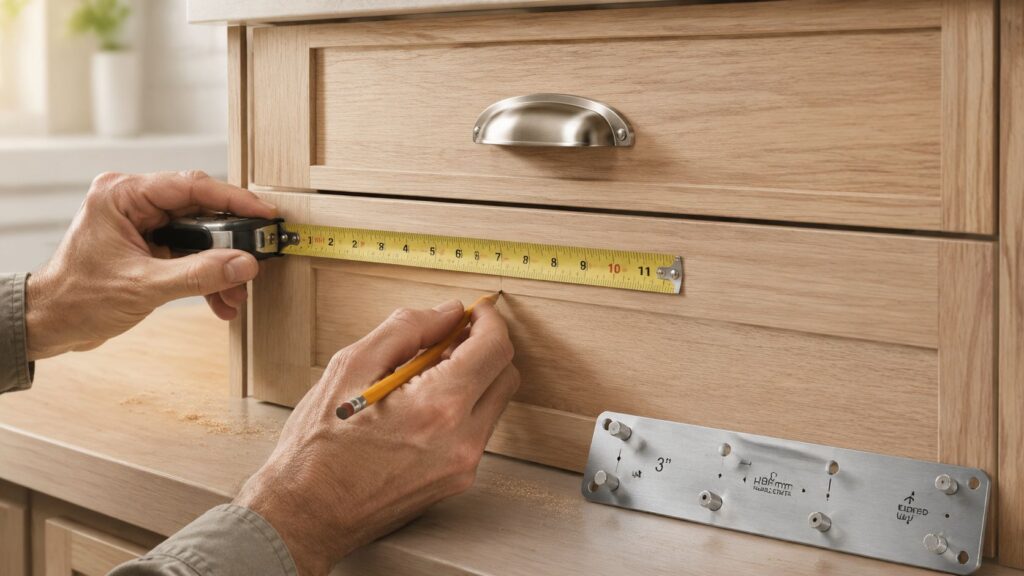
Proportion matters too. A tiny knob on a heavy pantry door feels undersized. An oversized pull on a narrow drawer looks top-heavy and can crowd the stile or rail lines. Before drilling, hold the hardware against the actual door or drawer front and step back a few feet. That quick check catches a lot of mistakes that a tape measure alone will miss.
Center-to-center sizing matters for another reason. You need a pull length that fits the scale of the front and leaves enough room for your hand. If you are sorting through common pull sizes before buying, this center-to-center measurement guide from Emtek is a useful sizing reference.
Construction matters more than many homeowners expect. A solid drawer box can handle daily pulling force better than a cheap stapled box, especially on wide drawers and trash pull-outs, so it helps to understand how dovetail drawer construction affects strength and longevity before you commit to hardware size and placement.
If you like practical reference material before drilling into finished surfaces, the same logic shows up in other trades too. This comprehensive guide to deck and fence components is a good reminder that fastening details and placement rules matter far more than people think, whether you're working outside or finishing cabinetry.
Standard hardware placement cheat sheet
| Cabinet Part | Hardware Type | Standard Placement |
|---|---|---|
| Upper framed door | Knob | Bottom corner on the opening side, aligned consistently with the rail and stile |
| Lower framed door | Knob | Top corner on the opening side, aligned consistently with the rail and stile |
| Drawer front | Pull | Center horizontally, then choose a vertical position that matches drawer depth and sightline |
| Wide drawer over 24 inches | Two pulls | Install two pulls symmetrically, usually on the outer thirds |
| Base cabinet pull | Pull | Place high enough to grab comfortably without forcing a low reach |
| Wall cabinet door | Knob or pull | Bottom corner on the opening side |
| Base cabinet door | Knob or pull | Top corner on the opening side |
Consistency beats guesswork
A polished kitchen has repeating reference points. Matching uppers should share the same placement. Matching lowers should share another. Stacked drawers should read as a set, even if one or two fronts need slight adjustment to look right from standing height.
Practical rule: Pick one reference point for each cabinet type and repeat it exactly. Use a jig once you know the layout works.
That last part matters. Test one door and one drawer first, then live with it for a day if you can. Open them. Stand back. Check clearance near walls, appliance handles, and proud countertop edges. Pantry doors, trash pull-outs, and appliance panels often need a functional adjustment, and the best placement is the one that still looks right after a month of daily use.
Mastering Drawer Hardware Placement
A drawer bank is where a kitchen starts to look custom or starts to look slightly off. Homeowners usually spot the problem after installation, when one lower pull reads low, a wide pot drawer feels awkward to open, or a trash pull-out lands where your hand keeps hitting the countertop edge.

Single pulls, paired pulls, and what actually looks right
Start with the drawer's job, not just its size. A shallow top drawer for utensils can carry a centered knob or pull without looking strange. A deep drawer under a cooktop usually looks better and works better with the hardware set higher, closer to the top rail, because that is where your hand naturally reaches.
Wide drawers need more judgment than generic charts suggest. On many drawers over 24 inches wide, two pulls look better balanced and spread the load across the front. That matters on heavy drawers filled with plates, pans, or food storage containers. One centered pull can work on some modern slab fronts if the hardware is long enough and the drawer glide is excellent, but it often leaves the drawer feeling twisted in use.
A simple set of checks keeps drawer fronts looking disciplined:
- Match the hardware to the drawer mass: tiny pulls disappear on deep drawers, and oversized pulls can crowd a narrow top drawer.
- Keep a drawer stack reading as one composition: lined-up placements make the whole run look intentional.
- Set hardware where the hand wants it: deeper drawers usually want the pull higher than a shallow drawer does.
- Use two pulls where the drawer earns them: pan drawers, dish drawers, and other heavy storage drawers often feel better with a pair.
If you are choosing drawer fronts and hardware at the same time, this guide to what dovetail drawers are helps explain why drawer construction and finished hardware should be considered together.
The pro adjustment for lower drawers
Lower drawers fool the eye.
Geometric center is not always visual center, especially on the bottom drawers in a base cabinet stack. You stand over them and view them from above, so a pull installed at the exact midpoint can look too low even when your tape measure says it is correct.
A better approach is perceptual centering. On the lowest drawer, I often bump the pull slightly above true center. On the drawer above it, I may raise it a little less. The goal is not to create a visible stair-step. The goal is to make the whole stack read correctly from normal standing height.
That small correction is one of the details generic placement guides miss. It is also one of the fastest ways to make a kitchen feel professionally laid out.
Tricky drawer installations that need special handling
Trash pull-outs deserve their own plan. They get opened constantly, often with one hand full, so the pull should sit high enough to grab quickly without forcing you to hook your fingers under the countertop overhang. If the cabinet is near a corner or appliance handle, test the swing and your hand clearance before drilling.
Pantry pull-outs and deep interior drawer stacks need a similar reality check. A mathematically centered pull may be fine on the shop drawing and annoying in daily use if the drawer is tall, heavy, or tucked beside a proud panel. In those cases, I favor placement that preserves the visual lines of the cabinet run while giving you a clean, comfortable grip.
Appliance panels with hidden dishwashers or refrigerator drawers need extra restraint. Hardware has to match the surrounding drawers closely enough that the panel disappears into the run, but placement still has to respect the appliance manufacturer's clearance and mounting requirements. That is one spot where copying the neighboring drawer exactly can cause problems, so measure the appliance first and the cabinet second.
Nailing Door Hardware for Every Cabinet Style
A door can be built well, painted well, and still look off once the hardware goes on. I see that a lot with otherwise nice kitchens. The problem is usually simple. The installer used one placement rule for every door in the room.
Door style decides the reference point. Framed doors want hardware tied to the frame. Slab doors need consistent edge offsets. Inset doors demand both visual discipline and clearance checks, because even a small miss shows fast.
Framed and Shaker style doors
Framed doors give you a clear map. The rails and stiles already establish the visual structure, so the hardware should support that structure instead of fighting it. On uppers, the grip belongs low on the opening side. On base doors, it belongs high on the opening side. That matches the way your hand reaches the cabinet and keeps the room feeling orderly.
Shaker doors trip people up because the recessed panel pulls your eye inward. Homeowners often want the knob or pull centered in that panel. It looks balanced on paper, but installed, it usually looks disconnected from the door itself. Worse, a pull mounted in the recessed field can feel awkward because your hand is reaching past the strongest part of the door.
Set the hardware on the stile, not in the panel.
That one decision fixes a lot. It keeps the placement consistent across the run, gives the screw a better mounting area, and makes the door style read cleanly from across the room. If you are comparing designs before you commit to hardware placement, this guide to types of kitchen cupboard doors helps explain why different door constructions need different placement rules.
A practical rule set works well here:
- Knobs on framed doors: place them near the opening corner, inside the frame lines
- Pulls on Shaker doors: mount them on the stile so they follow the vertical structure
- Upper cabinet doors: keep the grip low enough for a comfortable reach
- Base cabinet doors: keep the grip high enough to catch naturally without bending your wrist
Slab, inset, and full-overlay doors
Slab doors leave no place to hide a bad layout. There is no frame to visually absorb a crooked line or inconsistent setback, so every pull needs the same offset from the side and top or bottom edge. On modern slab kitchens, I usually start with a modest, repeatable edge distance and then check the full run before drilling. If one pantry door, appliance panel, or end cabinet breaks the pattern, it will stand out immediately.
Inset doors are stricter. The reveals are part of the look, so hardware has to respect those margins and the way the door swings inside the opening. A pull that sits a little too close to the edge can crowd the reveal and make the whole cabinet look tighter on one side. Full-overlay doors give you more visual forgiveness, but they still need enough room so the hardware does not crash into the neighboring door, drawer front, or appliance trim.
Appliance panels need their own check. A dishwasher panel may need the handle to visually line up with nearby doors, but the placement also has to clear the countertop overhang and match the appliance mounting points. Refrigerator panels bring a similar trade-off. Matching the surrounding cabinetry matters, but function comes first if the panel or handle needs extra clearance to open cleanly.
Use a simple decision rule if you are stuck. Framed and Shaker doors should reference the frame. Slab doors should reference the edges. Inset doors should reference the reveals first, then confirm the swing and finger clearance before you drill.
Avoiding and Fixing Common Installation Mistakes
You tape off a few pulls, measure twice, drill carefully, and everything still looks wrong once the light hits the whole run. That usually comes down to layout decisions, not drilling skill. A pull can be perfectly measured and still look off if the spacing ignores how the eye reads a bank of drawers or a row of doors.

What goes wrong most often
The mistake I see most is drilling before checking the full kitchen as a system. One door and one drawer may look fine on the bench. Ten of them in a row can expose every inconsistency.
The usual problems are predictable:
- No real mock-up: Tape marks are better than guessing, but actual hardware held in place tells you more about scale, reach, and sightlines.
- No jig or template: Tiny measuring errors repeat fast, especially across drawer stacks.
- Visual centering mistakes: A lower drawer pull can be mathematically centered and still look too low. On deep drawers, slight upward adjustment often looks more balanced from standing height.
- Inconsistent reference points: Some pulls are measured from edges, others from rails or stiles, and the run loses its rhythm.
- Wrong pull for the job: A slim decorative pull may look good on a sample door and feel undersized on a heavy trash pull-out or tall pantry.
- Rushed drilling: Bits wander, finishes chip, and small errors become permanent.
A jig saves time, but more important, it keeps your decisions consistent. Consistency is what makes hardware look expensive.
Before drilling, stand in the doorway and check the whole wall. Look at the drawer stack that faces the room first. If the lower drawers feel visually heavy, adjust before you commit. That perceptual centering issue is one of the easiest mistakes to miss up close and one of the most obvious from across the kitchen.
If you want a step-by-step companion for the physical install, this guide on how to install cabinet hardware is worth keeping open while you work.
How to recover when a hole is wrong
A bad hole is fixable. The right repair depends on the cabinet finish, the hardware style, and how visible the cabinet is.
If the miss is slight, stop. Do not widen the hole and hope the screw head hides it. That usually creates a sloppier problem that limits your repair options.
Use these fixes based on the situation:
- Use a backplate if it suits the hardware style. This works best when the miss is minor and the plate looks intentional with the rest of the kitchen.
- Fill and redrill painted fronts carefully. Wood filler, sanding, primer, and touch-up can make a small mistake disappear if you stay patient.
- Treat stained wood more cautiously. Repairs on stained fronts are harder to hide, so replacement is sometimes the cleaner choice.
- Recheck the whole run before correcting one piece. One shifted pull can solve a single problem and create a new crooked line beside it.
- Replace one front when the repair will stay visible. A new drawer front costs less than staring at a bad patch every day.
One more trade-off matters here. Decorative fixes can save a painted Shaker kitchen. On a flat slab door with a clean finish, the same fix may draw more attention than the original mistake. Choose the repair that disappears, not just the one that avoids replacing a part.
Drill only after the layout looks right from across the room, not just from six inches away. That is how you catch the mistakes that homeowners notice for years after the install is done.
Advanced Scenarios and Accessible Design
A pantry door can look crooked even when the pull is measured perfectly. A trash pull-out can bind because the screw lands where the internal frame needs clearance. Appliance panels add another wrinkle. If the hardware is undersized or placed by the same rule as a regular cabinet door, the whole run feels off in use and in appearance.

Pantries, trash pull-outs, and appliance panels
Tall units need placement that respects both reach and scale. On a pantry, a pull set too low makes the door feel heavy at the bottom. Set too high, and it becomes annoying every day. I usually treat pantry hardware as a reach-first decision, then fine-tune it so it still relates cleanly to the stile and the other vertical lines around it.
Lower specialty drawers need a different eye. Geometric center is not always what looks centered. On deep bottom drawers, the pull often reads better a little higher than true center because the heavier visual mass sits lower. That small adjustment is one of the trade secrets that keeps a kitchen from looking subtly awkward.
Trash pull-outs deserve extra caution. Before marking anything, pull the unit out fully and check where the inner frame, slide hardware, and bin structure sit behind the face. Some models leave very little room for screw tips or washers. A location that looks fine on the outside can create interference once the unit starts moving.
Appliance panels are about force, not just style. A panel-ready dishwasher, refrigerator, or freezer takes a stronger grab and usually looks better with a longer pull that matches the scale of the panel. Tiny decorative hardware on a heavy panel almost always feels wrong in the hand.
Use this checklist before drilling:
- Tall pantry doors: Set the pull where the main user can grab it comfortably, then verify it still looks anchored to the door's vertical lines.
- Deep lower drawers: Bias the pull slightly above true center when visual weight makes the drawer front look low and heavy.
- Trash pull-outs: Open the unit, inspect the back of the face, and confirm screw depth and hardware clearance.
- Appliance panels: Choose pull length and projection for grip and panel weight, not just to match nearby doors.
- Odd storage pieces: Test the cabinet in motion first. Clearance problems show up fast when the unit is fully opened.
Choosing hardware that works for more people
Accessible hardware starts with grip. Knobs ask for pinching and finger strength. A well-shaped pull lets the hand wrap naturally and gives better control, especially for anyone dealing with arthritis, limited dexterity, or wet hands at the sink.
Placement matters just as much. Base cabinet hardware set too low forces an awkward bend. Pulls tucked too close to trim, counters, or neighboring fronts can pinch fingers and slow down use. Good accessible placement feels obvious once you use it. The hand finds it without hunting, and the cabinet opens without strain.
If you are planning for long-term comfort, universal design for kitchens and baths is a useful framework. It helps homeowners choose hardware by reach, grip, clearance, and daily use instead of treating accessibility like a special add-on.
The best specialty placements do two jobs at once. They look right from across the room, and they work right in your hand every day.
If you're planning a kitchen or bath renovation in South Jersey and want help getting details like hardware placement right before any holes are drilled, The Cabinet Coach brings the showroom experience to you. Their mobile design approach helps homeowners in Cherry Hill and surrounding areas coordinate cabinetry, countertops, hardware, and finishes with expert guidance, so the final space looks right and works the way it should.