

You’re probably staring at counters that have seen better days. Burn marks by the stove, swollen edges near the sink, a seam that’s starting to telegraph through the finish, or a color that dates the whole kitchen. That’s usually the point where homeowners start searching for how to replace kitchen countertops and realize the job looks simple right up until the moment measurements, cutouts, and cabinet issues show up.
Countertop replacement can be a very manageable project if you choose the right material and respect the parts that punish rushed work. The biggest mistake I see isn’t bad taste or lack of effort. It’s assuming the old tops came off cleanly, the cabinets underneath are flat enough, and the new surface will somehow settle itself into place. It won’t. Good results come from planning, careful removal, and a foundation that’s dead level before the new top ever enters the room.
Table of Contents
- Planning Your Countertop Replacement Project
- Measuring for Success and Removing Old Surfaces
- The Critical Step Leveling and Prepping Cabinets
- Installing Your New Countertops
- Finishing Work Sinks Backsplashes and Sealing
- Disposal Cleanup and Final Project Costs
- Common Mistakes and When to Call The Cabinet Coach
Planning Your Countertop Replacement Project
Most countertop jobs go sideways before demolition starts. A homeowner picks a slab or a laminate pattern first, then tries to make budget, timing, and cabinet condition fit around that decision. It works better the other way around. Start with budget, then your usable timeline, then the material that makes sense for both.
The numbers help frame the decision. The average cost to replace kitchen countertops is $3,142, with most projects ranging from $1,851 to $4,459, according to HomeAdvisor’s countertop cost guide. That same source notes countertop replacement can return up to 98.5% ROI, which is one reason it remains such a strong upgrade for resale-minded owners in towns like Cherry Hill, Haddonfield, and Moorestown.

Budget timeline and disruption
Material price is only one part of the job. Removal, disposal, plumbing disconnects, cabinet prep, adhesive, seam work, and any wall touch-up all affect the final number. Labor also matters. In the verified cost data, labor typically accounts for 30% to 40% of the total, averaging $20 to $50 per square foot, and heavy materials can push that higher because they need more precise handling and support.
Timing matters just as much as budget. For a professionally fabricated top, the replacement process commonly runs 5 to 10 business days from templating to installation, with up to 1 hour for measurements, 5 to 7 business days for fabrication, and 2 to 4 hours for final installation, based on the installation timeline outlined by Masters Countertops. If you cook every night, that window affects how you plan meals, sink access, and cleanup.
Practical rule: If your kitchen can’t be partially offline for several days, choose a material and install method that minimizes fabrication delays.
A full remodel plan helps here. If you’re also touching cabinets, fixtures, or layout, it’s worth reviewing a broader kitchen remodel planning process before ordering anything.
Countertop material comparison
Here’s the trade-off table I’d use with a first-time DIYer.
| Material | Cost per Sq. Ft. (Installed) | Pros | Cons |
|---|---|---|---|
| Laminate | $30 to $80 | Budget-friendly, light, approachable for skilled DIY work, lots of patterns | Seams and edges are less forgiving, easier to damage with water if poorly finished |
| Butcher block | $50 to $150 | Warm look, easier to cut on site, repairable surface | Needs regular care, can react to moisture if neglected |
| Granite | $40 to $150 | Natural stone look, strong resale appeal, heat resistant | Heavy, needs sealing, pro handling is usually the right move |
| Quartz | Qualitatively higher than budget surfaces in this guide | Non-porous, easy maintenance, clean modern appearance | Heavy, precise fabrication required, not a forgiving DIY material |
Laminate is usually the best testing ground if you want to learn how to replace kitchen countertops yourself. Stone looks great, but it’s less tolerant of small mistakes. Butcher block sits somewhere in the middle. It’s workable with standard carpentry tools, but it still demands careful sealing around sinks and seams.
Measuring for Success and Removing Old Surfaces
A countertop can only fit as well as it’s measured. On remodels, the temptation is to trust the old top as your template. That’s risky. Old counters often hide crooked walls, patched corners, and sink cutouts that were never centered properly in the first place.
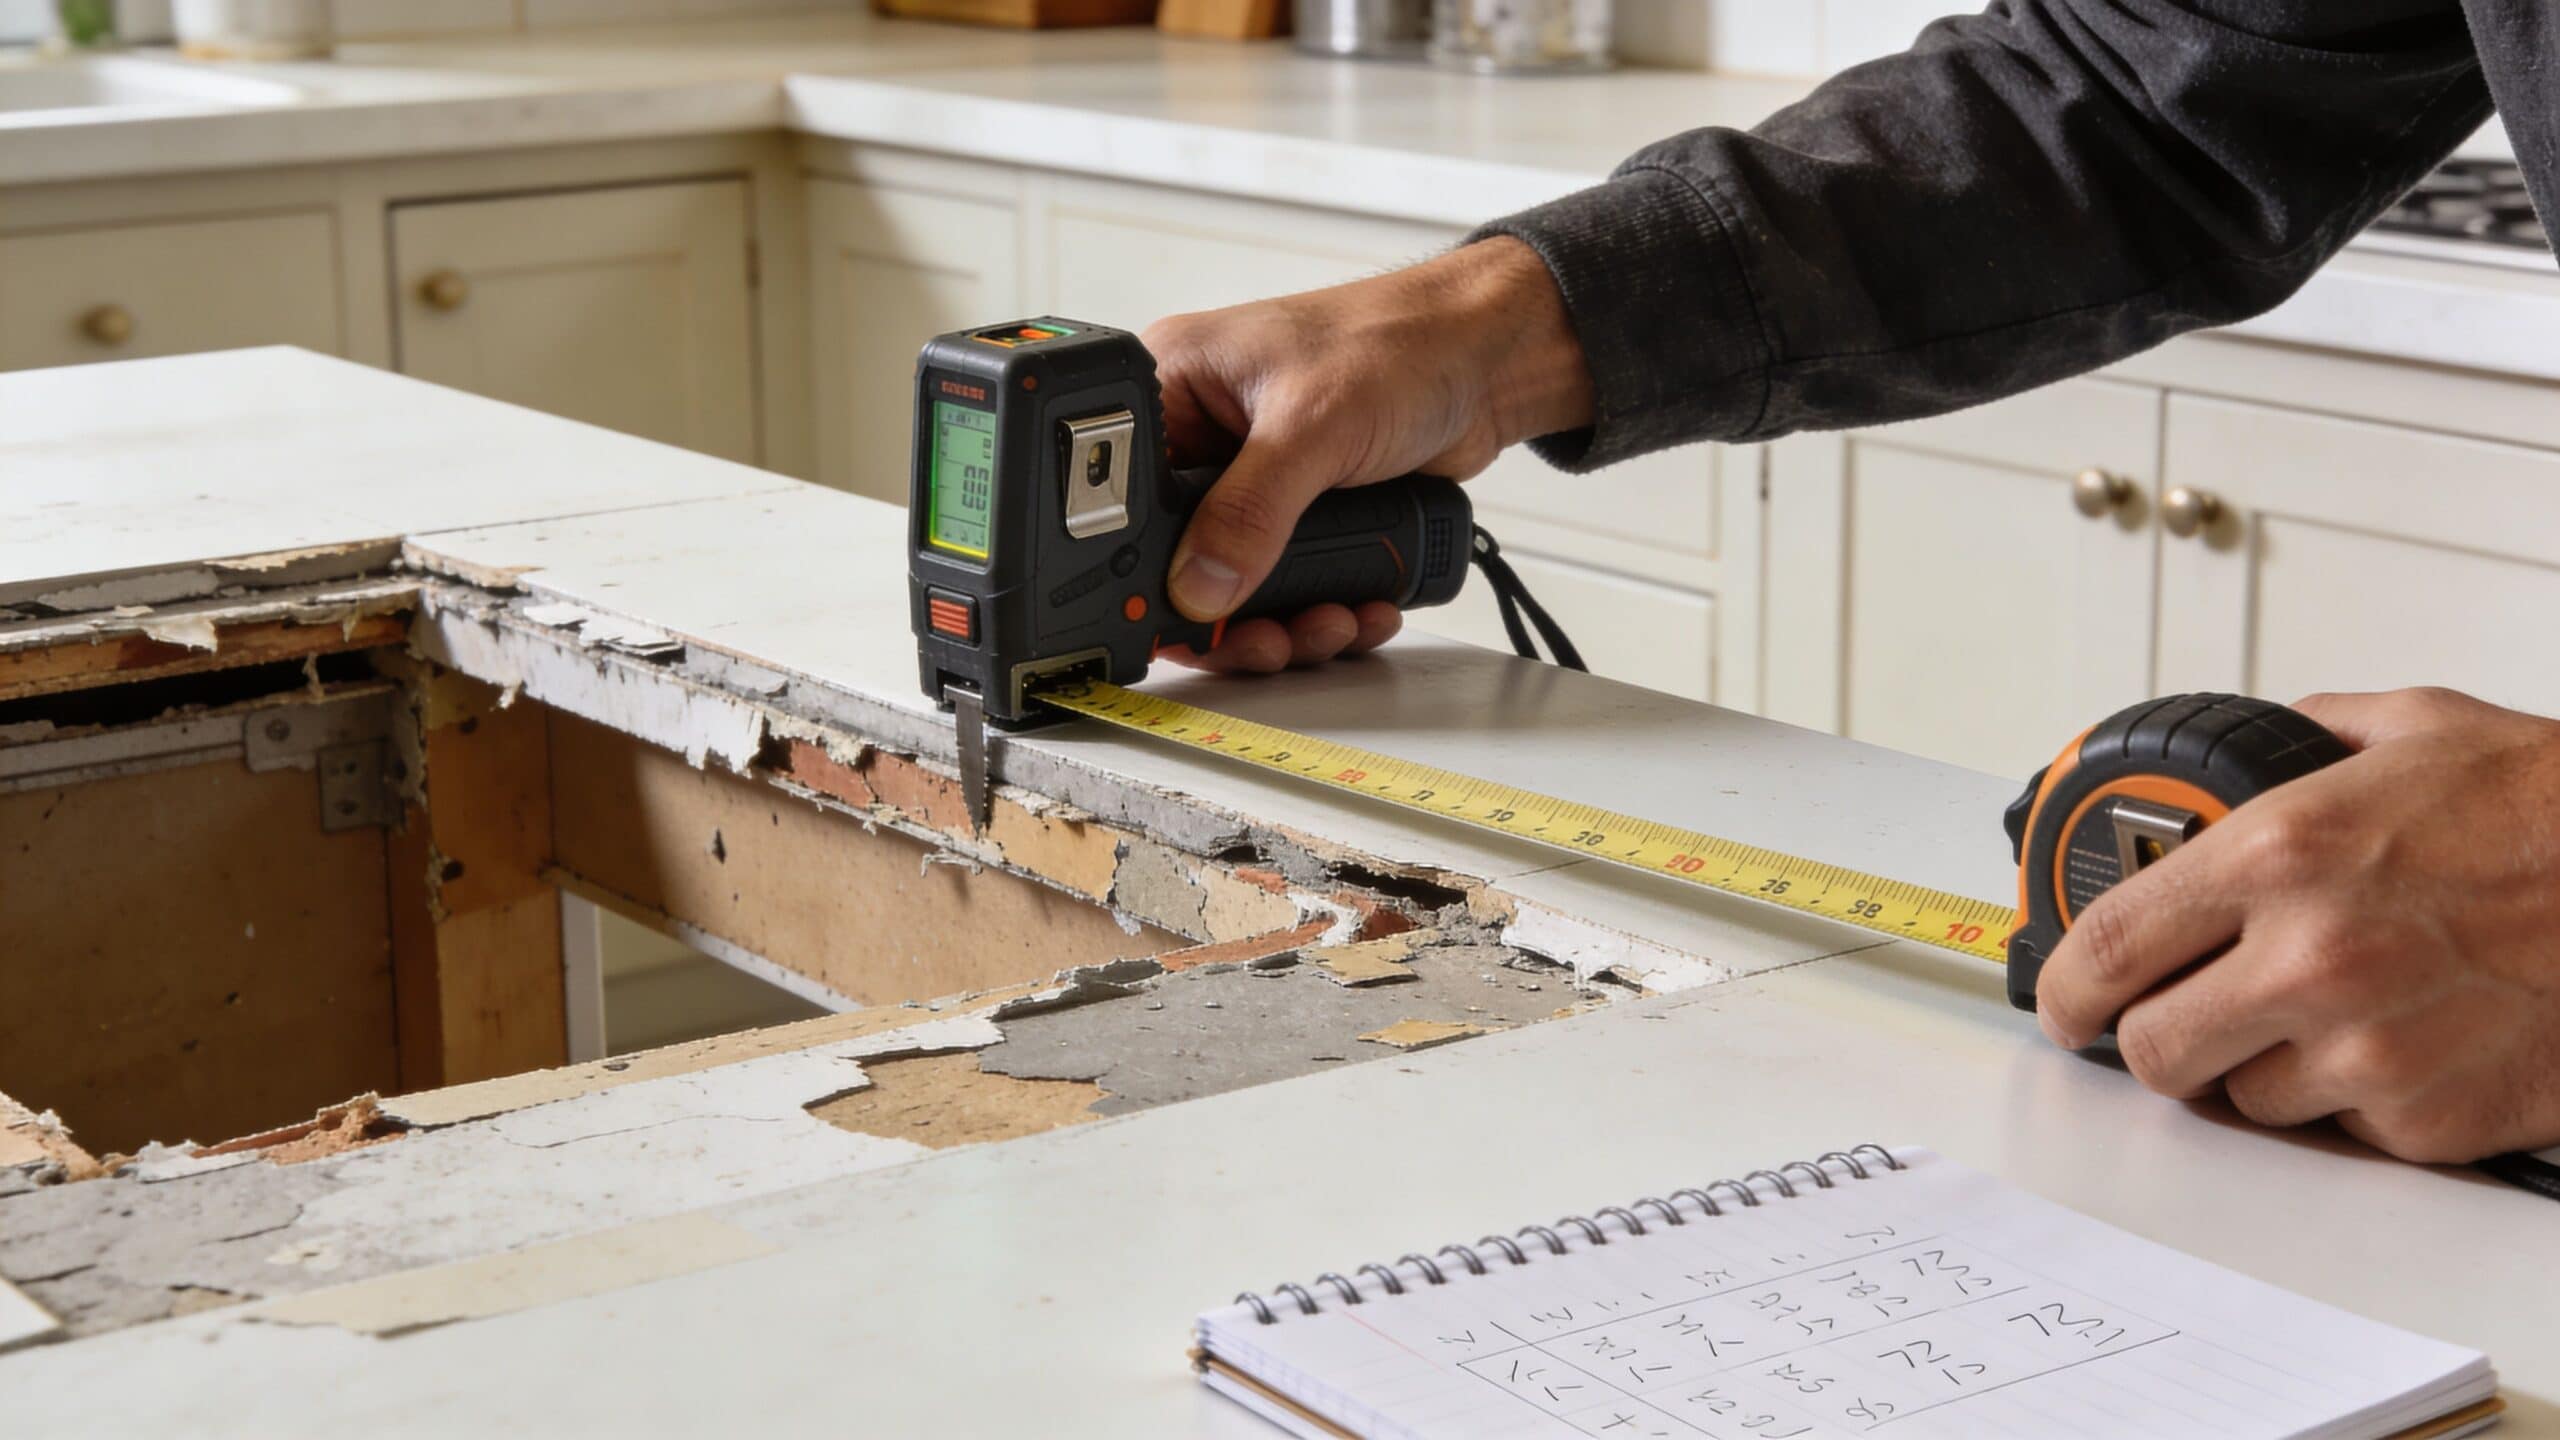
How to measure without guessing
For laminate in particular, precision matters because you may be cutting and seaming on site. Verified trade data notes laminate countertop replacement has an 80% to 85% success rate for experienced DIYers, but poor seaming causes 50% of water damage claims within two years, as explained in FM Remodeling’s countertop replacement guide. That’s why the measuring stage deserves real patience.
Use a tape measure and, if you have one, a laser distance measure to confirm lengths. Record every wall run in more than one place because walls rarely stay perfectly parallel.
Take these measurements before you buy or cut anything:
- Overall run length: Measure front edge length and wall-side length. If they differ, the wall isn’t straight.
- Cabinet depth: Don’t assume all bases match. Check each section.
- Sink and cooktop openings: Measure width, depth, and exact location from nearby cabinet lines.
- Overhangs: Note exposed ends, seating overhangs, and any unsupported corners.
- Back wall condition: Write down bows, tile buildup, or plaster irregularities that may affect fit.
If you’re still deciding on the right surface, looking through a focused guide on how to choose kitchen countertops can help you match the measuring and installation demands to your skill level.
Write dimensions directly on painter’s tape stuck to each cabinet run. Paper notes get mixed up fast during demo.
How to remove old countertops safely
Demolition is less about force than control. Shut off water first. Disconnect the faucet supply lines and trap at the sink. If there’s a cooktop, disconnect power or gas through the appropriate trade if needed. Then empty the base cabinets so you can see how the top is fastened from below.
A typical removal sequence looks like this:
- Cut caulk lines with a sharp utility knife along the backsplash and wall.
- Remove sink clips or fasteners from underneath.
- Back out screws driven up through the cabinet rails into the countertop substrate.
- Break adhesive bonds carefully with a putty knife or pry bar.
- Lift in sections if the top is brittle, long, or heavy.
Laminate usually comes off more cleanly than tile or stone. Tile tops can shed sharp pieces. Old particleboard cores often crumble near sink bases. Work slowly enough that you don’t tear cabinet face frames or split the top rail you need for the new install.
Keep these items nearby:
- Safety glasses: Flying debris is common when old adhesive lets go.
- Cut-resistant gloves: Helpful around broken tile, metal sink clips, and jagged laminate edges.
- Drop cloths or ram board: Protect finished floors before prying starts.
- Buckets and towels: Even after shutoff, sink lines usually spill some water.
- Oscillating tool or pry bar: Useful for stubborn adhesive joints.
The Critical Step Leveling and Prepping Cabinets
Many DIY articles treat cabinet prep like a quick wipe-down before installation. That assumption ruins otherwise good countertop jobs. Cabinets move over time. Floors settle. Moisture swells boxes near sinks. A new top installed over a bad base may look acceptable for a day, then start rocking, separating, or stressing at the seams.
Why level matters more than most people think
This is the part homeowners skip because it isn’t visible when the job is done. It’s also one of the biggest reasons installations fail. Installer experience summarized by Interiors by Thomas on uneven countertop surfaces notes that 20% to 30% of jobs require cabinet adjustment, and uneven cabinets are a primary cause of wobbly counters and premature failure.

In older South Jersey homes, that shows up all the time. One cabinet bank may dip slightly toward the sink wall. Another may have been shimmed poorly years ago when flooring changed. If you set a rigid top across those highs and lows, the countertop becomes the thing trying to correct the error. That’s not its job.
Uneven cabinets don’t become flatter because a new countertop covers them. The problem just gets more expensive.
How to correct the cabinet base
Use a long spirit level or straightedge across the full cabinet run, front to back and side to side. Check multiple points, not just the front rails. Then mark low spots, high spots, and any cabinet that twists.
Corrective work usually falls into a few categories:
- Low spots: Add shims at support points until the run is flat and consistent.
- High spots: Plane, sand, or adjust the offending area if it’s minor and accessible.
- Weak spans: Add blocking where overhangs or seams need stronger support.
- Heavy material prep: Reinforce cabinets when moving from lightweight laminate to a much heavier surface.
That last point matters. The verified data notes that heavy stone materials may require cabinet reinforcement, and switching from laminate to granite or quartz can mean the new top weighs up to 20 pounds per square foot. That load changes what the cabinet boxes need to carry safely.
While you’re inside the cabinets, it’s also a good time to rethink storage and access. If the countertop project is part of a broader kitchen reset, ideas for organizing deep kitchen cabinets can help you get more function out of the same footprint before everything goes back in.
Installing Your New Countertops
On installation day, clean prep proves its worth. If the cabinets are flat and your measurements were careful, the work becomes controlled and methodical. If not, forcing, trimming, and reworking start eating time.
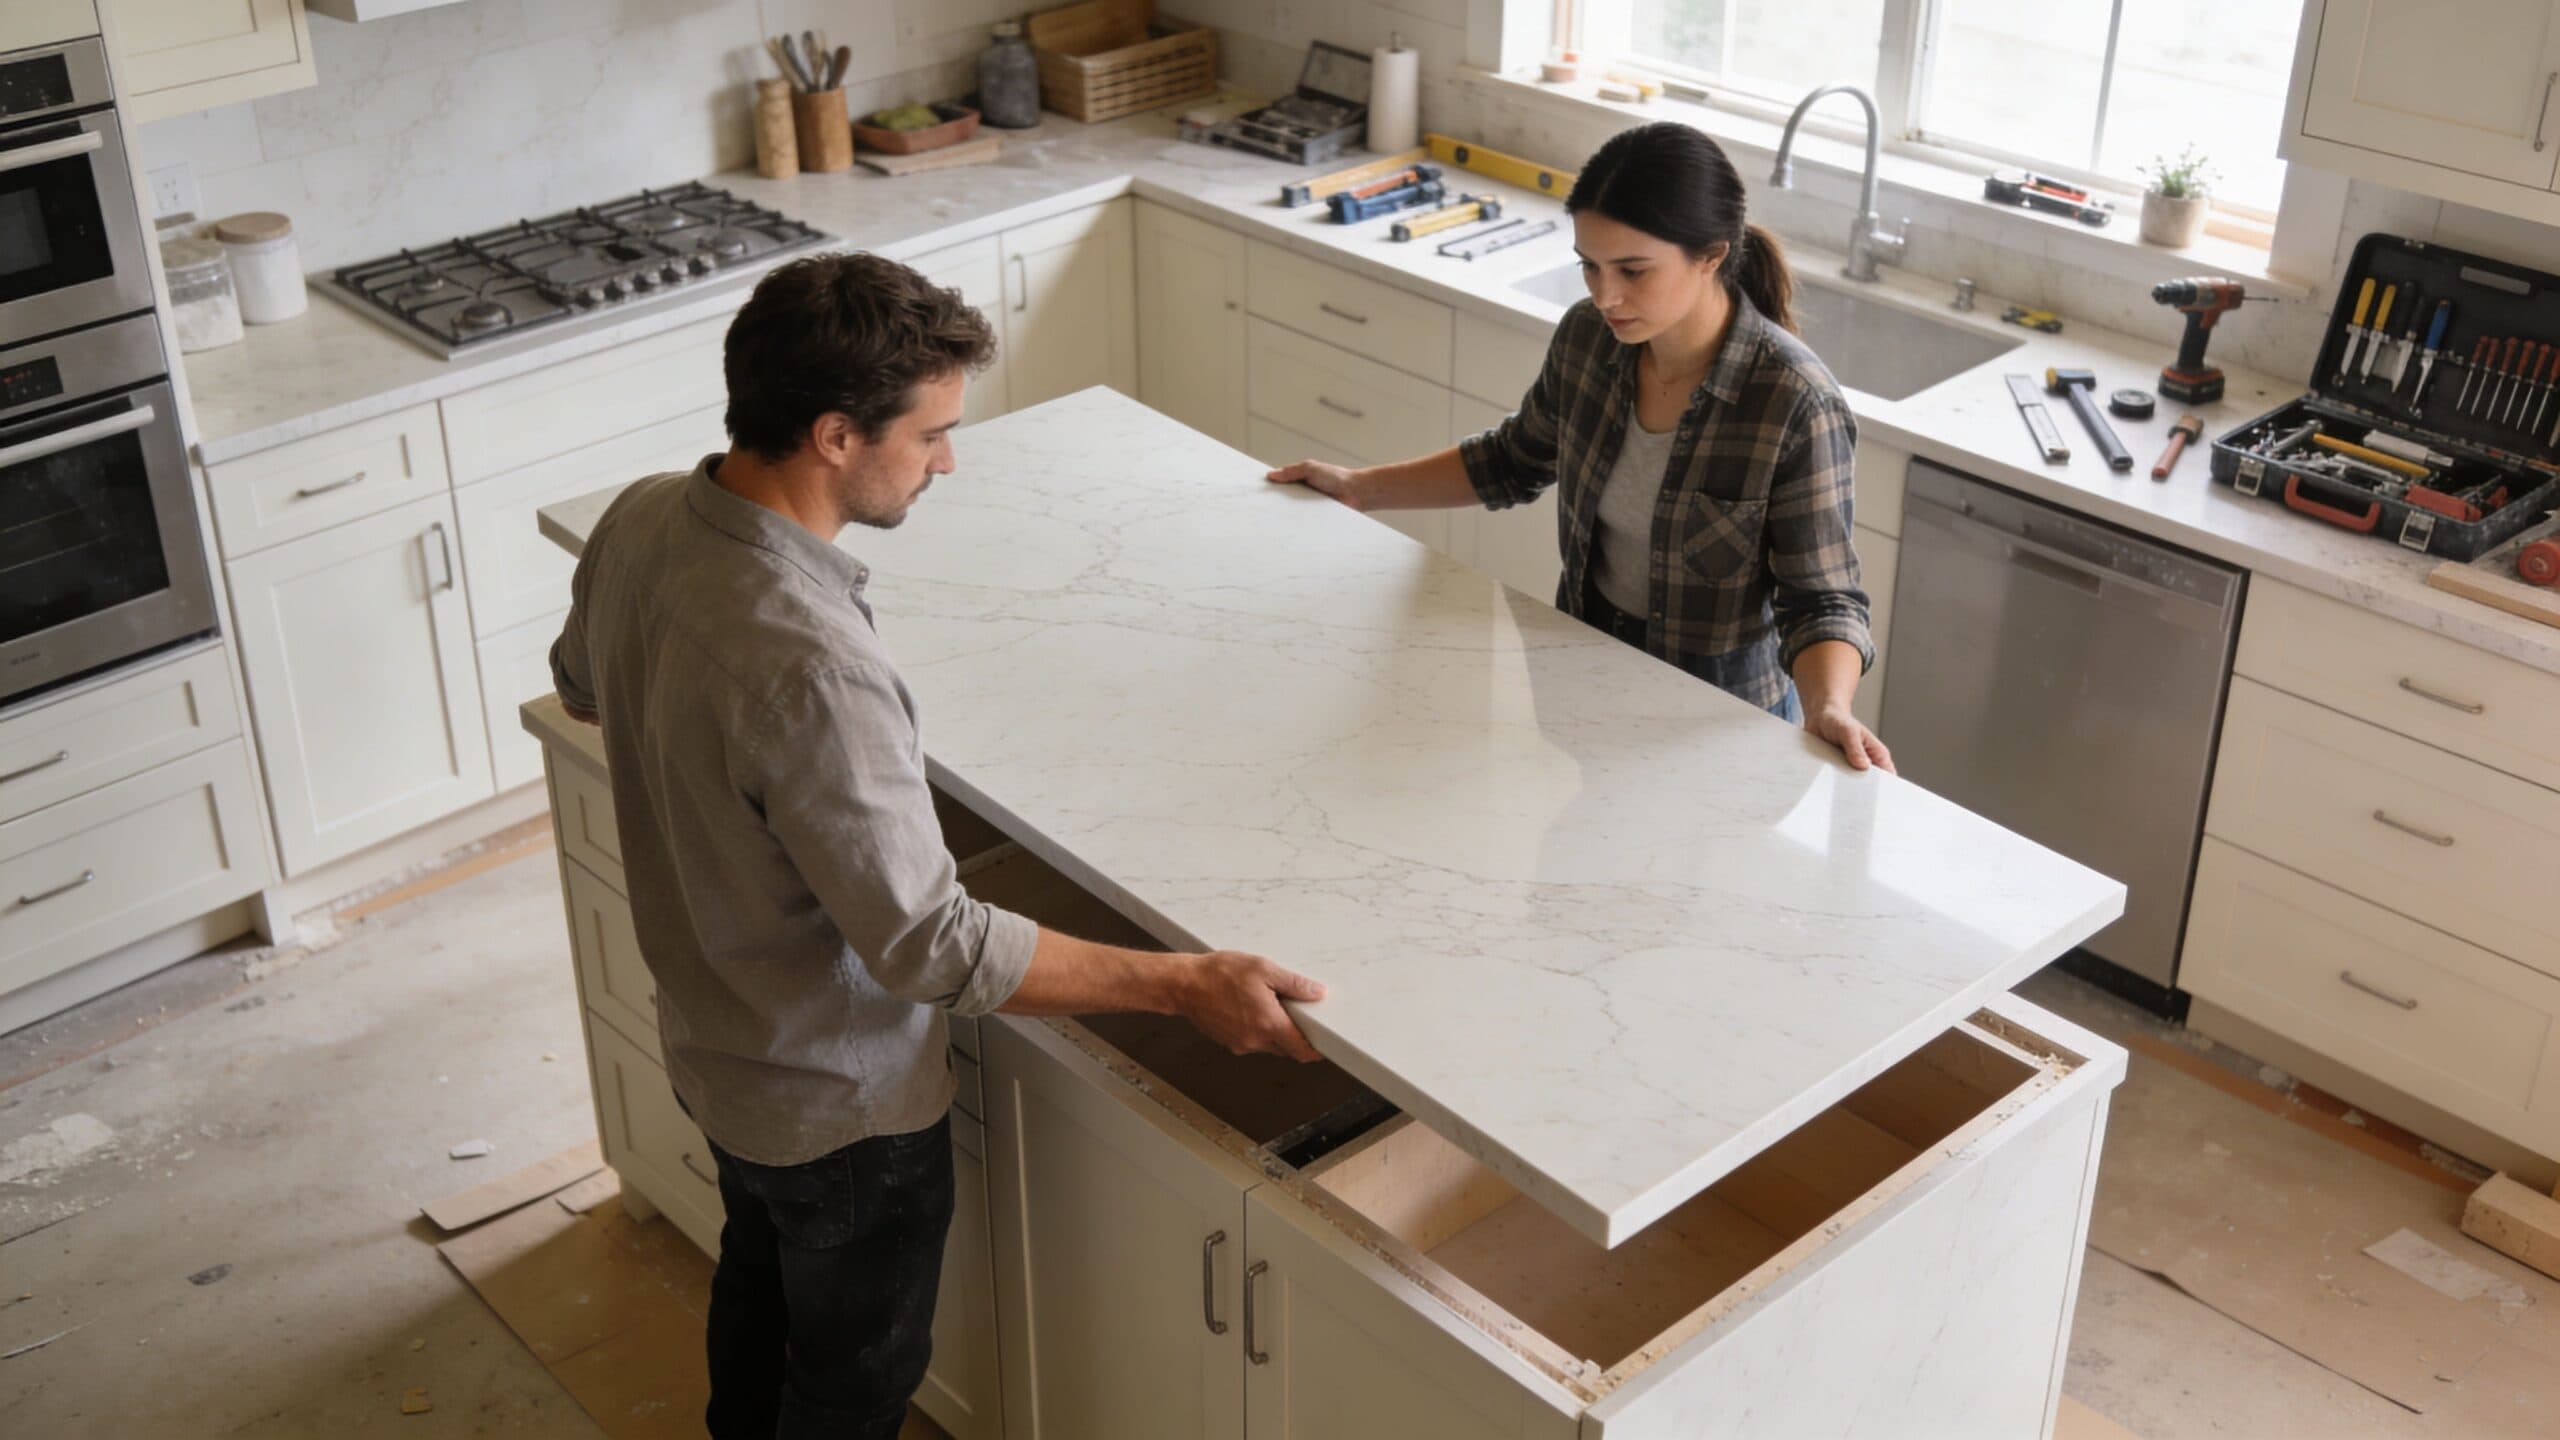
Dry fit before adhesive
Always dry fit first. Set the countertop in place without adhesive and check reveals, wall fit, sink alignment, and seam locations. On L-shaped runs or multi-piece layouts, make sure adjoining sections meet exactly where the cabinets provide support.
For a laminate or wood top, I like to verify four things before fastening:
- Front overhang consistency: The face should look even across all cabinet runs.
- Wall contact: Small scribe gaps can sometimes be managed, but large bows need correction before fastening.
- Appliance clearance: Ranges, dishwashers, and slide-in units need their proper opening.
- Sink centering: Even a slight drift becomes obvious once the faucet and accessories are installed.
If you’re replacing sink, faucet, and accessories at the same time, it helps to review the finish and mounting details together. A fixture-focused guide on choosing the perfect kitchen or bathroom fixture can save you from pairing the right counter with the wrong hardware.
Setting fastening and joining
Once the dry fit checks out, remove the top and apply the right adhesive in the right places. Use beads of construction adhesive on cabinet contact points where the manufacturer or material type calls for it. Don’t overapply. Too much adhesive creates squeeze-out, uneven seating, and cleanup headaches.
For a straightforward install, the sequence is usually:
- Apply adhesive to cabinet tops or support rails.
- Lower the countertop carefully into position without smearing it side to side.
- Align seams before fastening anything permanent.
- Secure from below using the appropriate fasteners and existing cabinet structure.
- Check level and contact one more time before final tightening.
The biggest DIY mistake here is over-tightening. Fasteners should hold the top snugly to the cabinet, not pull it into submission. If the top rocks before fastening, the cabinet base still needs work. Tightening harder won’t fix that.
Here’s a visual walkthrough if you want to watch the sequence before attempting your own install:
For seamed tops, bring the joint together gradually and evenly. On laminate, edge treatment and seam filler matter a lot to water resistance and appearance. On stone, accurate fabrication does most of the heavy lifting, which is why those jobs are much less forgiving in the field.
If a piece needs muscle to fit, stop and find out why. Countertops should seat with control, not brute force.
Finishing Work Sinks Backsplashes and Sealing
A countertop job can look done and still fail fast at the sink. The trouble usually shows up as a slow drip into the sink base, a loose rim, or a gap at the wall that keeps collecting water. Finishing work is where careful prep pays off, especially if you took the time earlier to get the cabinets flat and fully supporting the top.
Bringing the sink area back together
Start with a dry fit. Set the sink in place, check reveal, confirm faucet and accessory holes clear the backsplash or wall, and make sure clips or brackets can be reached from below. I see DIY installs go sideways here because the cutout is fine, but the cabinet rail, drawer box, or plumbing stub-out leaves no room to fasten the sink correctly.
For drop-in sinks, run a consistent bead of silicone under the rim and tighten clips in stages, alternating sides so the sink pulls down evenly. For undermount sinks, use the mounting method approved for your countertop material and sink hardware. Do not trust adhesive alone to carry the load of a full sink. If the top is stone or quartz, this is one of those points where calling a pro is often the safer move, because a bad undermount install can damage an expensive top and the repair options are limited.
Small finish cuts sometimes happen at this stage, especially on laminate tops or end panels. If you need to trim a laminate cutout or tune an opening, blade choice affects whether the visible edge stays clean. A practical guide on selecting Milwaukee jig saw blades can help you match the blade to laminate, wood substrate, or other finish materials.
Hook the plumbing back up only after the sink is secured and the sealant has had enough time to set. Then run water and watch everything with a flashlight. Check the basket strainer, supply lines, trap joints, faucet base, and the underside of the rim. A five-minute leak test now is a lot cheaper than replacing a swollen sink base later.
Backsplash details and long-term protection
Backsplashes do more than finish the look. They hide minor wall waviness, protect drywall from daily splash, and cover the small inconsistencies that show up where houses settle. If your wall has a bigger bow than expected, forcing the countertop tight to it was never the right fix. That should have been addressed during cabinet prep or allowed for in the scribe, which is another reason pre-installation site checks matter.
A short matching backsplash works well in many kitchens, especially with painted walls. Tile gives more protection behind the sink and range, but it adds another layer of layout decisions. If you are still sorting that out, this guide on how to select tile backsplash will help you choose something that fits the counter instead of fighting it.
Seal every place where water can sit or migrate. That usually means the sink edge, faucet base if the manufacturer calls for it, the counter-to-backsplash joint, and the counter-to-wall joint where there is no backsplash piece. Keep the bead neat and sized for the gap. Too much caulk looks amateur, traps grime, and often fails sooner because it skins over before bonding well.
Maintenance depends on the material you installed. Quartz is generally low-maintenance and does not need sealing. Granite and other natural stones usually do. Laminate needs special attention at seams, cut edges, and around the sink, because once water gets into the substrate, the top starts to swell and there is no clean repair.
A few habits help the finish work last:
- Wipe up standing water: Pay extra attention around the sink rim, faucet, and seams.
- Use cleaners that fit the material: Mild soap and water handle most day-to-day cleanup.
- Watch the caulk line: If it shrinks, cracks, or pulls away, scrape it out and recaulk before water gets behind it.
- Stay on top of stone maintenance: If you chose granite, follow a regular sealing schedule.
Disposal Cleanup and Final Project Costs
The glamorous part of the job ends before the mess does. Old countertops are awkward, dusty, and often heavier than they look once you start carrying them through a hallway or down porch steps. Cleanup is part of the project, not an afterthought.
What to do with the old countertop
Laminate, tile, and stone all dispose differently in practice because of weight and breakage. Some pieces can be cut down into smaller sections for hauling. Others should stay intact until you’ve got enough help to move them safely. Protect door casings and finished floors on the way out. The old top usually causes more property damage during removal than during demo itself.
Check your township or county guidance before loading debris for curbside pickup or drop-off. Construction materials often have different rules than standard household trash, and heavy stone can exceed what normal pickup will handle. If you salvaged the top in decent shape, reuse may be possible in a garage, laundry room, or workshop.
The real cost after the dust settles
The final project number is rarely just the countertop invoice. Even on a careful DIY, you’re paying in materials, tools, consumables, and disposal effort.
Keep a written tally that includes:
- Countertop material: The core purchase.
- Adhesives and sealants: Construction adhesive, silicone, seam products.
- Cabinet prep supplies: Shims, blocking, screws, sanding materials.
- Plumbing reconnect items: New supply lines, trap parts, gaskets if needed.
- Protection and cleanup: Drop cloths, vac filters, trash bags, surface cleaner.
- Disposal costs: Dump fees, trailer rental, or hauling help if required.
That total is where homeowners decide whether the DIY route saved enough to justify the labor. Sometimes it does. Sometimes the hidden costs narrow the gap more than expected.
For the cleanup itself, I like practical checklists over guesswork. These effective home remodeling cleanup advice tips are useful for handling fine dust, surface wipe-downs, and room-by-room reset after renovation work, especially if the kitchen connects directly to living spaces.
Common Mistakes and When to Call The Cabinet Coach
A lot of countertop jobs go sideways before the new top even comes into the house. The pattern I see most often is simple. A homeowner focuses on the surface, but the cabinets underneath are out of level, out of square, or loose at the wall. The top may still go on, but the problems show up later as a bad seam, a rocking sink, stress cracks, or a backsplash gap that never looks right.
Online tutorials often make countertop replacement look cleaner and faster than it usually is in practice.
Mistakes that turn a weekend job into a redo
The biggest mistake is treating the old countertop as a template. Old tops can hide crooked walls, cabinet sag, filler strips, and years of settling. Measure the cabinet layout itself, check the wall in several spots, and confirm overhangs from the boxes, not from the piece you removed.
The next miss is the one DIY articles skip past. Failing to inspect and level the base cabinets before install. If the run is off, even by a little, that error carries forward into every step after it. Seams get harder to close. Sink reveals drift. Rigid materials do not forgive a twisted cabinet run.
Other common trouble spots include:
- Planning seams in the wrong location, especially near sinks or high-visibility corners
- Cutting sink or cooktop openings too aggressively, leaving no margin for correction
- Underestimating weight and support needs, particularly on long spans, waterfall ends, or stone tops
- Assuming walls are straight, then discovering a growing gap at the backsplash line
- Skipping dry-fit checks, which is how small layout mistakes become expensive material mistakes
Material choice matters too. Laminate gives a careful DIYer more room for adjustment. Butcher block is manageable if you can keep it flat, seal it properly, and stay on top of maintenance. Stone, quartz, and other shop-fabricated tops are where I usually tell homeowners to slow down and be honest about risk. One bad measurement or a cabinet run that is not properly shimmed can ruin an expensive piece before the kitchen is back in service.
Replacement is not always the right answer, either. If the cabinets are solid and the goal is mainly cosmetic, a lower-risk refresh can make sense. Resurfacing products exist for that reason, but they are best suited to sound, stable tops, not failing substrates or cabinets with movement.
A full replacement makes sense when the cabinet run is ready for it. If the boxes need correction first, deal with that before spending money on the top.
When a pro is the smarter move
Call a professional if you find cabinet movement, major level issues, wall irregularities, or unsupported spans. Those are site conditions, not finish details, and they need to be corrected before installation day. I also recommend bringing in help if the material is heavy, the template has to be exact, or the sink and appliance cutouts leave very little room for error.
That call is usually smartest for quartz, granite, and any top being fabricated off-site. It also makes sense when you can handle demo but do not want to wrestle with cabinet prep, template accuracy, plumbing reconnects, and the punch-list work that follows.
For South Jersey homeowners, that is where The Cabinet Coach earns its keep. A site visit can catch the problems that photos and rough measurements miss, especially cabinet leveling issues that cause failed installs. Getting those conditions sorted out before fabrication is a lot cheaper than forcing a bad fit after the slab or top arrives.
DIY can still be the right move. But if the cabinet run is questionable, the walls are rough, or the material cost makes mistakes expensive, professional help is usually the less costly choice in the end.